
Installation Guide


4
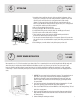
2 x 4 STUDS ALIGNMENT & POSITIONING
TIME REQUIRED
½ to 1 HR
5
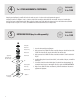
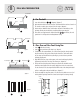
INSTALLING DRAIN (may be sold seperately)
TIME REQUIRED
½ to 1 HR
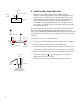
1. Locate the drain assembly to install into pan.
2. Apply a generous bead of 100% RTV silicone around the shower pan drain hole and around the
outside of the drain collar #5, insert the drain collar #5 into the drain hole.
3. Apply a generous bead of 100% RTV silicone around the drain collar #5 from the underside of
the pan.
4. Install the rubber gasket #6 over the drain collar #5, to the underside of the pan, next install the
slide ring #7.
5. Screw on the drain lock nut #8 and hand tighten. Turn drain lock nut #8 approximately 1/4
turn with the wrench to ensure a water-tight fit. Check for a good seal. DO NOT OVERTIGHTEN.
6. Wipe off excess 100% RTV silicone and allow to dry. Follow the manufacturer’s directions for
application and drying time.
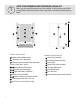
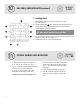
4
#1 trim plate
#2 drain tool
#3 pressure ring
#4 rubber seal
#5 drain collar
pan
#6 rubber gasket
#7 slide ring
#8 drain lock nut
apply silicone
around drain collar
sides and under lip
floor hole with
2” drain pipe
diagram 3
DA
Using the pan and wall panels, you will be able to check to make sure your 2 x 4 studs are in the needed position and supported
adequately. You will see in (diagram 2) extra 2 x 4 studs are added to the door and glass side thresholds for extra strength. You may need to make adjust-
ments for your faucet or optional shampoo shelf. When you place the bottom sections of the wall into the shower pan, you can also calculate the needed width
and height of areas to keep free of 2 x 4 studs. (See installation instructions included with the faucet or shampoo shelf)