
Installation Guide


WALL PANEL/LINER INSTALLATION (continued)
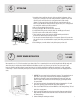
TIME REQUIRED
3-4 HR
10
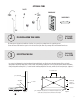
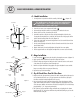
C - Installing Panels
9. Remove all dust and dirt with a clean dry cloth. This will increase the bond
to the 100% RTV silicone.
10. Start with the bottom panel apply a generous amount of 100% RTV silicone to the
cement board and to the back side of the wall panel. Also refer to the manufacturer’s
recommendations for application and drying time.
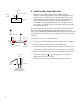
11. Press the wall firmly into position. Be sure to use spacers between the bottom panel and the
shower pan to ensure panel is level. (diagram 17)
12. Install the panels in the same order as you dry-fitted the panels.
B races may be required to keep walls flush
diagram 17
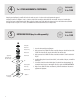
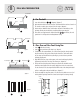
OPTIONAL SHAMPOO SHELF INSTALLATION
TIME REQUIRED
1/2 - 1 HR
11
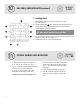
4. On the 2 tiles the Shampoo Shelf will be replacing, mark 1”
from the outside of the grout line, the cut-out area will be
10” x 22”. Cut out the hole for the Shelf. The smaller the
hole the better.
5. Dry-fit the Shampoo Shelf for alignment of grout lines.
6. Using 100% RTV Silicone in-place with a generous bead
around the back of the lip, wipe off excess silicone with
tissue.
1. The Shampoo Shelf was designed to match your tile size.
(2) 12” x 24” tiles, the cut-out hole size is 10 x 22”.
2. There is a 1” lip or frame around the Shampoo Shelf, this will
be the water sealed area for the Shampoo Shelf.
3. The best way to cut the hole is with a small 5” round
diamond blade, and with a jigsaw to cut the corners.
See detailed instructions enclosed with Shampoo Shelf
8
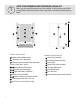
WB3
WB2
L3
WT3
L2
WB2
WB1
L1
WT1
WT2