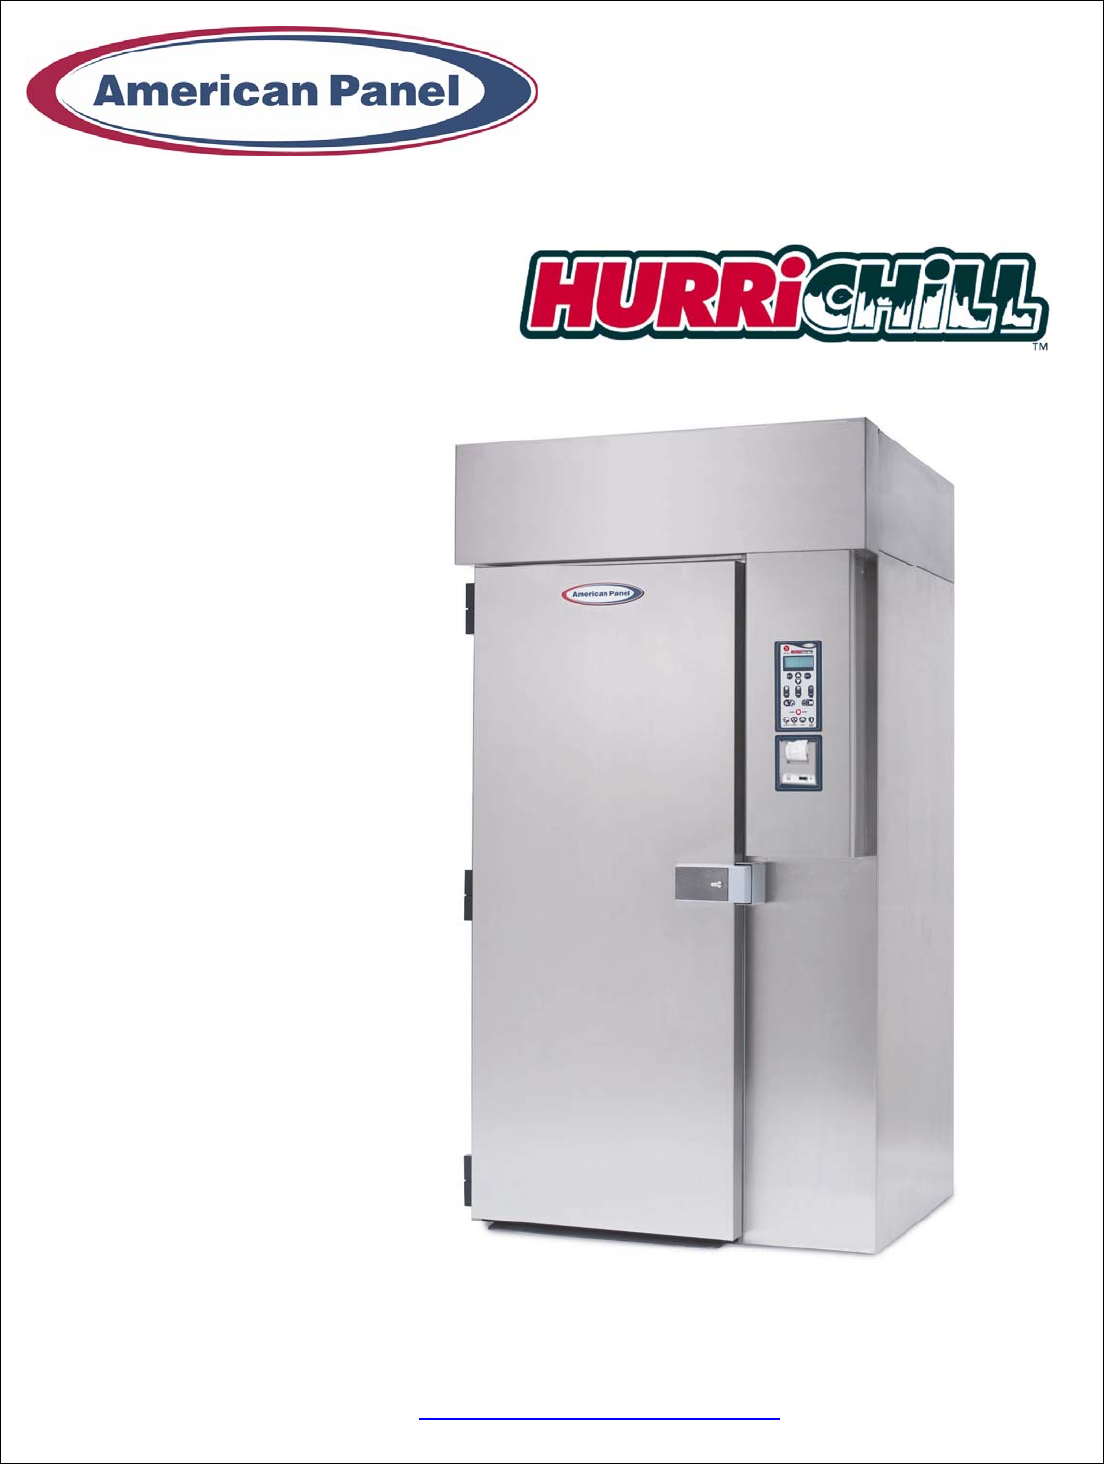
REV. C Cooler is Better!TM USER’S MANUAL BLAST CHILLER / SHOCK FREEZER MODEL AP20BC175-2 American Panel Corporation 5800 S.E. 78th Street, Ocala, Florida 34472-3412 Phone: (352) 245-7055 Fax: (352) 245-0726 E-mail: service@americanpanel.
AP20BC175-2 Manual INDEX INTRODUCTION 3 CONTROLLER FEATURES OPERATING MODES AUTOMATIC MODE MANUAL MODE OPERATING CYCLES ADDITIONAL CYCLES PRINTER PC CONNECTION (OPTIONAL) 3 3 3 3 4 4 4 4 INSTALLATION OF REMOTE UNITS 5 REQUIREMENTS TO BE MET DURING INSTALLATION (8 STEPS) INSTALLATION AT THE SAME LEVEL INSTALLATION AT DIFFERENT LEVELS CONNECTION PIPING FOR REMOTE CONDENSING UNITS 5 5 6 6 INSTALLATION 7 WARNINGS PREPARATION INSTALLATION LOCATION DIMENSIONS ELECTRICAL AND REFRIGERATION SPECIFICATIONS
AP20BC175-2 Manual MANUAL SOFT CYCLE PARAMETERS PROGRAMMING MANUAL HARD CYCLE PARAMETERS PROGRAMMING 3. RECIPE NAME PROGRAMMING 20 21 22 OPERATION 23 1. 2. 3. 4. 5. 6.
AP20BC175-2 Manual INTRODUCTION Blast Chiller Model AP20BC175-2 is used to rapidly chill cooked foods to temperatures suitable for refrigerated storage. It is capable of lowering the core temperature of up to 200 pounds of most foods from 160o F to 40o F in 90 minutes. Food is loaded into 12" x 20" x 2-1/2" pans. All units are sized to accept one rack containing up to 20 pans. Model AP20BC175-2 has an integral temperature recording device (printer) and 4 food probes.
AP20BC175-2 Manual OPERATING CYCLES The operator can choose from the following 3 operating cycles: MODE END FOOD TEMP. SOFT CHILL 38 F TO 40 F HARD CHILL 38 F TO 40 F o o o o USES NOTES FOR LOW DENSITY FOODS FOR MEDIUM & HIGH DENSITY FOODS AIR TEMP. IS 28 F TO 35 F o o o AIR TEMP. STARTS AT 10 F, RISES TO 28 F TO 35 F o WHEN FOOD CORE TEMP.
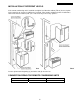
AP20BC175-2 Manual INSTALLATION OF REMOTE UNITS REQUIREMENTS TO BE MET DURING INSTALLATION (8 STEPS) COMPRESSOR FIG. 2 FIG. 1 2. Fastening of brackets on insulated piping. 1. Inclination of the piping. FIG. 3 3. Airtight welding. FIG. 4 4. Create the vacuum and load the line. 5. Check for leaks. 6. Open the shut-off valves (A & B, FIG.4) on both sides of remote unit and of cabinet. 7. Check the exact load of refrigerant in the liquid passage gauge. 8. Make sure all the refrigerant taps are open.
AP20BC175-2 Manual INSTALLATION AT DIFFERENT LEVELS If the remote condensing unit is installed at a higher level than the cabinet (FIG. 6) insert a siphon in the return line at every 6 ft. of difference in height. If the remote condensing unit is installed at a lower level than the cabinet (FIG. 7) it is not necessary to insert any siphons. FIG. 7 FIG. 6 Insert a siphon at the beginning (a) and at the end (b) of each riser CONNECTION PIPING FOR REMOTE CONDENSING UNITS MODEL SUPPLY LINE DIA.
AP20BC175-2 Manual INSTALLATION WARNINGS READ ALL OF THE INSTRUCTIONS IN THIS MANUAL BEFORE YOU ATTEMPT TO INSTALL THE EQUIPMENT AND CAREFULLY FOLLOW THEM. ALWAYS DISCONNECT THE UNIT FROM THE POWER SOURCE BEFORE PERFORMING ANY SERVICE OR MAINTENANCE. INSTALLATION AND SERVICE MUST BE PERFORMED BY A QUALIFIED SERVICE AGENCY APPROVED & AUTHORIZED BY AMERICAN PANEL CORPORATION. DOING OTHERWISE MAY VOID THE WARRANTY.
AP20BC175-2 Manual 4. At least 15” clear space is required above the unit for service. 5. At least 6” is required on both sides of the cabinet (for servicing the control panel and door opening). CONNECTION TO THE REMOTE UNIT The specified diameters (see chart on page 6) for the copper tubing used to connect the remote condensing unit to the cabinet are adequate for a separation of up to 60 feet. For greater distances, contact the factory for instructions. NOTES: 1.
AP20BC175-2 Manual SPACES AROUND THE CABINET • At least 15" clear space is required above the unit for service. • At least 6" clear space is required on both sides of the cabinet. • At least 6" clear space is required on the rear of the cabinet for drain hookup and maintenance. • Enough space should be provided in front of the cabinet to fully open the door. STARTING & TESTING THE UNIT 1. To charge the unit, use the "HARD" cycle and the "MANUAL" mode.
AP20BC175-2 Manual USING THE HURRICHILL™ TECHNOLOGY BLAST CHILLING All cooked food rapidly loses its quality and aroma if it is not served promptly. Natural bacteria growth, the main reason why food becomes stale, takes place at an exponential rate between 140°F and 40°F. However lower temperatures have a hibernating effect that increases as the temperature drops, thereby gradually reducing bacterial activity until it stops altogether.
AP20BC175-2 Manual PANNING AND LOADING PANNING 1. Standard pan depth is 2-1/2”. Other depths can be used but are not recommended as their use would require an increase in the cycle time. 2. Stainless steel or aluminum pans are recommended, as plastic containers will increase the chilling time. 3. Crockery or stainless steel cylinders, 6” dia. and 10” max. height, are acceptable. 4. Slack filled Cryovac bags can be used if placed on wire shelves. 5.
AP20BC175-2 Manual CONTROL PANEL FOR MODEL AP20BC175-2 BLAST CHILLER 12
AP20BC175-2 Manual KEYBOARD KEYS ON/OFF & START/STOP CYCLE KEYS ON/OFF SOFT CYCLE START/STOP HARD CYCLE SHOCK CYCLE AUTOMATIC CYCLE PROGRAMMING KEYS UP MANUAL CYCLE DOWN UV LIGHT CYCLE SELECT DEFROST CYCLE ENTER PRINT HEAT PROBE CYCLE KEY COMBINATIONS ¾ Initial Programming state – to initially set the device o With the display reading "OFF", press and hold (“START/STOP”) for 5 seconds ¾ Cycles programming state – to initially set the cycles o With the display reading "OFF", press (“ENTER
AP20BC175-2 Manual PROGRAMMING 1. INITIAL PROGRAMMING NOTE: Initial programming is preset at the factory. Use this section only if changes are desired. If no changes are to be made, skip to Page 17 ( 2. Programming the cycles ). OFF a. With the display reading "OFF", press ("START/STOP") for a few seconds. INITIAL PROGRAMMING b. To change the language, press or then SELECT LANGUAGE ENGLISH . press c. Enter the default password by pressing, in order, the and buttons.
AP20BC175-2 Manual INITIAL PROGRAMMING g. To set the day, press or then press SET DAY 03 . h. To set the hour, press or (be sure to continue to press the buttons until the hour and "AM" or "PM" show correctly) then press 03(day) Blinks INITIAL PROGRAMMING SET TIME 10:25 AM . 10(hours) Blinks INITIAL PROGRAMMING i. To set the minutes, press or then press SET TIME 10:25 AM . 25(minutes) Blinks INITIAL PROGRAMMING j. To change the number of probes, press then press or k.
AP20BC175-2 Manual INITIAL PROGRAMMING p. To change to YES or NO, press press or then SHOCK FREEZE? NO NO Blinks . INITIAL PROGRAMMING q. To change to YES or NO, press press or then UV CYCLE? NO NO Blinks . INITIAL PROGRAMMING r. To change to YES or NO, press or then DEFROST CYCLE? YES YES Blinks . press INITIAL PROGRAMMING s. To change to YES or NO, press press or then PC CONNECTION? NO NO Blinks . For YES, the display will show: The P.C. baud rate should be left at 38400.
AP20BC175-2 Manual INITIAL PROGRAMMING y. To change to YES or NO, press press or then PRINT DURING CYCLE NO NO Blinks . INITIAL PROGRAMMING z. To change to YES or NO, press press or then RECIPES? NO NO Blinks . INITIAL PROGRAMMING aa. To change to YES or NO, press or then NAFEM COMMUNICATION NO NO Blinks . press INITIAL PROGRAMMING The display will show for 2 seconds: Then the controller will go into “OFF” state.
AP20BC175-2 Manual d. To change the temperature, press then press 35 Blinks PARAM. PROGRAMMING AUTOMATIC SOFT CYCLE FOOD TEMPERATURE 40 °F or 40 Blinks PARAM. PROGRAMMING AUTOMATIC SOFT CYCLE HOLDING LOW TEMP. 35 °F or 35 Blinks PARAM. PROGRAMMING AUTOMATIC SOFT CYCLE HOLDING HIGH TEMP. 42 °F 42 Blinks . h. To change the temperature, press then press or . g. To change the temperature, press then press PARAM. PROGRAMMING AUTOMATIC SOFT CYCLE HIGH AIR TEMPERATURE 35 °F . f.
AP20BC175-2 Manual l. To change the temperature, press then press or PARAM. PROGRAMMING AUTOMATIC HARD CYCLE BREAKING TEMP 60 °F 60 Blinks PARAM. PROGRAMMING AUTOMATIC HARD CYCLE LOW AIR TEMP PART 2 28 °F 28 Blinks PARAM. PROGRAMMING AUTOMATIC HARD CYCLE HIGH AIR TEMP PART 2 35 °F 35 Blinks PARAM. PROGRAMMING AUTOMATIC HARD CYCLE HARD FOOD TEMP. 40 °F 40 Blinks PARAM. PROGRAMMING AUTOMATIC HARD CYCLE HOLDING LOW TEMP. 35 °F 35 Blinks . m. To change the temperature, press then press or . n.
AP20BC175-2 Manual t. To change the time, press press or then PARAM. PROGRAMMING DEFROST CYCLE TOTAL TIME 05 MIN 05 Blinks . PARAM. PROGRAMMING DEFROST CYCLE The display will show: PROGRAMMING COMPLETE NOTE: The defrost is done by running the evaporator fan for 5 minutes with the door open. MANUAL SOFT CYCLE PARAMETERS PROGRAMMING u. v. Press "ON". . The LED for "SOFT" will be steady To change the temperature, press w. To change the temperature, press y. To change the time, press z.
AP20BC175-2 Manual MANUAL HARD CYCLE PARAMETERS PROGRAMMING After about 2 seconds the display will automatically change to: The LED for "M" will be "ON". The LED'S for cycles will be blinking. PARAM. PROGRAMMING MANUAL MODE CHOOSE PROGRAMMING CYCLE button. The LED for "HARD" will aa. Press the be steady "ON". bb. To change the temperature, press then press dd. To change the time, press or then press then press or then 01:00 Blinks PARAM.
AP20BC175-2 Manual PARAM. PROGRAMMING MANUAL HARD CYCLE The display will show: PROGRAMMING COMPLETE NOTE: PROGRAMMING FOR "DEFROST" WILL BE THE SAME IN MANUAL MODE AS IT IS IN AUTOMATIC MODE (see pages 19-20). 3. RECIPE NAME PROGRAMMING OFF a. With the display reading "OFF", press the button and hold it for 10 seconds. b. Enter your password (see page 14), then press RECIPES PROGRAMMING . c.
AP20BC175-2 Manual OPERATION 1. AUTOMATIC MODE - SOFT CHILL OFF a. With the display reading "OFF", press the (“ON/OFF”) button. b. To select the soft cycle, press the appropriate button . The LED for "SOFT" will be steady "ON". c. The LED's for “AUTOMATIC” and “MANUAL” are now blinking.
AP20BC175-2 Manual The display will show briefly: STARTING CYCLE . . . Then the display will show: 03.07.2006 AIR 1 10:28 AM 75°F 00:00 alternating with R / CHICKEN Y / ROAST BEEF B / CHICKEN G / ROAST BEEF 140°F 143°F 141°F 142°F 00:00 Will count up The AUTOMATIC mode uses both the food probes and air probe temperatures to control the cycle. When all the food temperatures have reached the final setting of 40o F, the unit will automatically go into holding mode and a beep will sound for 5 seconds.
AP20BC175-2 Manual The display will show briefly: STARTING CYCLE . . . Then the display will show: 03.07.2006 AIR 1 10:41 AM 75°F 01:29 alternating with R / CHICKEN Y / ROAST BEEF B / CHICKEN G / ROAST BEEF 140°F 143°F 141°F 142°F 01:29 Will count down The MANUAL mode uses time and the air probe temperature to control the cycle. The default total time for a soft cycle is 90 minutes. After the 90 minutes the unit will automatically go into holding mode. 03.07.
AP20BC175-2 Manual 03.07.2006 12:15 PM DEFROST CYCLE b. Open the door. OPEN THE DOOR! c. Press the defrost cycle. ("START/STOP") button to start the 03.07.2006 12:15 PM DEFROST CYCLE READY TO START The display will show briefly: READY TO START Blinks STARTING CYCLE . . . 03.07.2006 12:15 PM DEFROST CYCLE Then the display will now show: DEFROST TIME After 5 minutes the display will show: The controller will beep for a few seconds. 04:59 04:59 Will count down to 00:00 03.07.
AP20BC175-2 Manual 5. PREPARING AND USING THE PRINTER OFF a. With the display reading "OFF", press the (“PRINT”) button. b. To start printing, press the button. ("START/STOP") After a few seconds the display will show: and the printer will be printing. PRINT EVENTS MEMORY READINGS LEFT 249 PRINT EVENTS MEMORY PRINTING . . . 6. TO CLEAR DATA a. To clear existing data that is no longer needed from OFF the controller, from the "OFF" display, press and together for about 10 seconds.
AP20BC175-2 Manual NOTE: The optional printer is delivered fully installed LOADING A ROLL OF PAPER 1. Remove the paper cover by pressing on the groove patterns to pop the front edge up. Lift off the cover. 2. Press the rocker switch to the left. The light will go off. 3. Unroll several inches of paper. 4. Cut a straight edge on the paper roll if it is jagged. This will facilitate the entry of the paper into the printer. 5.
AP20BC175-2 Manual 1. Turn the printer OFF. 2. Four small grooves are embossed on each side of the printer cover. Push down on one or both of these areas until the printer cover tilts up, then lift the cover completely off. 3. Push down on the right side of the ribbon cartridge where it is marked “PUSH”. Remove the cartridge. 4. Install the new cartridge. Be sure the cartridge is inserted firmly to prevent weak or irregular printing. The cartridge must be properly seated and aligned for best printing 5.
AP20BC175-2 Manual CLEANING THE CONDENSER For correct and efficient operation of the blast chiller, it is necessary that the condenser be kept clean so that air can circulate around it freely and come into contact with the whole of its surface. This operation (to be performed every 30 days, max.) can be accomplished using a brush (non-metallic) to remove all the dust and dirt from the condenser fins. Remove the finned grid to gain access to the condenser. Fig.
AP20BC175-2 Manual 31
AP20BC175-2 Manual 32
AP20BC175-2 Manual 33
AP20BC175-2 Manual COMPUTER CONNECTION 34
AP20BC175-2 Manual PARTS LIST PART # 990059 990074 990075 990103 990104 990105 990108 990136 990137 990147 990150 990155 990156 990161 990178 990191 991021 991025 991037 991040 993018 993024 993025 993030 DESCRIPTION PRINTER TRANSFORMER 208V/24V/12V TRANSFORMER FOR PRINTER ELECTRONIC BOARD "BLUE SYS" (D) PC CONNECTION BOX CONNECTION CABLE, SERIAL AIR PROBE PT100 EVAPORATOR FAN FOOD PROBE – NON HEATED MAGNETIC DOOR SWITCH RELAY 10 A FINDER SOLENOID, DANFOSS SOLENOID SOCKET PRINTER POWER CABLE AC ADAPTOR PC
AP20BC175-2 Manual STANDARD WARRANTY AMERICAN PANEL CORP. 5800 S.E. 78th Street, Ocala, Florida 34472-3412 American Panel Corporation products are warranted to the original user installed within the United States and Puerto Rico to be free from defects in materials and workmanship under normal use and service for the applicable period shown in the chart below. NOTE: This Warranty does not apply to altered or misused parts.
AP20BC175-2 Manual ORDERING PRINTER SUPPLIES (RIBBON & PAPER) Replacement paper and ribbons for the optional printer for your blast chiller can be ordered from a local distributor of Weigh-Tronix supplies. To locate a distributor near you: If you have access to the internet: Go to www.wtxweb.