
Owner's Manual


Section 3 Installation Instructions
3-3
Electrical Service
A 240VAC, 60Hz separately grounded circuit that is protected by a 30A circuit breaker or time
delay fuse must be supplied to the appliance
A 4-wire connection (not provided) is required to connect the appliance to the electrical supply
junction box. Consult local building codes for the type and minimum wire gauge to use.
The wiring to the appliance from the electrical supply junction box needs to be long enough to
allow the appliance to be pulled out from the wall for service, while remaining connected.
Gas Supply
Be certain that the appliance being installed is correct for the gas service being provided. Refer
to the appliance data plate for the gas supply requirements.
Minimum Natural Gas Supply Required – 6” water column
Minimum Liquid Propane (LP) Gas Supply Required – 11” water column
A manual gas shut-off valve must be remotely installed and easily accessible in the adjacent
cabinet.
The regulator inlet is for a 3/4” gas line. The appliance ships with a 1/2” to 3/4” adapter
connected to the regulator.
Preparing for Installation
Unpacking the Appliance
Unpack all parts boxes and verify that all of the required components have been provided. If any
items are missing or damaged, please contact your dealer immediately. Do not install a damage
or incomplete appliance.
♦ This Manual ♦ 4 Large and 2 Small Burner Assemblies
♦ Anti-Tip Kit
♦ 2 Racks
♦ 3 Grates
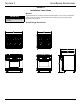
Removing the Oven Door
To make the appliance easier to move, remove the door to reduce weight. Open the door to its
fully opened position.
Rotate the catch over the retaining arm on each hinge.
Lift the oven door to about a 15 degree angle from the vertical position.
Hold the door with both hands just below the handle and pull it away from the oven while
continuing to lift.
Connecting the Electrical Service
Make sure that the conduit or appliance wire is long enough to allow the range to be pulled
out for service without disconnecting it.
Connect the wires from the conduit or appliance wires to the wires on the appliance
electrical panel.
Connecting the Gas Supply
Make sure the gas supply valve is in the off position.
Connect the gas line to the appliance.
Connect the gas line to the supply line.
Turn on the gas supply and check for leaks
Turn the gas supply off.
1.
2.
3.
1.
2.
1.
2.
3.
4.
5.
WARNING
It is the owner’s responsibility
to ensure that the electrical
connections of this appliance is
performed by a qualified electrician.
The electrical installation must
be in accordance with the latest
version of the National Electrical
code ANSI/NFPA 70 and local
codes and ordinances.
WARNING
Check your local building codes for
the proper method of installation.
In the absence of local codes,
this appliance should be installed
in accordance with the National
Fuel Gas Code ANSI Z223.1. Be
certain that the appliance being
installed is correct for the gas
service being provided.
IMPORTANT
Within the Commonwealth of
Massachusetts, this appliance
must be installed by a licensed
plumber or gas fitter.
WARNING
Do not attempt to disengage the
hinge catch with the door removed
from the oven. The hinge spring
could release causing personal
injury.
Do not lift or carry the oven door
by the door handle