
Instructions / Assembly


4
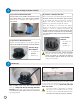
Install the lter into the lter canister.
Make sure the lter
has soaked at least 30
minutes before you
install it. Insert the lter
all the way and screw it
in. Do not over-torque
the cartridge during
installation, just hand
tighten gently.
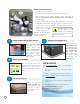
After the spa has run for two
hours, test and adjust the water
chemistry. See your owner’s
manual for instructions on water
clarity.
Adjust water chemistry.
Replace the equipment door.
Let the spa heat up.
When the spa has
nished priming, the
heater will activate. Put
the cover on and let
the spa heat to the set
temperature.
6
7
9
8
VERY ACIDIC ACIDIC
OPTIMAL TOO ALKALINE
4.5 5.0 5.5 5.75 6.0 6.25 6.5
6.75 7.0 7.25 7.5 8.0 8.5 9.0
Manually priming the pump
a. Shut off the power to the spa.
b. Close the gate valve on the discharge side of the pump.
c. Turn the bleeder valve counter clockwise with a small pair of
pliers or a at head screwdriver until the air has been released
from the pump.
d. If this is unsuccessful, loosen the white union nut on side of the
pump with channel locks. When air is bled out, tighten the nut.
e. Turn on power to the spa and press the JETS button. If there is
still air trapped in the pump,
repeat steps a through e
until the pump primes.
When you are sure the pump
has successfully primed,
continue to step 6.
The pump will not work
properly while air is
trapped in it. Continuing
to operate the pump in this way
will cause damage.
USER GUIDES
Your pre-delivery guide will give you information
on:
• Preparing the site where you want to place
the spa
• Power and wiring requirements for your spa
Your owner’s manual will give you information on:
• Priming the pump
• Operating your spa with the electronic control
panel
• Keeping your spa water clean and fresh
• Draining and relling your spa
• Cleaning and maintenance
• Troubleshooting
LTR17000972_ASC, Rev. B
100-1432
If you have a drain
in the door (1) pull
it through the door
then (2) screw the
door in and nally
(3) screw the
corner panel back
into place using
the screws you
removed earlier.