
Installation Guide

A60001
6 0611
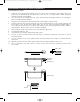
UNDERMOUNT SINK INSTALLATION ALTERNATIVE 2
Sink Installation Procedure
1. American Standard provides DXF files for this product at www.americanstandard-us.com. This outline of the
countertop cut-out is full scale and can be used to program CNC machinery. The cut-out has been designed to
crate a uniform reveal around the sink rim.
2. Finish the cut-out edge with the desired router bit (ie, chamfer, bullnose, Roman ogee).
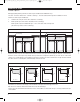
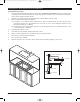
3. Mount a support frame to adjacent cabinets.
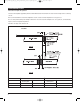
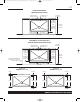
A) The position of the frame members (dimensions X and Y) is determined by the sink cut-out location
(see figure). Check front to back dimensions for the sink cut out to ensure adequate clearance for the
faucet and possible use of a flip tray.
B) The elevation of the support frame (dimension Z) will be determined by the material thickness of the
countertop build-up, or substrate.
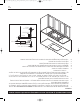
4. Assemble sink strainers to sink.
5. Clean sink rim and countertop mating surface with solvent.
6. Apply a continuous (translucent color) bead of silicone around the sink rim.
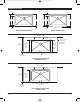
7. Drop sink into opening of support members.
8. Lay countertop onto cabinets.
9. Align the sink to the cut-out so that a uniform reveal shows around the periphery of the cut-out.
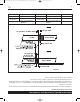
X
Y
APPROX. 1/8 - 1/4" REVEAL
"Z" BUILD-UP / SUBSTRATE
"Z" ELEVATION
CABINET
SUPPORT FRAME
1/4" CLEARANCE
SILICONE
COUNTER TOP
229062_Kindred_AMSD_DS_Farm_Undermount_A60001.qxd:Layout 1 7/8/11 11:36 AM Page 6