
Installation & Assembly
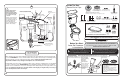


Wax Ring
Arillo de Cera
Installation Instructions:
Instrucciones De Instalación:
pg4
Apply weight evenly.
Do not move after
placement. Water
tight seal may break.
Distribuya el peso
uniformemente. No
lo mueva una vez
colocado. El sello
apretado del agua
puede romperse.
Press Firmly
Presionar Firmemente
3
1 2
Hand Tighten
Only. Do Not
Overtighten.
!
!
4
BACK-TO-BACK INSTALLATION
INSTALACIÓN EN OPOSICIÓN
Recommended fitting type for
back-to-back installations.
Tipo de accesorio recomendado
para instalaciones en oposición.
Depending upon your plumbing and venting conditions, the flow from this toilet in a back-to-back
installation may create a vacuum on the system and draw water from the opposing bowl. The
National Standards Plumbing Code prohibits the use of a cross fitting for drainage as throw over
is possible. The code does approve a directional "Y" style fitting with proper venting to direct the
water downward and away from the other toilet.
Según las condiciones de plomería y ventilación, el ujo de este inodoro en una instalación
espalda con espalda puede crear un vacío en el sistema y tomar agua de la taza contraria. El
Código Nacional de Normas de Plomería (National Standards Plumbing Code) prohíbe el uso de
un accesorio cruzado para el drenaje, debido a la posibilidad de rechazo. El código aprueba un
accesorio direccional tipo "Y" con una ventilación adecuada para dirigir el agua hacia abajo y
lejos del otro inodoro.
Apriete A Mano
Solamente. No
Apriete De Más.
PLASTIC CONE
MUST FACE AWAY
FROM BOWL.
EL CONO DE
PLÁSTICO DEBE
IR EN SENTIDO
CONTRARIO DE
LA CERÁMICA.
!
ADVERTENCIA: Si aprieta demasiado las tuercas de la
tubería que suministra agua, puede provocar una rotura
y causar una inundación.
Si la conexión tiene una fuga después de apretar todo a
mano, reemplace la manguera de suministro de agua. Si
la conexión continua fugando con la nueva manguera de
suministro, reemplace la válvula de admisión.
No utilice ninguna clase de sellador en la conexión de la
tubería. El uso de masilla de plomería, lubricante o
cualquier otra clase de sellador invalidará la garantía.
!
WARNING: Overtightening of water supply line nuts
could result in breakage and potential flooding.
If the connection leaks after hand tightening, replace
the supply line. If the connection continues to leak
with the new supply line, replace the fill valve.
Do not use plumber’s putty, pipe dope or any other
sealant on the water supply connection. Use of
plumber’s putty, pipe dope, or any other type of
sealant will void the warranty.
!
!
Tank to Bowl Gasket
Place the tank gasket over the
tank nut ensuring there are no
gaps between the gasket and
the chinaware.
Empaque de Acoplamiento
Taza a Tanque
Asegúrese de colocar el empaque sobre
la tuerca del tanque evitando que queden
espacios entre el empaque y la cerámica.
pg5
B
Connect Water
Supply Line.
(Sold Separately)
Hand Tighten Nut.
Conecte La Línea De
Suministro De Agua
(Se Vende Por Separado)
Apriete La Tuerca
A Mano.
Turn On
Water Supply
Encienda
Abastecimiento
De Agua
A
8
5
NOTE: To ease
installation, push
down on the top of
the tank while
tightening handles.
NOTA: Para facilitar
la instalación,
presione desde
arriba el tanque
mientras aprieta
las manijas.
Tighten handles
alternately until the tank
contacts the front and
back of the bowl
achieving china-to-china
contact.
Apriete las manijas
alternadamente hasta que
el tanque haga contacto
con el frente y la parte
posterior de la taza
logrando un contacto
cerámica-cerámica.
6
7
Use Handle From Step 6
Use La Manija Del Paso 6
Push Up
Levante
Install tank grommets and tank bolts in
bottom of tank as shown.
Instale las guías para ornillos y los tornillos del
tanque en el fondo del mismo, como se indica.