
Installation Guide


3
2
10
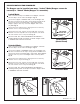
TEST INSTALLED FITTING
5
2
CHECK DRAIN CONNECTIONS
Operate POP-UP KNOB (4) and fill lavatory with water.
Check that DRAIN STOPPER (5) makes a good seal
and retains water in SINK. If DRAIN STOPPER (5)
does not seal properly, please refer to Troubleshooting
section in these instructions.
Release POP-UP KNOB (4) down and check all drain
connections and "P" trap for leaks. Tighten
if necessary.
“P” TRAP
WASTE
OUTLET
4
4
1
11
12
CARE INSTRUCTIONS:
DO: SIMPLY RINSE THE PRODUCT CLEAN WITH CLEAR WATER. DRY WITH A SOFT COTTON FLANNEL CLOTH.
DO NOT: DO NOT CLEAN THE PRODUCT WITH SOAPS, ACID, POLISH, ABRASIVES, HARSH CLEANERS, OR A
CLOTH WITH A COARSE SURFACE.
CARTRIDGE INLETS
MANIFOLD
SERVICE
1
2
3
4
If Faucet Drips Proceed As Follows:
Turn VALVE in OFF position.
Remove HANDLE (1), CAP (2) and CARTRIDGE (3).
Clean CARTRIDGE INLETS and MANIFOLD.
Reassemble CARTRIDGE (3), alternately tightening SCREWS (4).
Replace CAP (2) and HANDLE (1). Check flow.
If faucet drips, operate handle several times from "off" to "on".
Do not apply excessive force.
Clogged CARTRIDGE INLETS may cause reduced flow in "full on" hot
or cold. To clean inlets, first turn off water supply, then:
With HANDLE (1) in OFF position, turn on WATER
SUPPLIES (2) and check all connections for leaks.
Ensure that AERATOR (3) is tightened completely.
Operate HANDLE (1) to allow water flow.
M968881 Rev. 1.3