
Installation Guide


791174-100 Rev. G
INSTALLATION
AMERICAN
STANDARD
FINISHED TILE FLOOR
UNDERLAYMENT
SUB FLOOR
NAIL
OR
DRYWALL
SCREW
EVERY STUD
4
3
2
Remove Lift and Turn Stopper and Tailpiece Assembly from box and check that all
parts are included. Remove Lift and Turn Stopper Assembly from Tailpiece by setting
Stopper to closed position, and turning Stopper Knob counter-clockwise.
(Re-install Stopper after Drain installation is completed.)
Apply plumbers putty around drain hole and pipe thread compound on threaded
end of tailpiece.
Set Tailpiece in drain hole. (Lift and Turn Stopper Assembly should be removed,
and reinstalled after tub installation is completed.)
From underside of tub: Place Rubber Wedge Seal on Tailpiece, small end toward tub,
and center in hole, place Brass Washer on Tailpiece, and thread on Locking Nut, flange
side first. Tighten Locking Nut to obtain a uniform seal between Wedge Seal
and hole in tub.
DO NOT OVERTIGHTEN!
Final hook up to tub waste can be made using either internal threads in Tailpiece
(1-1/2 tubing 1-1/2—28 thd.), or external threads on Tailpiece (1-1/2—11-1/2 NPSM)
for appropriate tub fittings.
DRAIN INSTALLATION
TAILPIECE
RUBBER
DRAIN SEAL
BRASS DRAIN
WASHER
BRASS
DRAIN NUT
STOPPER
ASSEMBLY
STOPPER
KNOB
LIFT AND TURN
STOPPER ASSEMBLY
SET
TAILPIECE
APPLY PIPE JOINT
COMPOUND TO
THREADS
APPLY PLUMBERS
PUTTY
ASSEMBLE AND
TIGHTEN
TURN TO
REMOVE
STOPPER IN
CLOSED POSITION
(UNSCREW STOPPER ONCE IN
CLOSED POSITION TO REMOVE)
STOPPER IN
OPEN POSITION
1
2
3
4
1
2
4
3
2
STUD
SHIM
DRY WALL
TILE
SEALANT
TUB
2 x 4 WOOD
STRINGER
FULL LENGTH
ROOFING NAIL
2 x 4 WOOD
STRINGER
FULL LENGTH
STEEL
STUD
SHIM
DRY WALL
WASHER
TILE
SEALANT
TUB
4"
DRYWALL
SCREW
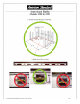
Below is shown typical cross sections of the tub rim
showing typical wall constructions.
WOOD STUDS STEEL STUDS
Position bathtub within the recess, check level, front to back, side to side. Also
check drain clearance hole in sub floor. To secure the tub to wood studs, use
roofing nails immediately above the flange of the tub.
To secure the tub to steel studs, use drywall screws and flat washers. (See Step 4)
Caution: Take Extra Care When Driving Nails or Screws To Avoid Damaging
The Tub.
The tile or similar finished floor will be butted against the bottom of the
tub apron also holding the tub in place.
NOTE: Warranty will be voided if the drain is installed after the tub has been
set in place.