
Installation Guide

790041-400 Rev. P 3/17- 2 -
3
4
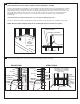
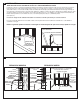
Below is shown typical cross sections of the tub rim showing typical wall constructions.
NAIL
OR
DRYWALL
SCREW
EVERY STUD
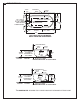
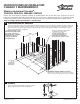
The tub is provided with an integral base for easier installation. Position the bath on the floor and slide into place until the
tub is resting on the rear stringer. The base does not need to contact the floor for proper installation. The base on the
2396 and 2397 models is raised above the floor to facilitate drain installation. Check level, front to back and side to side.
Also check drain clearance hole in sub floor. To secure the tub to wood studs, use sheet rock screws with washers
immediately above the flange of the tub. To secure the tub to steel studs, use drywall screws and flat washers.
(See Step 4)
Caution: Take Extra Care When Driving Nails or Screws To Avoid Damaging The Tub.
The tile or similar finished floor will be butted against the bottom of the tub apron also holding the tub in place.
NOTE: Warranty will be voided if the drain is installed after the tub has been set in place.
FINISHED TILE FLOOR
UNDERLAYMENT
SUB FLOOR
INSTALLATION - BEDDING MATERIAL (MORTAR, SANDMIX, ETC.) IS ACCEPTABLE
SUB FLOOR MUST BE STRUCTURALLY SOUND & FREE OF MOVEMENT / FLEXING
STUD
SHIM
DRY WALL
TILE
CAULKING/
SEALANT
TUB
DRYWALL SCREW
DRYWALL
SCREW
51 x 102mm (2 x 4) WOOD STRINGER FULL LENGTH
STEEL STUD
SHIM
DRY WALL
WASHER
STEEL STUDS
FOR STEEL STUDS SUPPORT
THE WOOD 2 X 4 STRINGER
TO THE FLOOR IN 3 PLACES
TILE
DRYWALL
SCREW
WOOD STUDS
STEEL STUDS
CAULKING/
SEALANT
WASHER
WOOD
2 x 4
STRINGER
TUB
DRYWALL
SCREW
•
•
•
•
•
•
•
•
•
•
•
•
•
•
•
•
•
•
2 x 4
SUPPORT
TO
FLOOR/
SCREWED
TO STUD
INSTALL
ON STUD