
Instruction Manual


7301416-100 Rev. N 5/18
- 4 -
11
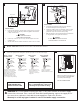
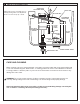
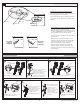
MAJOR WATER ADJUSTMENT
MINOR WATER ADJUSTMENT
Remove the clip as per the drawing.
Install the clip as per the drawing.
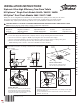
BODY
CLIP
SCREW
SCREW
INLET PIPE
Unscrew the fill valve body
counterclockwise, push the
body up or down to the desired
height and refasten valve body
by turning clockwise.
1
2
BODY
CLIP
INLET PIPE
3
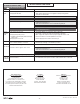
1 2 3
Slide tab in the “Open” direction
as shown in the drawing.
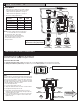
To reduce water level:
lower the float to the
desired height and rotate
the thumb screw
counterclockwise. This
will move the float down.
(As per drawing)
To increase water
level: Rotate thumb
screw clockwise, lift the
float and the water
level will correspond.
Set the float to the
desirable position.
(As per drawing)
Slide the tab to the “CLOSE”
position as per the drawing.
CLIP
CLIP
WATER LEVEL ADJUSTMENT (DUAL FLUSH TANK ONLY)
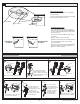
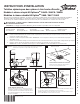
ADA DUAL FLUSH TRIP LEVER OPERATION
Trip Lever Operation
To select a Full Flush, push the Long Paddle
fully and release.
To select a Partial Flush, push the Short Paddle
with Green Stripe fully and release.
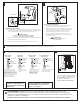
To Replace Trip Lever
Loosen the Blue Nut between the trip lever
and housing by turning “clockwise” (NOTE: this
is a reverse thread) and pull the housing away
from the trip lever.
Loosen and remove the White Nut by turning
“clockwise”.
Remove the trip lever from the tank.
Install the new trip lever into the tank mounting
hole and tighten the white nut by turning
“counterclockwise”.
Attach housing to trip lever by aligning tab and
slot, push together, and retain by tightening
Blue Nut “counterclockwise”.
Full Flush
Position
Rest
Position
Long Paddle
Short Paddle
Green Stripe
Partial Flush
Position