
Installation Guide


7301416-100 Rev. L 1/16
- 4 -
11
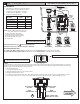
MAJOR WATER ADJUSTMENT
MINOR WATER ADJUSTMENT
Remove the clip as per the drawing.
Install the clip as per the drawing.
BODY
CLIP
SCREW
SCREW
INLET PIPE
Unscrew the fill valve body
counterclockwise, push the
body up or down to the desired
height and refasten valve body
by turning clockwise.
1 2
BODY
CLIP
INLET PIPE
3
1 2 3
Slide tab in the “Open” direction
as shown in the drawing.
To reduce water level:
lower the float to the
desired height and rotate
the thumb screw
counterclockwise. This
will move the float down.
(As per drawing)
To increase water
level: Rotate thumb
screw clockwise, lift the
float and the water
level will correspond.
Set the float to the
desirable position.
(As per drawing)
Slide the tab to the “CLOSE”
position as per the drawing.
CLIP
CLIP
Adjust water level to level indicated on
tank by turning water level adjustment
knob to move float cup up or down.
WATER LEVEL
ADJUSTMENT KNOB
TRIP LEVER ROD
FLUSH
VALVE
FLAPPER
WATER SUPPLY LINE
TANK TO BOWL GASKET
APPROXIMATE
WATER LEVEL
FLUSH
VALVE
CHAIN
FILL VALVE
OR WATER
CONTROL
FLOAT CUP
FLOAT
REFILL TUBE
OVERFLOW
TUBE
FLAPPER
SEAL
WATER LEVEL ADJUSTMENT (DUAL FLUSH TANK ONLY)
SINGLE FLUSH MODELS ONLY