
Installation Guide

- 3 -
1
2
3
4
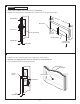
Figure B. Figure C.
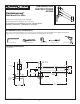
Figure A.
SPLINE
LEVEL
3/8" HEX
WRENCH
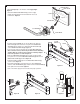
Figure D.
5
2
3
8
6
7
3
4
INSTALL FAUCET MOUNTING ADAPTER
INSTALL POT FILLER
• Apply Sealing Tape to the threads of the Supply Nipple.
Figure A.
• Thread the MOUNTING ADAPTER (1) onto the Supply
Nipple until tight against the the nished wall. Use a 3/8
Hex Wrench. Figure B.
• Install the ESCUTCHEON (1) onto the pot ller body. Align the
POT FILLER (2) and install it onto the spline of the MOUNTING
ADAPTER (3). Be carefull not to damage the O-RING SEALS (4)
on the MOUNTING ADAPTER (3). Figure A.
• Use a level as shown to help align the pot ller. Note: If the pot
filler cannot be leveled, remove the pot filler from the mounting
adapter. With the 3/8 hex wrench rotate the mounting adapter
until a level position is acheived. Figure A.
• When the MOUNTING ADAPTER (3) is properly positioned, drill
four pilot holes. Secure the MOUNTING ADAPTER (3) with the four
MOUNTING SCREW (5) provided. Figure B.
• Reinstall the POT FILLER (2) onto the MOUNTING ADAPTER (3),
check for level. Figure C.
• If the POT FILLER (2) is level, tighten the two SET SCREWS (6)
with the small HEX WRENCH (7) provided. Push the ESCUTCHEON (1)
ush against the nshed wall. Figure D.
• Turn on the water supply. Check for leaks and proper operation.
M985014 (3/19)
WALL BOARD
SEALING TAPE
FINISHED WALL
Figure A.
SUPPLY NIPPLE
3/8" HEX WRENCH
Figure B.
SUPPLY NIPPLE
1