
Installation Instructions

- 2 -
3b 3c
3
4
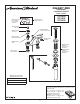
• Remove AERATOR. With handles in OFF position, turn on water supplies and check all connections for leaks.
• Operate both handles to ush water lines thoroughly. Operate LIFT ROD and check DRAIN for leaks. Replace AERATOR.
If Faucet Drips Proceed As Follows:
• Turn HANDLES in OFF position.
• If spout drips, operate HANDLES several times from OFF to ON position. Do not forc HANDLES they turn only 90˚.
• AERATOR may accumulate dirt causing distorted and reduced water ow. Remove AERATOR and rinse clean.
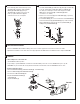
To Change Handle Position:
• Remove INDEX BUTTON (1), HANDLE SCREW (2) and HANDLE (3).
• Remove ADAPTER (4) & RETAINING O-RING (5).
• Lift and turn STOP WASHER (6) 90˚.
• Replace RETAINING O-RING (5)
& ADAPTER (4).
Replace HANDLE (3).
TEST INSTALLED FAUCET
SERVICE
M965761 Rev. 1.0 (4/19)
3
2
1
5
4
6
5
8
7
3
2
4
1
90°
90°
5
6
Aerator
1
2
3
4
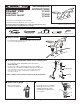
• Place SEAL (1) with small end facing up into
TAILPIECE (2) and tighten against DRAIN
BODY (4). PIVOT ROD (3) opening in
TAILPIECE (2) should face the rear of the
lavatory. Tighten LOCK NUT (5) with
channel locks. Do not over tighten.
• Assemble PIVOT ROD (1), PIVOT NUT (2). CLIP (3) and SEAL (4)
as shown. Hand tighten PIVOT NUT (2) Drop STOPPER (5)
into drain.(For vandal proof drain rotate stopper so PIVOT
ROD (1) goes through EYE (6) of STOPPER (5). Make
connection to “P” TRAP.)
• Remove one end of CLIP (3) from PIVOT ROD (1) by squeezing
ends together while sliding.
• Insert PIVOT ROD (1) into second or third hole in EXTENSION (7)
and reassemble CLIP (3). (EXTENSION (7) may need to be bent).
• Adjust STOPPER (5) height by repositioning EXTENSION (7)
andtightening THUMBSCREW (8).