
Installation Guide


1
The WALL MOUNTED ACCESSORIES work best if secured to a wall stud or cross brace within the wall, using the SCREWS (2) supplied.
If the ACCEASAORY is to be installed on a tile or plaster wall the ANCHORS (3) and SCREWS (2) should be used.
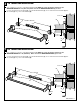
Secure MOUNTING BRACKET (1) to wall with SCREWS (2)
Determine desired height and location (optional) and mark a center line. Make sure the centerline is level. Using the MOUNTING
BRACKET (1) as a template mark the two spots for the mounting holes. If MOUNTING BRACKET (1) is secured to a stud or cross
brace drill small pilot holes for SCREWS (2).
For installations on tiled walls or drywall, use TILE ANCHORS (3) and SCREWS (2) for securing MOUNTING BRACKET (1) to wall. Drill two
1/4" diameter holes a minimum of 1-1/4" deep. Insert the two TILE ANCHORS (3) flush with face of finished wall. Place MOUNTING
BRACKET (1) over TILE ANCHORS (3) and insert SCREWS (2) provided with a flat blade screwdriver. See illustration below.
M965368 REV. 1.1
INSTALLATION OF MOUNTING BRACKETS
FOR ALL WALL MOUNTED ACCESSORIES
Thank you for selecting American-Standard...the benchmark
To ensure that your installation proceeds smoothly--please
read instructions carefully before you begin.
Regular Screwdriver
Recommended Tools
Phillips Screwdriver
10'
Tape Measure
OPTIONAL TO
FINISHED FLOOR
OPTIONAL TO
FINISHED FLOOR
2
DRILL PILOT HOLE FOR
WOOD SCREW (2) OR
1/4" DIA. HOLE FOR
ANCHOR (3)
1
1
3
3
Installation
Instructions
CS SERIES
Contemporay Square Accessories
CARE INSTRUCTIONS:
DO: SIMPLY RINSE THE PRODUCT CLEAN WITH CLEAR
WATER. DRY WITH A SOFT COTTON FLANNEL CLOTH.
DO NOT: CLEAN THE PRODUCT WITH SOAPS, ACID,
POLISH, ABRASIVES, HARSH CLEANERS, OR A CLOTH
WITH A COARSE SURFACE.
8335.018
8335.024
8335.190
8335.210
8335.230
18" TOWEL BAR
24" TOWEL BAR
TOWEL RING
DOUBLE ROBE HOOK
TOILET PAPER HOLDER
3/8" (9mm)
3/4" (19mm)
2
LEVEL
C
L
Electric Drill
Level
4mm Hex wrench