
Installation & Assembly


Installation Guide
8
Installation videos available online at:
www.AmericanTinCeilings.com/videos
MOLDING INSTALLATION FOR CEILINGS
If you are installing Flat Molding with your ceiling, please refer to the Flat Molding installation instructions before complet-
ing the Crown Molding installation.
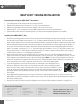
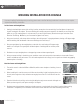
Inside Corner and Straight Runs:
1. Starting in the back right corner of the ceiling, install an uncut piece of crown molding. Your final piece of coped mold-
ing will overlap this uncut piece. The crown molding will overlap your panels regardless of whether you are using filler
panels or not. (This starting place is only necessary if you are using the factory directional cut copes and miters from
American Tin Ceilings. Otherwise, you can start at any place in the room.)
2. Using cone head nails, nail the top of the molding to the ceiling every 6” along the perimeter, forming a 45 degree angle
with the molding. Nail the bottom of the crown molding to the wall every 6”.
3. Run your coped piece into the straight piece on the left side, and forming a 45 degree angle,
attach it as in Step #2. The coped piece will be the piece of molding that has a factory cut at
one end.
4. Continue to run your straight pieces to the opposing corner and then repeat Step #3.
5. After your crown molding is installed you can caulk the seams and corners with color matched or clear caulk. Colored
caulk is available at most paint stores. This will not be required for all ceilings, but is an option to minimize any gapping
between pieces of molding.
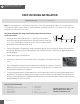
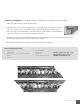
Outside Corner and Straight Runs:
1. The outside corner is called an M-Cut or Miter Cut, which means the piece of molding is cut on
each end.
2. When installing this outside corner you will first cut the molding in half, turning the pieces end
for end (on the angled cut sides) where the two angle pieces meet. This will form the outside
corner.
3. Place the left half to the ceiling, and on the right, bring the angle cut to meet the left angle cut.
When you have a good fit, nail up the molding as in Step #2.
4. Continue around the perimeter, trimming and cutting corners as needed until all molding is installed. After molding
installation is completed you can caulk the corner and the seams with latex color match caulking if necessary.