
Installation & Assembly


9
Installation Guide
• Tape measure
• Framing square
• Cone head nails or 18 guage brad nail gun with
brad nails
• Hammer
• Fine point Sharpie
• Aviation tin snips
• Caulking gun
• Silicone caulking (color match)
If you have any questions, please call:
1-888-231-7500 or visit us online at
www.AmericanTinCeilings.com
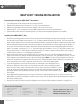
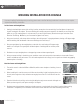
C2 cornice molding showing an inside corner cope.
C2 cornice molding showing an outside corner miter.
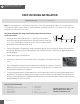
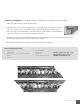
Installation of Flat Molding: Flat molding is sometimes used between your field panels and your filler panels.
1. Make a 45 degree cut on the end of the flat molding.
2. Starting with the short side of the 45 degree angle, nail it to the point of the field tile on only one
side. This will allow you to insert your filler panel under the flat molding and create a finished
look as the edge of the flat molding has a decorative nail rail. After the filler is inserted under the
edge, nail the other side of the molding, securing it to the ceiling.
3. Continue around the field tile, cutting 45 degree angles on the remaining corners and only nailing the field tile side of
the molding, leaving the other side loose as mentioned in Step #2.
4. Once the flat molding and filler are in place, your crown molding can be installed.
TOOL/SUPPLIES REQUIRED: