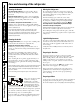
Top-Freezer Refrigerators Safety Information Connecting Electricity . . . . . . . . . . . 3 Extension Cords . . . . . . . . . . . . . . . . 3 Safety Precautions . . . . . . . . . . . . . . 2 Operating Instructions Automatic Icemaker . . . . . . . . . . . . .5 Care and Cleaning . . . . . . . . . . . . . . 6 Shelves . . . . . . . . . . . . . . . . . . . . . . . . .4 Storage Drawers . . . . . . . . . . . . . . .4, 5 Temperature Controls . . . . . . . . . . .
WARNING! Use this appliance only for its intended purpose as described in this Owner’s Manual. SAFETY PRECAUTIONS When using electrical appliances, basic safety precautions should be followed, including the following: ■ This refrigerator must be properly installed and located in accordance with the Installation Instructions before it is used. Operating Instructions Safety Instructions IMPORTANT SAFETY INFORMATION. READ ALL INSTRUCTIONS BEFORE USING.
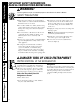
www.AmericanaAppliances.com WARNING! HOW TO CONNECT ELECTRICITY Do not, under any circumstances, cut or remove the third (ground) prong from the power cord. For personal safety, this appliance must be properly grounded. Have the wall outlet and circuit checked by a qualified electrician to make sure the outlet is properly grounded. Where a standard 2-prong wall outlet is encountered, it is your personal responsibility and obligation to have it replaced with a properly grounded 3-prong wall outlet.
Safety Instructions Operating Instructions Installation Instructions Troubleshooting Tips About the temperature control dial. Turning the dial to 0 stops cooling in both compartments—fresh food and freezer. It does not shut off power to the refrigerator. Temperature Control Dial (on some models) The temperature control dial has nine settings plus 0. 1 is the warmest. 9 is the coldest. At first, set the dial at 5. After using the refrigerator, adjust the dial if necessary.
www.AmericanaAppliances.com Utility Drawer The utility drawer can be moved to the most useful location for your family’s needs. About storage drawer and cover removal. Not all features are on all models. Adjustable Humidity Drawer (on some models) Slide the control all the way to the LOW setting to provide lower humidity levels recommended for most fruits. Drawer and Cover Removal Drawers can be removed easily by grasping the sides and lifting up slightly while pulling drawers past the stop location.
Safety Instructions Operating Instructions Installation Instructions Troubleshooting Tips Consumer Support Care and cleaning of the refrigerator. Cleaning the Outside Moving the Refrigerator The door handles and trim (on some models). Clean with a cloth dampened with soapy water. Dry with a soft cloth. Be careful when moving the refrigerator away from the wall. All types of floor coverings can be damaged, particularly cushioned coverings and those with embossed surfaces. Keep the outside clean.
Installation Instructions Models 16, 17, 18 If you have questions, call 1.800.432.2737 BEFORE YOU BEGIN CLEARANCES Read these instructions completely and carefully. Allow the following clearances for ease of installation, proper air circulation and plumbing and electrical connections. • IMPORTANT – Save these instructions for local inspector’s use.
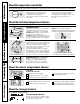
Installation Instructions 1 INSTALLING THE WATER LINE (ON SOME MODELS) BEFORE YOU BEGIN WHAT YOU WILL NEED (CONT.) Recommended copper water supply kits are WX8X2, WX8X3 or WX8X4, depending on the amount of tubing you need. Approved plastic water supply lines are GE SmartConnect™ Refrigerator Tubing (WX08X10006, WX08X10015 and WX08X10025). GE SmartConnect™ Refrigerator Tubing Kits are available in the following lengths: 6′ (1.8 m) 15′ (4.6 m) 25′ (7.
Installation Instructions Install the shutoff valve on the nearest frequently used drinking water line. 4 ROUTE THE TUBING 1 SHUT OFF THE MAIN WATER SUPPLY AND UNPLUG REFRIGERATOR Route the tubing between the cold water line and the refrigerator. Route the tubing through a hole drilled in the wall or floor (behind the refrigerator or adjacent base cabinet) as close to the wall as possible.
Installation Instructions 1 INSTALLING THE WATER LINE 7 CONNECT THE TUBING TO THE (CONT.) 8 TURN THE WATER REFRIGERATOR ON AT THE SHUTOFF VALVE NOTES: • Before making the connection to the refrigerator, be sure Tighten any connections that leak. the refrigerator power cord is not plugged into the wall outlet. • We recommend installing a water filter if your water supply has sand or particles that could clog the screen of the refrigerator’s water valve.
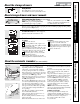
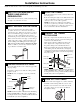
Installation Instructions 2 REVERSING THE DOOR SWING 2 REMOVE THE FREEZER DOOR IMPORTANT NOTES 2.1 Tape the door shut with masking tape. When reversing the door swing: • Read the instructions all the way through before starting. • Handle parts carefully to avoid scratching paint. • Set screws down by their related parts to avoid using them in the wrong places. • Provide a non-scratching work surface for the doors. IMPORTANT: Once you begin, do not move the cabinet until door-swing reversal is completed.
Installation Instructions 2 REVERSING THE DOOR SWING (CONT.) 3 REMOVE THE FRESH FOOD DOOR (CONT.) 3 REMOVE THE FRESH FOOD DOOR 3.5 Transfer the two screws from the opposite side of the cabinet to the screw holes vacated by the center hinge removal. 3.1 Tape the door shut with masking tape. 3.6 Transfer the washer (if your model has one) to the opposite side. 3.2 Using a 5/16″ hex-head socket screwdriver and a 5/16″ open-end wrench, remove the two screws holding the center hinge to the cabinet.
Installation Instructions 4 REVERSING THE HARDWARE (CONT.) 5 REVERSING THE DOOR HANDLES (CONT.) 4.2 Interchange hinge and screws at top right with screws at top left of cabinet. Do not tighten screws on hinge side at this time. 5.1.4 Remove plug button from the top hinge hole on the left side of the door and insert it into the hole on the opposite side that was vacated by removal of the top hinge. Plug Button Installing the hinge on the left. Installing the hinge on the right. 5.1.
Installation Instructions 2 REVERSING THE DOOR SWING 5 REVERSING THE DOOR HANDLES (CONT.) 5.4 Transfer Freezer Door Handle 5.4.1 Remove the screw holding the handle to the top of the door and the two screws holding the handle to the bottom of the door. 5.4.2 Remove the handle. (CONT.) 6 RE-HANGING THE DOORS (CONT.) 6.1.2 Insert the pin on the center hinge into the socket in the top of the door. Place the spacer, then the washer, on the hinge pin.
www.AmericanaAppliances.com Newer refrigerators sound different from older refrigerators. Modern refrigerators have more features and use newer technology. Do you hear what I hear? These sounds are normal. ■ The new high efficiency ■ You may hear the fans spinning at HUMMM... WHOOSH... ■ You may hear a whooshing sound when the doors close. This is due to pressure equalizing within the refrigerator.
Safety Instructions Operating Instructions Installation Instructions Before you call for service… Troubleshooting Tips Problem Possible Causes What To Do Motor operates for long periods or cycles on and off frequently. (Modern refrigerators with more storage space and a larger space and a larger freezer require more operating time. They start and stop often to maintain even temperatures.) Normal when refrigerator is first plugged in. Often occurs when large amounts of food are placed in refrigerator.
GE Service Protection Plus™ GE, a name recognized worldwide for quality and dependability together with Assurant Solutions, offers you Service Protection Plus ™—comprehensive protection on your appliances.
Consumer Product Ownership Registration Dear Customer: Thank you for purchasing our product. Registration for Americana™ is provided by GE. Thank you for placing your confidence in us. We are proud to have you as a customer! Follow these three steps to protect your new appliance investment: 1 2 3 Complete and mail your Consumer Product Ownership Registration today. Have the peace of mind of knowing we can contact you in the unlikely event of a safety modification.
All warranty services for Americana™ are provided by GE Factory Service Centers, or an authorized Customer Care® technician. To schedule service, call 800.432.2737. Please have serial number and model number available when calling for service. Staple your receipt here. Proof of the original purchase date is needed to obtain service under the warranty. We Will Replace: One Year From the date of the original purchase Any part of the refrigerator which fails due to a defect in materials or workmanship.
Consumer Support. Schedule Service Expert GE repair service is only one step away from your door. Schedule service at your convenience by calling 800.432.2737 during normal business hours. In Canada, call 1.800.561.3344 Extended Warranties Purchase a GE extended warranty and learn about special discounts that are available while your warranty is still in effect. You can purchase it by calling 800.626.2224 during normal business hours.
Congelador superior Refrigeradores Información de seguridad Cables de extensión . . . . . . . . . . . . . . . . . 3 Cómo conectar la electricidad . . . . . . . . 3 Precauciones de seguridad . . . . . . . . . . . 2 Instrucciones de operación Control . . . . . . . . . . . . . . . . . . . . . . . . .4 Cuidado y limpieza . . . . . . . . . . . . . . .6 Estantes . . . . . . . . . . . . . . . . . . . . . . . . .4 Gavetas de almacenamiento . . . . . .4, 5 Máquina de hielos automática . . . . . .
¡ADVERTENCIA! Use este aparato sólo con el fin para el cual fue diseñado como se describe en este Manual del propietario. PRECAUCIONES DE SEGURIDAD Al usar aparatos eléctricos, se deben seguir precauciones básicas de seguridad, incluyendo las siguientes: ■ Este refrigerador debe instalarse y ubicarse correctamente según las Instrucciones de instalación antes de su uso. ■ No permita que los niños se suban, se paren o se cuelguen de los estantes en el refrigerador.
¡ADVERTENCIA! CÓMO CONECTAR LA ELECTRICIDAD Bajo ninguna circunstancia, no corte ni retire la tercera pata (conexión a tierra) del cable de electricidad. Por seguridad personal, este aparato debe estar correctamente conectado a tierra. Haga que el tomacorriente de la pared y el circuito sean revisados por un electricista calificado para asegurar que el tomacorriente tiene la conexión a tierra apropiada.
Información de seguridad Instrucciones de Operating Instructions operación Instrucciones para la instalación Sobre el dial de control de la temperatura. Girar el dial a 0 interrumpe el enfriamiento en ambos compartimientos: el compartimiento de alimentos frescos y el congelador, aunque no apaga el suministro de corriente hacia el refrigerador. Dial de control de la temperatura (en algunos modelos) El dial de control de la temperatura tiene nueve niveles más 0.
www.AmericanaAppliances.com Gaveta de refrigerios La gaveta de refrigerios se puede mover a la posición más útil según las necesidades de su familia. Sobre la remoción de la gaveta de almacenamiento y cubierta. No todas las características están presentes en todos los modelos. Información de seguridad Sobre las gavetas de almacenamiento.
Información de seguridad Instrucciones de Operating Instructions operación Instrucciones para la instalación Consejos para la solución de problemas Soporte al consumidor Cuidado y limpieza del refrigerador. Limpieza exterior Mover el refrigerador Las manijas de la puerta y accesorio (en algunos modelos). Limpie con un paño humedecido con agua jabonosa. Seque con un paño seco. Tenga cuidado al mover el refrigerador lejos de la pared.
Instrucciones para la instalación Modelos 16, 17, 18 Si tiene preguntas, llame al 800.432.2737 ANTES DE INICIAR ÁREA Lea estas instrucciones completa y cuidadosamente. Permita el siguiente espacio para una fácil instalación, apropiada circulación del aire y conexiones de plomería y eléctricas. • IMPORTANTE – Guarde estas • Costados 3/4″ (19 mm) • Arriba 1″ (25 mm) • Atrás 1″ (25 mm) instrucciones para uso del inspector local.
Instrucciones para la instalación 1 CÓMO INSTALAR LA TUBERÍA DEL AGUA (EN ALGUNOS MODELOS) ANTES DE INICIAR QUÉ NECESITA (CONT.) Los kits de cobre recomendados para el suministro de agua son WX8X2, WX8X3 o WX8X4, dependiendo de la cantidad de tubería necesaria. Las tuberías plásticas aprobadas para el suministro de agua son las tuberías para el refrigerador SmartConnect™ de GE (WX08X10006, WX08X10015 y WX08X10025).
Instrucciones para la instalación Instale la válvula de cierre en la tubería del agua de consumo más frecuentemente utilizada. 4 DIRIJA LA TUBERÍA 1 CIERRE EL SUMINISTRO PRINCIPAL DE AGUA Y DESENCHUFE EL REFRIGERADOR Dirija la tubería entre la línea del agua fría y el refrigerador. Dirija la tubería a través de un orificio perforado en la pared o en el piso (detrás del refrigerador o del gabinete de la base adyacente) lo más cerca posible a la pared.
Instrucciones para la instalación 1 CÓMO INSTALAR LA TUBERÍA DEL AGUA 7 CONECTE LA TUBERÍA AL 8 ABRA LA LLAVE DEL AGUA REFRIGERADOR EN LA VÁLVULA DE CIERRE Apriete cualquier conexión que pueda presentar fugas. NOTAS: • Antes de hacer la conexión al refrigerador, asegúrese de que el cable de corriente del refrigerador no esté conectado en el tomacorriente de la pared.
Instrucciones para la instalación 2 CÓMO INVERTIR EL VAIVÉN DE LA PUERTA 2 RETIRE LA PUERTA NOTAS IMPORTANTES DEL CONGELADOR Al invertir el vaivén de la puerta: • Lea las instrucciones completamente antes de empezar. • Maneje las partes con cuidado para evitar raspar la pintura. • Ponga los tornillos con su parte correspondiente para evitar usarlas en el lugar equivocado. • Disponga de una superficie de trabajo que no se raspe para las puertas.
Instrucciones para la instalación 2 CÓMO INVERTIR EL VAIVÉN DE LA PUERTA 3 RETIRE LA PUERTA DE (CONT.) 3 RETIRE LA PUERTA DE ALIMENTOS FRESCOS ALIMENTOS FRESCOS (CONT.) 3.1 Pegue la puerta cerrada con cinta de enmascarar. 3.7 Tome uno de los tornillos retirados en el paso 2 y colóquelo en el orificio para tornillo más exterior en el lado opuesto. No atornille por completo, deje suficiente espacio bajo la cabeza del tornillo para el grosor del soporte. 3.
Instrucciones para la instalación 5.2 Traslade el freno de la puerta 5 CÓMO INVERTIR LAS MANIJAS 5.2.1 Desplace el tope de la puerta de metal o plástico y los tornillos del lado derecho al lado izquierdo. DE LAS PUERTAS 5.1 Traslade la manija de la puerta de alimentos frescos Freno metálico de la puerta 5.1.1 Retire el tapón de la manija por debajo del borde usando un cuchillo de masilla con la punta forrada con cinta, y retire el tornillo que está por debajo.
Instrucciones para la instalación 2 CÓMO INVERTIR EL VAIVÉN DE LA PUERTA (CONT.) 6 CÓMO VOLVER A COLGAR LAS PUERTAS (CONT.) 5 CÓMO INVERTIR LAS MANIJAS DE LA PUERTA (CONT.) 6.1.3 Incline la puerta hacia el gabinete. A medida que la puerta vuelve a su posición, deslice la bisagra debajo de la cabeza del tornillo que anteriormente se había insertado parcialmente en el orificio más externo. Inserte el tornillo restante, luego apriete ambos tornillos firmemente. 5.4.
www.AmericanaAppliances.com Los refrigeradores más nuevos producen sonidos diferentes a los modelos más antiguos. Los refrigeradores modernos tienen más funciones y usan tecnología más reciente. ¿Usted escucha lo que yo escucho? Estos sonidos son normales. ■ El nuevo compresor de HMMMM... WHOOSH... CHASQUIDOS, ESTALLIDOS, CRUJIDO, GORJEOS ■ Puede escuchar sonidos como de crujido o estallidos moviéndose a gran velocidad.
Información de seguridad Instrucciones de operación Instrucciones para la instalación Consejos para la Troubleshooting Tips solución de problemas Soporte al consumidor Antes de llamar a solicitar servicio… Problema Posibles causas Qué hacer El motor opera con frecuencia por largos periodos o ciclos de forma intermitente (Los refrigeradores modernos con más espacio de almacenamiento y un congelador más grande requieren de más tiempo de operación.
Instrucciones de operación Instrucciones para la instalación Consejos para la solución de problemas Soporte al consumidor 17 Información de seguridad www.AmericanaAppliances.com Notas.
Soporte al consumidor Consejos para la solución de problemas Instrucciones para la instalación Instrucciones de operación Información de seguridad Notas.
Todos los servicios de la garantía para Americana™ son proporcionados por GE centros de fábrica o nuestros prestadores Customer Care® autorizados. Para concertar una cita de servicio, llame al 1.800.432.2737. Cuando llame para solicitar servicio, por favor tenga a mano el número de serie y el número de modelo. Grape aquí su recibo. Se requiere facilitar prueba de la fecha de compra original para obtener un servicio bajo la garantía.
Soporte al consumidor. Solicite una reparación El servicio de expertos GE está a tan sólo un paso de su puerta. Programe el servicio a su conveniencia llamando al 800.432.2737 durante horas normales de oficina. Garantías ampliadas Compre una garantía ampliada y obtenga detalles sobre descuentos especiales disponibles mientras su garantía está aún activa. Puede comprarla llamando al 800.626.2224 durante horas normales de oficina. GE Consumer Home Services estará aún ahí cuando su garantía termine.