
Instructions / Assembly

2
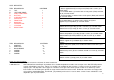
LISTA DE
P
A
RTES
ITEM DESCRIPCION
C
A
NTI
DAD
A TOP 1
B LEFT SIDE PANEL
1
C RIGHT SIDE PANEL 1
D BOTTOM 1
E SUPPORT BLOCK 2
F PARTITION 2
G FRONT RAIL 1
H BACK RAIL 1
I SUPPORT RAIL 1
J CUSHION 1
K BACK PANEL 1
ITEM DESCRIPCION
CA
NTID
A
D
1 CAM BOLT
13
2 CAM LOCK
13
3 WOOD DOWEL 24
4 SCREW
4
5 SCREW 11
6 SCREW 18
Limites de carga la
página:
Llame a el numero gratuito para asistencia o visitenos al correo
electronico:
1-800-489-3351
www.altrafurniture.comLimpie
el producto con su favorito limpiador de muebles con un trapo suave. NO UTILISE
quimicos
asperos o limpiadores agresivos. Mueva sus muebles con cuidado con dos personas. Levante y mueva el mueble
nunca
empuje o jale. No deje ninos subir o jugar en el mueble. Si no sigue estos avisos puede resultar en un dano muy
severo.
Este mueble esta disenado para soportar la carga maxima como lo muestra la foto. Exidiendo estos limites de cargo
puede
causar danos como doblamiento, desaliniarlo, y el producto puede caerse o causar danos severos. Partes adicionales
estan
disponibles por un precio
nomino.
PASO
1
- Attach support block (E) to side panels (B&C) with 4 screws (4) as
below shown.
- Insert wood dowels (3) into the holes of side panels (B&C) and front
rail (G) as below shown.
- Screw cam bolts (1) into the holes of side panels (B&C) and front rail
(G) as below shown.
PASO
2
- Insert wood dowels (3) into the holes of back rail (H) and
support rail (I) and partition (F) as below shown.
PASO 3
- Attach front rail (G) to top (A) with 3 cam locks (2) as below shown.
- Attach back rail (H) to top (A) with 3 screws (5) as below shown.
PASO 4
- Attach two partitions (F) to top (A) with 4 screws (5) as below shown.
- Attach bottom (D) to two partitions (F) with 4 screws (5) as below
shown.
PASO 5
- Attach support rail (I) to bottom (D) as below shown.
PASO 6
- Attach side panels (B&C) to assembled unit with 10 cam locks (2) as
below shown.
PASO 7
- Attach back panels (K) to assembled unit with 18 screws (6) as below
shown.
PASO 8
- Attach cushion (J) to top panel (A) as below shown.