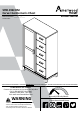
5555555COM CCCCCCCCCCCCCCCCCCCCCCCC BBBBBBBBBBBBB Date of Purchase: ____/____/_____ Lot Number: THIS INSTRUCTION BOOKLET CONTAINS IMPORTANT SAFETY INFORMATION. PLEASE READ AND KEEP FOR FUTURE REFERENCE. Do Not Return This Product! Contact our customer service team for help first Call: 1-800-489-3351 (toll free) Monday-Friday 9am - 5pm CST Visit: www.ameriwoodhome.com WARNING –Unit can tip over causing severe injury or death.
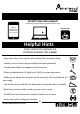
Do NOT return this product! Contact our friendly customer service team first for help Call us! 1-800-489-3351 Monday-Friday 9am - 5pm CST Assembly Tips Visit ameriwoodhome.
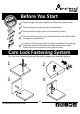
k Quic bly m Asse Ti p Before You Start P P P P P Read through each step carefully and follow the proper order Separate and count all your parts and hardware Give yourself enough room for the assembly process Have the following tools: Flat Head Screwdriver, #2 Phillips Head Screwdriver and Hammer Caution: If using a power drill or power screwdriver for screwing, please be aware to slow down and stop when screw is tight. Failure to do so may result in stripping the screw.
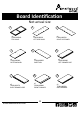
Board Identification Not actual size 1 2 x1 T5991196010 TOP PANEL 4 3 x1 T5991196020 LEFT SIDE PANEL 5 x1 T5991196030 RIGHT SIDE PANEL 6 x1 T5991196040 BOTTOM PANEL x1 T5991196050 PARTITION 7 8 9 x5 T5991196070 RIGHT DRAWER SIDE x5 T5991196080 FRONT DRAWER x5 T5991196090 BACK DRAWER ameriwoodhome.
Board Identification Not actual size 10 x5 T5991196100 DRAWER BOTTOM 13 x1 T5991196130 FRONT & BACK RAIL 12 11 x2 T5991196110 SIDE RAIL x4 T5991196120 LEG 15 14 x1 T5991196150 BACK PANEL x1 T5991196140 DOOR 17 x1 T5991196170 CENTER LEG ameriwoodhome.
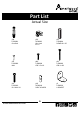
Part List Actual Size x36 TUD0001 Cam Bolt x36 TUD0002 Cam Lock 15-12 x22 TUD0004 DOWEL 8 X 25 x21 TUD0006 NAIL x80 TUD0008 CBS 3.5 x 16 x31 TUD0009 CBS 4 x 38 x12 TUD0010 PH M4 X 18 x16 TUD0018 SHELF HOLDER x2 TUD0020 L-BRACKET ameriwoodhome.
Part List Not Actual Size x5 SET TUD0016 DRAWER SLIDE 12“ x6 TUD0012 HANDLE x1 set TUD0021 ANTI TIPPING KIT x2 SET TUD0019 SLIDING ROLLER ameriwoodhome.
Step 1 x6 TUD0001 x1 SET TUD0021 Insert Cam Bolt and fully tighten it. Fix anti-tipping kit, do not fully tighten in this step 1 ameriwoodhome.
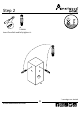
Step 2 x8 TUD0001 Insert Cam Bolt and fully tighten it. 12 x4 ameriwoodhome.
Step 3 Quick Assembly Tip x10 TUD0002 x10 TUD0004 Proper orientation of CAM LOCK Please ensure direction of Cam lock 13 x2 11 x2 18 ameriwoodhome.
Step 4 x16 TUD0008 x2 TUD0010 x1 TUD0012 x2 SET TUD0019 Install sliding roller & handle. 14 ameriwoodhome.
Step 5 Fix legs to side rail by tighten the Cam Lock 12 11 x2 SET 12 ameriwoodhome.
Step 6 Fix front rail & back rail by tighten the Cam Lock 11 13 13 ameriwoodhome.
Step 7 Fix side rail by tighten the Cam Lock 11 13 ameriwoodhome.
Step 8 x4 TUD0009 Fix bottom panel by using screw. 4 13 ameriwoodhome.
Step 9 x1 TUD0009 Attach center leg. 17 4 ameriwoodhome.
Step 10 x4 TUD0008 x2 TUD0020 Secure bottom panel installation by using screw & L-Bracket. 4 ameriwoodhome.
Step 11 Quick Assembly Tip x2 TUD0002 x4 TUD0004 x8 TUD0018 Proper orientation of CAM LOCK Preparation of left side panel 2 ameriwoodhome.
Step 12 x1 TUD0001 x15 TUD0008 x2 TUD0002 x5 (CL) TUD0016 Preparation of partition panel 5 LEFT FACE Screw Position ameriwoodhome.
Step 13 Quick Assembly Tip x4 TUD0004 x8 TUD0018 Proper orientation of CAM LOCK Preparation of partition panel 5 RIGHT FACE ameriwoodhome.
Step 14 x1 x2 TUD0001 TUD0002 Preparation of right side panel x4 x15 TUD0004 TUD0008 x5 (CR) TUD0016 Quick Assembly Tip Proper orientation of CAM LOCK 3 Screw Position ameriwoodhome.
Step 15 Attach front rail to the right side panel 3 18 ameriwoodhome.
Step 16 Attach to the partition panel 5 3 ameriwoodhome.
Step 17 x6 TUD0009 Attach left & right side panel, and partition panel to bottom panel. Please fully tighten the screw. 2 4 3 ameriwoodhome.
Step 18 Attach top panel. 1 ameriwoodhome.
Step 19 IMPORTANT! THE BACK PANEL IS A STRUCTURAL PART OF THIS UNIT AND MUST BE INSTALLED PROPERLY. x21 TUD0006 Attached back panel as shown nailing straight into the raw edges. Ensure that the unit is square. Distance from corner to corner must be equal as shown. 15 ameriwoodhome.
Step 20 x20 TUD0001 Preparation of drawer front. 8 x5 ameriwoodhome.
Step 21 Quick Assembly Tip x20 TUD0002 Proper orientation of CAM LOCK Preparation of left drawer side & right drawer side 6 x5 7 x5 ameriwoodhome.
Step 22 Attach drawer side to the drawer front x5 SET 6 7 8 ameriwoodhome.
Step 23 Slip in drawer bottom inside the groove x5 SET 10 ameriwoodhome.
Step 24 x20 TUD0009 Attach drawer back and fully tighten it. x5 SET 9 ameriwoodhome.
Step 25 x10 TUD0010 x5 TUD0012 Attach the handle and tighten it from inside x5 SET 8 ameriwoodhome.
Step 26 x5 (DR & DL) TUD0016 x30 TUD0008 Attach drawer slide DR & DL x5 SET 8 Screw Position ameriwoodhome.
For Masonry, Concrete, or other wall materials: Consult your local hardware store for appropriate anchors to securely attach the safety bracket. IMPORTANT: THIS UNIT MUST BE SECURE TO THE WALL TO HELP PREVENT TIPOVER. FOLLOW THESE INSTRUCTIONS TO INSTALL THE ANTI-TIPPING SAFETY BRACKET PROVIDED WITH THIS PRODUCT. WARNING hole Serious or fatal crushing injuries can occur from furniture tipover.
Step 27 Top roller STEP 1: Insert bottom roller into bottom rail STEP 2: Push down top roller before pushing the door inside. STEP 3: Properly align with top rail, then push the button from inside. 14 STEP 4: Door installation success when top roller fully inserted in rail. Up Down STEP 5: To align your door in proper alignment, use #2 Philip Head screwdriver to adjust bottom roller up or down. ameriwoodhome.
Step 28 Slide the door to the right. Insert the shelf. 16 2 16 16 16 ameriwoodhome.
Step 29 Slide the door to the left. Insert the drawers. 1 2 ameriwoodhome.
Maximum Loads This unit has been designed to support the maximum loads shown. Exceeding these load limits could cause sagging, instability, product collapse, and/or serious injury. 45 lbs. 20.4 kg 10 lbs. 4.5 kg Each drawers 25 lbs. 11.3 kg Each shelf Warning: Risk of serious injury to person - do not place a television on this furniture. This furniture is not approved for use with a television. Certificate of Confirmity 1. This certificate applies to Dorel Home Furnishings, Inc.
RCgiCCCC youC pCoducC Co CCcCiCC CCC foCCowiCg: * NCw CCCCd dCCCiCC -CCCCk pCCk oC wCCCCC CCw * SuCCCyC -CCCC C CoicC wiCCiC ouC coCCuCiCy * ExcCuCiCC dCCCC CCd diCcouCC codCC * Quick CCd CCCy CCpCCcCCCCC pCCC CCCCicC To register CCgiCCCCyour youCproduct, pCoducC,visit CiCiCAmeriwoodhome.
Español Cubierta Delantera Este libro de instrucciones contiene información IMPORTANTE de seguridad. Por favor lea y manténgalo para referencia en el futuro. No Regrese este producto! Comuniquese con nuestro amistoso equipo de servicio al cliente para obtener ayuda. Llamenos al: 1‐800‐489‐3351 (Gratis) Lunes ‐ Viernes 9am ‐ 5pm CST Visitar: www.ameriwoodhome.com PRECAUCION Este mueble puede volcarse y causar graves heridas y/o muerte. Anclar el mueble a un poste de madera en la pared (si esto se requiere).
Español Página 8 Inserte el perno de la leva y apriételo completamente. Fije el kit anti-vuelco, no apriete completamente en este p Página 9 Inserte el perno de la leva y apriételo completamente.
Español Página 24 Conecte el panel lateral izquierdo y derecho y el panel de partición al panel inferior. Apriete completamente el tornillo Página 25 Fije el panel superior Página 26 . IMPORTANTE! EL PANEL TRASERO ES UNA PARTE ESTRUCTURAL DE ESTA UNIDAD Y DEBE INSTALARSE CORRECTAMENTE. Sujeta el panel trasero como se muestra clavando directamente en los bordes sin procesar. Asegúrese de que la unidad es cuadrada. La distancia de la esquina a la esquina debe ser igual a como se muestra.
Español Página 34 Para mampostería, hormigón u otros materiales de pared: Consulte con su ferretería local para anclajes apropiados para fijar firmemente el soporte de seguridad. IMPORTANTE: ESTA UNIDAD DEBE SER ASEGURADA A LA PARED PARA AYUDAR. SIGA ESTAS INSTRUCCIONES PARA INSTALAR EL SOPORTE DE SEGURIDAD ANTI-TIPPING PROPORCIONADO CON ESTE PRODUCTO. ADVERTENCIA Pueden ocurrir lesiones de aplastamiento graves o mortales desde el extremo del mueble.
Español Página 37 Deslice la puerta hacia la izquierda. Inserte los cajones. Página 38 CARGA MAXIMA Esta unidad ha sido diseñada para soportar la carga máxima anotada. El exceder estos límites puede causar inestabilidad, colapsarse y/o causar serias lesiones. ADVERTENCIA: Riesgo de lesiones a las personas ‐ no coloque un televisor sobre muebles. Este mueble no está aprobado para su uso con un televisor.
Français capot avant Ce livret d’instructions contient d’importantes informations de sécurité. S’il vous plaît lire et conserver pour référence ultérieure. Ne pas retourner ce produit! Contactez notre équipe de service à la clientèle amical pour aider. Appel: 1-800-489-3351 (gratuit) Lundi - Vendredi 9am - 5pm CST Visite: www.ameriwoodhome.com MISE EN GARDE Ce mobilier peut basculer et causer des blessures graves et / ou la mort. Ancrer les meubles à un poteau en bois sur le mur (si cela est nécessaire).
Français page 8 Insérez la came du boulon et serrer complètement. Réglez le kit anti-bout serrez pas complètement dans cette étape page 9 Insérez la came du boulon et serrer complètement.
Français Page 24 Connectez le panneau latéral gauche et à droite et le panneau de séparation au panneau inférieur. Serrez complètement la vis Page 25 Fixez le panneau supérieur. Page 26 IMPORTANT! LE PANNEAU ARRIÈRE EST UNE PARTIE DE STRUCTURE ET CET APPAREIL DOIT ÊTRE INSTALLÉ CORRECTEMENT. En tenant le panneau arrière comme indiqué clouer directement sur les bords bruts. Assurez-vous que l’unité est carrée. La distance d’un coin à doit être égal comme indiqué.
Français Page 34 Maçonnerie, béton ou d’autres matériaux de paroi: Vérifiez auprès de votre magasin local de matériel pour les ancrages appropriés pour fixer fermement le support de sécurité. IMPORTANT: CET APPAREIL DOIT ÊTRE FIXÉ AU MUR POUR AIDER. CES INSTRUCTIONS POUR INSTALLER LE SUPPORT antibasculant DE SÉCURITÉ Avec ce produit. AVERTISSEMENT Blessures par écrasement graves, voire mortelles, la fin du gouvernement peut se produire.
Français Page 36 Faites glisser la porte vers la gauche. Insérez les tiroirs. Page 38 MAXIMUM DE CHARGE Cet appareil est conçu pour supporter la charge maximale enregistrée. Le dépassement de ces limites peut provoquer l’instabilité, l’effondrement et / ou causer des blessures graves. AVERTISSEMENT: Risque de blessures aux personnes - ne placez pas la télévision sur les meubles. Ce mobilier est pas approuvé pour une utilisation avec une télévision.