
User Manual
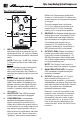
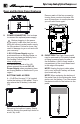
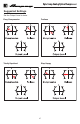
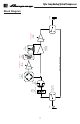
Table Of Contents

4
Opto Comp Analog Optical Compressor
Rear and Bottom Panel Features
9
9. POWER CONNECTOR: This is where
to connect the optional power supply.
Before plugging in the power
supply, make sure that you are
using the correct model power supply
for this product. Failure to do so may
result in damage to your unit and void
your warranty.
A DC-1G Power Supply may be
purchased from an Ampeg Dealer, or
you may purchase one directly from
the Ampeg Online Shop, at
shop.ampeg.com.
For residents outside of the US,
please request the model DC-1G
Power Supply when purchasing from
an Ampeg dealer or distributor in your
region.
BOTTOM PANEL ACCESS
A –15 dB Pad Jumper [11] is located
inside the bottom of the pedal. This is
also where the 9V battery is housed
[10].
Removing the bottom is easy. Simply
start by placing the pedal top down on
a soft, dry cloth.
Remove each of the four screws by
turning them counter-clockwise. Be
sure to keep them in a safe place as
you will need them again!
PINS 1-2: NORMAL
1
2
3
J1
PINS 2-3: 15dB PAD
10
11
10. 9V BATTERY: The Opto Comp pedal
may be powered by 9V battery instead
of using a power supply. As seen in
the illustration, it ts in nicely inside a
compartment of the circuit board next
to the edge of the pedal.
NOTE: Unplug the input cable when
not in use, as the 9V battery will drain
(and eventually die).
NOTE: When replacing the bottom of
the pedal, line up the rectangular foam
piece over the battery. Turn the screws
clockwise to ax to the bottom to the
pedal.