
Mfg. Co. Weather Radio User Manual


5. Advanced Measuring Procedures
Note: Cancel any Hold or Record functions before trying to performand advanced measuring
procedures.
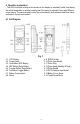
1. Press and hold the “ SET Button” (4-6, Fig. 1) for about 3 seconds until the LCD displays
“ Code” . Once you release the button you should see 1000 in the main display. 1000 Is the
password code to allow advanced measuring procedures. To leave the setting menu press the
“ ESC Button” (4-3, Fig.1).
2. Press the “ Enter Button” (4-4, Fig. 1).
4. Now you are in the setting area to set or change the temperature unit of measure. Pressing
the “ Set Button” (4-6, Fig. 1) will cycle through the following setting sections:
°F…… Change the Temp C or F (section 5-1)
SEC… Change the data logger sampling rate (section 5-2)
Cnt….. To show the balance data in memory (section 5-3)
CLr…. Clear saved data in memory (data logger data) (section 5-4)
OFF… Auto power ON/OFF management (section 5-5)
5-1 Change Unit of Measure from °C to °F
1.Press and hold the “ Set Button” (4-6, Fig. 1) for about 3 seconds until y ou see the w ord
“COde” in the bottom of the LCD.
2. Press the “ Enter Button” (4-4, Fig. 1). Now you may select betw een °C & °F by
pressing the “Function Button” (4-5, Fig. 1). When a “0” is in the main LCD the unit w ill
display temperature in °C. When a “1” is in the main LCD then the unit w ill display
temperature in °F.
3. Oncey ou hav e selected either a 0 or a 1, press the “REC Enter” button and then
press the “Hold ESC” button to escape and go back to the normal testing mode.
5-2 Change Data Logger Sampling Time
1. Press and hold the “ Set Button” (4-6, Fig.1) for more than 3 seconds.
2. The main LCD should then display1000. Now press the “ Enter Button” (4-4-, Fig. 1)
3. Now press the “ Set Button” (4-6, Fig.1). You will see SEC in the bottomleft of the LCD.
4. Use the “ Function Button” (4-6, Fig. 1) to cycle through the available seconds settings. Stop
on either 0, 1, 2, 10, 30, 60, 600, 1800 or 3600. The value you select will tell the meter how
often to log an event. Note that 0 SEC can only be used in the manual logging function.
5. Press the “ Enter Button” (4-4, Fig.1) to confirmyour selection and save it to the meters
memory.
6. Press the “ ESC Button” (4-3, Fig.1) to go to the normal measurement mode.
5-3 Show Memory Balance
1. Press and hold the “ Set Button” (4-6, Fig.1) for about 3 seconds.
2. The main LCD should then display1000. Now press the “ Enter Button” (4-4-, Fig. 1)
3. Press the “ Set Button” (4-6, Fig.1) twice and you will see the Cnt marker in the bottomof the
LCD. The top number is the number of available data points.
4. Press the “ ESC Button” (4-3, Fig.1) to go to the normal measurement mode.
9