
Installation Guide


Installations (refer to Page 4 for parts):
NOTE: Use threaded drywall anchors only when
mounting the hood on sheet rock. Mounting
the hood on wall studs or lumbars is highly
recommended.
Step 1:
Step 2: Installing the hood mounting bracket
Step 3: Installing the upper chimney bracket
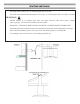
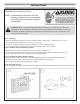
• Drill 2 holes according to the size of the upper mounting bracket. The upper mounting bracket
should be positioned ˜ush with the top of the outside chimney (See Figure # 1)
•
Screw upper and hood mounting brackets in tightly.
INSTALLATION:
Installations (refer to Page 4 for parts):
NOTE: Use threaded drywall anchors only when
mounting the hood on sheet rock. Mounting
the hood on wall studs or lumbars is highly
recommended.
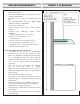
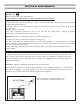
Step 1: Measuring
• Measure the distance between stove top and the bot tom of range hood. A distance of 24” to 30” is
recommended with a minimum of 30” for gas stove tops.
• To reach 9ft ceiling make sure hood is install ed at 32” from cooking surface
• If you require longer chimney ˜ue to reach your ceiling please contact ven do r.
Step 2: Installing the hood mounting bracket
• The range hood will be installed on top of this bracket (See Figure # 1)
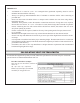
• Using references in Height & Clearance on P age 5 and Measurements and Diagrams on Page 16,
Drill 3 holes that will be used to ÿx the lowe r mou ntin g bracket.
Step 3: Installing the upper chimney bracket
• Drill 2 holes according to the size of the uppe r mounting bracket. The upper mounting bracket
should be positioned ˜ush with the top of the outs ide chimney (See Figure # 1)
• Screw upper and hood mounting brackets in t ightly.
INSTALLATION:
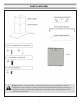
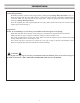
Step 4: Installing the glass
• Place the glass piece over the range hood and tighten using the 4 designated screws, C & D. (See Figure # 2)
Step 4: Installing the glass
• Place the glass piece over the range hood and tighten using the 4 designated screws, C & D. (See Figure # 2)
Mesuring
10
•
e the distance between stove top and the bottom of range hood. A distaMeasur
nce of 24” to 30” is
m recom ended with a minimum of 30” for gas stove tops.
• To reach 9ft ceiling make sure hood is installed at 32” from cooking surface
• If you require longer chimney flue to reach your ceiling please contact vendor.
• The range hood will be installed on top of this bracket (See Figure # 1)
• Using references in Height & Clearance on Page 5 and Measurements and Diagrams on Page 16,
holes that will be used to fix the lower mounting bra3 drill cket.
Hardware Note: For safety reasons, range hood mounting screws and anchors will not be
included due to the variation of cabinetry constructions and wall material. Please consult your
installation specialist regarding the optimal type of mounting screws and wall anchors to suit
your home’s construction.