
Installation Guide


NEW INSTALLATION:
Step 1: Create Exterior Ventilation
• Choose one of the exterior venting methods shown on Page 7.
• Create the exterior ventilation hole.
• Insert exterior damper into exterior ventilation hole.
• Following recommendations and calculations specified on Pages 5 to 9, use new aluminum/metal ducting
cut specifically for the distance between the range hood damper and the exterior damper.
• Fasten all connections with sheet metal screws and tape all joints with certified aluminum or foil tape.
Please check the building codes in your city to learn which tape product is recommended.
Step 2: Measuring
• Measure the distance between the cooking surface and the bottom of the range hood. A distance of
24” to 30”.
Step 3: Preparing The Hood
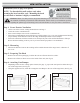
•
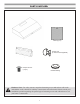
Remove the unit from packaging. Position the unit on a flat non-abrasive surface.
g # 4
Step 4: Attaching Vent/Damper
•
Depending on the exterior venting option chosen (See page 7), pop out the steel panel on either the top or
rear of the range hood. (See Fig #2)
Using the supplied screws, attach the rectangular vent/damper to the rear of the range hood. (See Fig #3)
•
g # 4
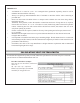
Installations (refer to page 4 for parts):
NOTE: Use threaded drywall anchors only when
mounting the hood on sheet rock. Mounting the hood
on wall studs or lumbars is highly recommended.
Fig #1
Fig #3
Hardware Note: For safety reasons, range hood mounting screws and anchors will not be included due to
the variation of cabinetry constructions and wall material. Please consult your installation specialist
regarding the optimal type of mounting screws and wall anchors to suit your home’s construction.
10
Fig # 2
•
Remove the 2 filters to allow access to the inside of the unit. (See Fig #1)