
Owner`s manual


9
E
N
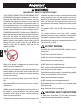
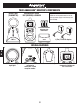
4 EASY STEPS TO OPERATE YOUR ANGELCARE
®
MONITOR
NURSERY UNIT (TRANSMITTER)
• Insert 4 AAA regular batteries (not included) into Nursery
Unit (for battery backup in case of power failure).
• Connect AC adapter to Nursery Unit and plug adapter into an
electrical outlet in the baby’s room.
• After both units are properly installed (step1 and 2), turn
them ON and then adjust microphone sensitivity level (if
necessary).
Adapter socket
Microphone
sensitivity
dial
Charger adapter
socket
Volume controls
(up & down)
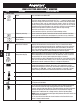
USING THE BATTERY MODE
• The monitor will revert to battery mode during a power
failure only if batteries are inserted in both units.
• When the Nursery Unit’s green light flashes, its batteries
need to be replaced. On the Parent Unit screen, the clear
battery icon flashes and the Nursery Unit icon appears. A
beep sound is also heard.
• Parent Unit should be recharged when icon is clear (does not
flash) and a beep sound is heard. Note: Do not use Alkaline
batteries in the Parent Unit.
HOW TO USE YOUR MONITOR
• To be warned if your units are “out of range”, switch the In
Range Notification ON (optional).
• If reception is not clear, switch to another channel. (see
instructions for changing channel in the “ICON” section).
• To avoid feedback (whistling sound), keep both units at
least 3 meters apart (10 feet).
STEP 1 STEP 2
STEP 4
STEP 3
Power ON/OFF
Channel
selector
Low battery indicator
Channel selector
ON/ OFF night light
button
Power ON/OFF
In range ON/ OFF
PARENT UNIT (RECEIVER)
• Insert 4 AAA NIMH rechargeable batteries (included) into
Parent Unit.
• Connect AC adapter to Parent Unit charger and plug adapter
into an electrical outlet. Let charge for 15 continuous hours
before using the monitor for the first time.
• After both units are properly installed (step1 and 2), turn
them ON and then adjust the volume control to the desired
level.