
User Manual


Installation and Connection
1. Before placing the device into its operating location, consider the following:
● The device’s ventilation outlets should not be obstructed by other devices and objects and
enough space for air circulation should be provided.
● The device should not be placed next to any heat-sensitive piece of equipment. (The
surface of ISOCHRONE 10M may reach a temperature of 55°C (140°F) during operation.)
● To minimize frequency instabilities, the device should not be placed near equipment
generating strong magnetic elds, such as generators, transformers, etc.
● To prevent possible interference, observe a minimum distance of 5 centimeters (2 inches)
between the cables of this device and any non-coaxial audio cables.
● It is OK to use the device unmounted (i.e. not in a rack) as long as the above conditions are
met. There is no requirement for the device to be leveled horizontally.
2. If the DC Power Connection (7) is to be used, make sure the power cord is wired properly,
because reversed polarity may damage the device. Refer to the illustration and the table
below for information on how to make the connection. If in doubt consult a competent
echnician.
If the mark on the Speakon NL4FX plug is… connect to the following mark on the power
supply unit circuit board / terminal:
1+ +15 V
2- Ground
1-
Earth
(optional, use it if available On the power supply unit)
3. Mount the device on its operating place in the rack and secure it with the screws.
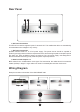
4. Connect the AC Power Connection (6) and/or the DC Power Connection (7) to the respective
power outlet(s).
5. Connect the devices you would like clocked to the Atomic Clock Outputs 1-8 (8) on the rear
panel. (These devices must support 10 MHz atomic clock signal input.)
Note: When connecting the devices, do so with the studio volume turned down. Some devices may
emit unpleasant sound until properly congured to accept incoming clock.
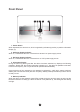
Operation
1. Power the device on by depressing the Power Switch (1) on the front panel. Depending
on the connected power sources, the Power Supply Indicator(s) (2) and/or (3) will go up.
2. If the connected slave devices are off, power them on.
3. Make sure the atomic clock indicators of the slave devices show that the 10 Mz clocking
signal is received properly. Some devices will automatically synch to the incoming clock
from the ISOCHRONE 10M when connected; others may require additional conguration in
order to utilize 10 MHz clock.
1
6