Retractable Ceiling Fans Model No.
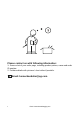
Please contact us with following information: 1. Screen shot of your order page, including product picture, name and order ID number. 2. Problem details with pictures / short video if possbile. Email: homechandelier@qq.com 1 Email: homechandelier@qq.
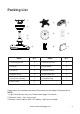
Packing List ① ⑥ ⑦ ⑧ ⑨ ⑩ ⑪ ② ③ ④ ⑤ Name QTY Name QTY ① Mounting Bracket 1 ⑦ Remote Receiver 1 ② Canopy 1 ⑧ Light Shade 1 ③ Downrod 2 ⑨ Remote Control 1 ④ Adapter Cover 1 ⑩ Bulb Holder Hub 1 ⑤ Fan Motor Assembly 1 ⑪ Hardware Bag 1 ⑥ Bulb Holder 1 Please open your package and check the accessories according to the packing list. NOTE: 1. Light Frame⑧ style may vary. Please check page 7 for details. 2. Downrod: short x 1pcs, long x 1pcs 3. Remote control requires AAA 1.
Safety Rules 1. Be sure the power to the wires you are working on is disconnected, either the fuse is removed or the circuit breaker is turned off. Turning the power off using the light switch is not sufficient to prevent electrical shock. 2. A qualified licensed electrician is required for the installation. 3. The outlet box and support structure must be securely mounted and capable of reliably /supporting a minimum of 50 pounds.
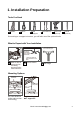
1. Installation Preparation Tools You Need Ladder Wire Strippers Pliers Screwdrivers Power Drill (optional) Drill Bit (optional) If mounting to a support structure, you will also need the optional tools. What to Expect with Your Installation You may need a friend to help you.
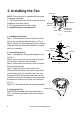
2. Installing the Fan Outlet box NOTE: This ceiling fan is supplied with two types of hanging downrods: 1. The short downrod for "close-to and flat ceiling" installation (less than 9 feet). 2. The long downrod is for high ceiling. 3. Angled ceiling is not supported. Flat washer Mounting bracket Hook Power Wire Mounting screw (supplied with the outlet box) Fig. 5 1. Installing the Bracket Step 1. Pass the power wires through the center hole in the mounting bracket as shown in Fig. 5. Step 2.
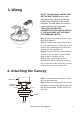
3. Wiring NOTE: THIS FAN ONLY NEEDS ONE SET OF INPUT WIRES (black, white and ground wire). Both of the fan and lights will be controlled by the remote controller. The wall switch is not able to control the fixture full functionally. THIS FAN CAN ONLY BE CONNECTED ONTO ON/OFF SWITCH IF YOU HAVE ONE, NOT SUITABLE FOR DIMMAER SWITCH. Step 1. Insert the remote receiver to the bracket as figure 8. Step 2.
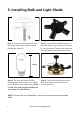
5. Installing Bulb and Light Shade Step 1. Screw the bulb holder hub onto Step 2. Take off the threaded tube from the center of fan base. Pass the wires the bulb holder, screw it into the hub and through the side hole. fix it with a screw. Connect the wires from the bulb holder to the ones from the fan. 14.5cm Step 3. Fix the bulb holder onto the threaded tube with cap nut on it. Install bulbs (E26/E27 Max. 60W each). NOTE: For 42" fan, bulb length should be no more than 5.7 inch/ 14.5cm. Step 4.
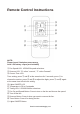
Remote Control Instructions ① ③ ④ ② ⑤ ⑥ ⑦ ⑨ ⑧ ⑩ ⑪ NOTE: Please insert 2 batteries before using. AAA 1.5V battery x 2pcs (not included) ① Fan Speed LCD. 1/2/3/4/5/6 speed selections. ② Reverse LCD. "R" refers "reverse", "F" refers "forward". ③ Current Time LCD Time setting: press ⑦ and ⑧ at the same time for 2 seconds; press ⑪ to choose the section, press ⑨ and ⑩ to adjust the digits; press ⑦ and ⑧ again at the same time to finish the setting.
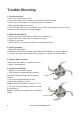
Trouble Shooting 1. Fan doesn't work • Press a fan speed button (1-3). • Check the remote control battery (not included in this package). • Check the circuit breaker to ensure the power is turned on. • Make sure the blades spin freely. • Turn off power from the circuit breaker, then loosen the canopy and check all the connections according to the wiring diagram. 2. Bulbs do not light up • Check your power and switch to make sure it's power on.
Clean And Care To clean, wipe fixture with soft cloth. Spray from chemical cleaners can discolor the finish of fixture. Do not use scouring pads, powders, steel wool or abrasive paper to clean this fixture. Ordering Parts Keep this manual for future reference, and in case replacement parts are needed. Available parts can be ordered from place of purchase. Use exact wording from diagrams when ordering parts. Hazardous substance Email: homechandelier@qq.
"We followed the light to a brighter and warmer place.