
Instructions / Assembly
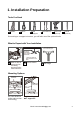
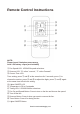

NOTE: This ceiling fan is supplied with two types
of hanging downrods:
1. The short downrod for "close-to and flat ceiling"
installation (less than 9 feet).
2. The long downrod is for high ceiling.
3. Angled ceiling is not supported.
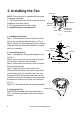
1. Installing the Bracket
Step 1. Pass the power wires through the center
hole in the mounting bracket as shown in Fig. 5.
Step 2. Secure the mounting bracket to the ceiling
outlet box with the screws and washers provided
with your outlet box.
2. Assembling the Fan
Step 1. Assemble the canopy and adapter cover
as Fig. 6.
Step 2. Remove the the bolt, pin and set screws
from the top of the fan motor assembly.
Step 3. Route wires from the top of the fan motor
through downrod/ ball.
Step 4. Align the holes at the bottom of the
downrod with the holes in the collar on top of the
motor housing (Fig. 6). Carefully insert the bolt
through the holes in the collar and downrod. Be
careful not to jam the bolt against the wires inside
the downrod. Insert the pin to the end of the bolt
(Fig. 6).
Step 5. Fix the downrod with set screws provided.
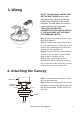
3. Hanging the Fan
Place the downrod ball into the bracket socket
(Fig. 7). Be sure the fixation slot is locked by the
bracket.
the bolt
(Fig. 6).
Step 5. Fix the downrod with set screws provided.
3. Hanging the Fan
Place the downrod ball into the bracket socket
(Fig. 7). Be sure the fixation slot is locked by the
bracket.
Outlet box
Mounting
bracket
Hook
Mounting screw
(supplied with
the outlet box)
Canopy
Set screw
Bolt
Pin
Fixation slot
Downrod
Fig. 5
Fig. 6
Fig. 7
Flat washer
2. Installing the Fan
Power Wire
Adapter cover
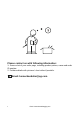
5 Email: homechandelier@qq.com