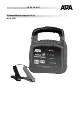
DE GB FR NL IT DE Automatik-Batterie-Ladegerät 12 V, 6 A Art.-Nr.
Inhalt Seite 1. Bestimmungsgemäßer Gebrauch 2 2. Lieferumfang 3 3. Spezifikationen 3 4. Sicherheitshinweise 3 5. Symbolerklärung 4 6. Bedienungsanleitung 4 6.1 Übersicht 4 6.2 Einsetzen der Kabelhalter 5 6.3 Vorbereitung 5 6.4 Anschließen des Batterieladegerätes 5 6.5 Laden der Batterie 5 6.6 Entfernen des Ladegeräts 5 7. Wartung und Pflege 6 7.1 Wartung 6 7.2 Pflege 6 8.
2. Lieferumfang • 1x Batterieladegerät • 4x Kabelhalter 3. Spezifikationen Abmessungen (L x B x H): Gewicht: Länge Netzkabel: Eingang: Ausgang: Batteriekapazität: Umgebungstemperatur: 145 x 90 x 170 [mm] 1,710 kg 1,70 m Länge Ladekabel: 1,40 m 220-240 V AC 50/60 Hz 12 V, 4 A (6 A RMS), DC 20 – 110 Ah -5 °C bis +40 °C • 1x Bedienungsanleitung 4.
• • • • kommen kann. Stellen Sie das Ladegerät im Betrieb nicht auf eine isolierende Unterlage (z.B. Styropor) – Gefahr von Hitzestau! Wenn Sie eine Fahrzeugbatterie in eingebauten Zustand aufladen möchten, stellen Sie zuerst das Fahrzeug sicher ab, ziehen Sie die Parkbremse an und schalten Sie die Zündung aus. Klemmen Sie die Batterie vom Bordnetz Ihres Fahrzeugs ab. Lesen Sie dazu im Handbuch Ihres Fahrzeugs nach oder fragen Sie Ihre Fachwerkstatt.
6.2 Einsetzen der Kabelhalter Setzen Sie die Kabelhalter in die Aufnahmen (Position 6 in der Übersicht) auf der Rückseite des Ladegerätes so ein, dass die Öffnungen der übereinanderliegenden Kabelhalter von einander weg zeigen. 6.3 Vorbereitung Reinigen Sie die Batteriepole von Staub und Korrosionsrückständen. Nur für offene Batterien: Entfernen Sie die Verschlussstopfen der Batteriezellen. Kontrollieren Sie den Flüssigkeitsstand in den Zellen, lesen Sie dazu in der Bedienungsanleitung Ihrer Batterie nach.
7. Wartung und Pflege 7.1 Wartung Das Batterie Ladegerät ist bei bestimmungsgemäßem Gebrauch wartungsfrei. 7.2 Pflege Reinigen Sie die Polzangen jedes mal nach einem Ladevorgang. Entfernen Sie jegliche Batteriesäure- spritzer von den Polzangen um Korrosion zu vermeiden. Reinigen Sie das Gerät vorsichtig mit einem trockenen Tuch. Benutzen Sie keine Flüssigkeiten oder chemische Reinigungsmittel. Tauchen Sie das Gerät niemals in Flüssigkeiten ein. Lassen Sie niemals Flüssigkeiten über das Gerät laufen.
GB Battery charger 6 Amp. 12V Item number 16627 Contents Page 1. Proper use of the product 7 2. Scope of delivery 8 3. Specifications 8 4. Safety precautions 8 5. Explanation of symbols 9 6. Operating instructions 9 6.1 Overview 9 6.2 Inserting the cable holder 10 6.3 Preparation 10 6.4 Connecting the battery charger 10 6.5 Charging the battery 10 6.6 Removing the charger 10 7. Maintenance and care 11 7.
2. Scope of delivery • 1x Battery charger • 1 x Operating instructions • 4 x Cable holders 3. Specifications Dimensions: 145 x 90 x 170 [mm] Weight: 1.710 kg Long of mains cable: 1.70 m Long charger cable: 1.40 m Input: 220-240 V AC 50/60 Hz Output: 12 V mode: 4 V, (6 A RMS), DC Battery capacity: 20 – 110 Ah Ambient temperature: -5 °C to +40 °C 4.
• To remove the battery charger, first pull the plug out of the socket and observe the sequence for disconnection. This prevents sparks from forming. Since charging generates a detonating gas, this is particularly important for the sake of your safety. • Only hold the power cable at the power plug when disconnecting from the power socket. • Never expose the charger to the vicinity of fire, heat and extensive temperatures over +40°C.
6.2 Inserting the cable holder Insert the cable holder into the mounts (Position 6 in the overview) on the rear of the charger so that the openings of the vertically aligned cable holders face away from each other. 6.3 Preparation Clean the battery poles to remove dust and corrosion residue. Only for open batteries: Remove the plugs of the battery cells. Check the liquid level in the cells, consult the operating instructions of your battery for more information.
7. Maintenance and care 7.1 Maintenance The battery charger is maintenance-free when used in accordance with the intended purpose. 7.2 Care Clean the pole callipers every time the charging procedure is completed. Remove all splashed battery acid from the pole callipers to prevent corrosion. Clean the device carefully with a dry cloth. Do not use liquids or chemical cleaning agents. Never submerge the device in liquid. Never allow liquid to flow over the device.
FR Chargeur de batterie automatique 12 V, 6 A N° d‘art. 16627 Sommaire Page 1. Domaine d‘application 12 2. Contenu de la fourniture 13 3. Spécifications 13 4. Consignes de sécurité 13 5. Explication des symboles 14 6. Mode d‘emploi 14 6.1 Vue d‘ensemble 15 6.2 Placement du support de câble 15 6.3 Préparation 15 6.4 Raccordement du chargeur de batterie 15 6.5 Chargement de la batterie 16 6.
disposant pas de l‘expérience ou des connaissances nécessaires. Les enfants doivent rester à distance de cet article. L‘article n‘est pas destiné à une utilisation industrielle ou commerciale. L‘utilisation conforme aux prescriptions implique également le respect de toutes les informations contenues dans ce mode d‘emploi, en particulier le respect des consignes de sécurité. Toute autre utilisation est considérée comme non conforme et peut entraîner des dommages matériels ou des blessures.
• Entreposez l‘appareil de recharge dans un endroit hors d‘atteinte d‘enfants et de personnes non-autorisées. • N‘employez pas l‘appareil à proximité de matériel inflammable ou dans un environnement explosible. • Portez toujours des vêtements de travails, gants de protection et lunettes de protection adaptés. L‘acide • de batterie est corrosif ! Le cas échéant, rincez immédiatement avec beaucoup d‘eau, consulter un médecin si besoin.
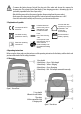
6.1 Vue d‘ensemble 1 Poignée 2 Lampe de contrôle - verte - chargée complètement 3 Lampe de contrôle - jaune - en cours de chargement 4 Lampe de contrôle - verte - en fonctionnement 5 Lampe de contrôle - rouge - pince crocodile mal branchée Illustration 1 : Vue avant 9 Possibilité de suspension 10 Consignes de sécurité 11 Plaque synoptique Illustration 2 : Vue arrière 6.
6.5 Chargement de la batterie Branchez maintenant le cordon de secteur (position 8 dans l‘aperçu) de l‘appareil de recharge de la batterie dans la prise. À présent, la lampe de contrôle verte « MARCHE » (position 4 dans l‘aperçu) et la lampe de contrôle jaune « CHARGE » (position 3 dans l‘aperçu) s‘illuminent. La batterie est en cours de chargement. Lorsque la batterie est complètement chargée, l‘appareil de recharge bascule en mode charge d‘entretien.
NL Automatische acculader 12V, 6 A Inhoud Pagina 1. Reglementair gebruik 17 2. Leveringsomvang 18 3. Specificaties 18 4. Veiligheidsinstructies 18 5. Uitleg bij de symbolen 19 6. Gebruiksaanwijzing 19 6.1 Overzicht 20 6.2 De kabelhouder plaatsen 20 6.3 Voorbereiding 20 6.4 De acculader aansluiten 20 6.5 De accu opladen 21 6.6 De oplader verwijderen 21 7. Onderhoud en verzorging 21 7.1 Onderhoud 21 7.
Tot het reglementair gebruik behoort ook de inachtneming van alle informatie in deze handleiding, vooral de in achtneming van de veiligheidsvoorschriften. Elk ander gebruik geldt als niet-reglementair en kan materiële schade of persoonlijk letsel veroorzaken. EAL GmbH is niet aansprakelijk voor schade als gevolg van niet-reglementair gebruik. 2. Leveringsomvang • 1 x acculader • 4 x kabelhouder 3.
• • • • • • • • • • Bewaar de oplader op een voor kinderen en onbevoegde personen onbereikbare plaats. Gebruik het apparaat niet in de buurt van brandbaar materiaal of in een omgeving met explosiegevaar. Draag altijd geschikte werkkleding, veiligheidshandschoenen en oogbescherming. Accuzuur is bijtend! Eventuele zuurspatten onmiddellijk grondig met veel water afspoelen, eventueel een arts raadplegen.
6.1 Overzicht 1 Draaggreep 2 Controlelampje – groen - volledig opgeladen 3 Controlelampje – geel - laadproces in werking 4 Controlelampje – groen - apparaat in werking 5 Controlelampje – rood - pooltangen verkeerd om aangesloten Afbeelding 1: voorzijde 1 Draaggreep 6 Opnamen voor kabelhouder 7 Typeplaatje 8 Stroomkabel 9 Laadabel Afbeelding 2: achterzijde 6.
6.5 De accu opladen Steek nu het netsnoer (positie 8 in het overzicht) van de oplader in het stopcontact. Nu gaat het groene controlelampje „AAN“ (positie 4 in het overzicht) en het gele lampje „LADEN“ (positie 3 in het overzicht) branden. De accu wordt geladen. Wanneer de accu volledig is opgeladen, schakelt de acculader over naar de onderhoudsmodus. Het groene controlelampje „VOL“ (positie 2 in het overzicht) gaat branden. 6.
IT Caricabatterie automatico 12 V, 6 A Cod. art. 16627 Indice Pagina 1. Uso conforme 22 2. Volume di consegna 23 3. Specifiche 23 4. Avvertenze di sicurezza 23 5. Spiegazione dei simboli 24 6. Istruzioni per l‘uso 24 6.1 Panoramica 24 6.2 Applicazione dei portacavi 25 6.3 Preparazione 25 6.4 Collegamento del caricabatterie 25 6.5 Ricarica della batteria 25 6.6 Rimozione del caricabatterie 26 7.
2. Volume di consegna • 1x Caricabatterie • 4 x portacavi 3. Specifiche Dimensioni: Peso: Lunghezza del cavo di alimentazione: Lunghezza del cavo di carica: Ingresso: Uscita: Capacità della batteria: Temperatura ambiente: • 1x Istruzioni per l‘uso • 1 cavo di carica per adattatore con terminali ad anello 145 x 90 x 170 [mm] 1,710 kg 1,70 m 1,40 m 220-240 V AC 50/60 Hz 12 V, 4 A (6 A RMS), DC 20 – 110 Ah da -5 °C a +40 °C 4.
polistirolo): pericolo di accumulo di calore! • Se si carica una batteria montata, parcheggiare il veicolo in sicurezza, tirare il freno a mano e disinserire l‘accensione. Staccare la batteria dalla rete di bordo del veicolo. Leggere il manuale di istruzioni del veicolo o rivolgersi a un‘officina specializzata. • Questo dispositivo offre la possibilità di caricare la batteria senza bisogno di staccarla dalla rete di bordo.
1 Maniglia di trasporto 6 Vano per portacavi 7 Targhetta 8 Cavo di alimentazione 9 Cavo di ricarica Figura 2: Vista della parte posteriore 6.2 Applicazione dei portacavi Inserire i portacavi negli appositi vani (pos. 6 dello schema) sul retro del caricabatterie, in modo che le aperture dei portacavi sovrapposti siano rivolti verso lati opposti. 6.3 Preparazione Pulire il polo della batteria rimuovendo polvere e residui di corrosione. Solo per le batterie a vaso aperto: rimuovere i tappi delle celle.
6.6 Rimozione del caricabatterie Attenzione: scollegare prima la spina dalla presa e rispettare la sequenza indicata per il distacco dei morsetti. In questo modo si evita la formazione di scintille. Questo è molto importante per la sicurezza, poiché durante la carica si formano dei gas esplosivi. Scollegare il caricabatterie dalla rete di alimentazione. Staccare prima il morsetto nero (negativo). Quindi staccare il morsetto del polo positivo della batteria (rosso). Far raffreddare la batteria.
EAL GmbH Otto-Hausmann-Ring 107 42115 Wuppertal, Deutschland 28 +49 (0)202 42 92 83 0 +49 (0) 202 42 92 83 – 160 info@eal-vertrieb.com www.eal-vertrieb.com © EAL GmbH, 16627, 02.