
Instructions / Assembly

COPY RIGHT APEC, 2012 Re-order filters at: FreeDrinkingWater.com 1-800-880-4808
APEC R.O. System Filter Change Instruction
Changing Stages 1, 2, 3 Pre-Filters: (should be changed at least every 12 months)
1) Turn OFF cold water supply to RO system. Turn OFF the tank ball valve. Lift up RO faucet lever briefly to relief the built-up
pressure inside the RO system. This will make opening the housings easier.
2) Open housing: Have the RO standing upright. Slip the plastic wrench onto the #1 housing. Looking down from a top view,
you should open the housing turning clockwise. If necessary, lay RO down on the floor to get a better leverage. If the
housing is too tight, use a hammer and tap on the wrench handle to help turn the wrench.
3) Discard 3 used filters, wash housings with mild soap, rinse off. Put 3 new filters into their respective housings: sediment
filter in stage-1, carbon block filters in stages 2 & 3.
4) Close up the housings. Make sure each housing has a black O-ring in the thread groves. Use wrench to tighten each
housing.
5) Remember: Turn ON the cold water supply and OPEN the tank valve after finished changing filters!
6) Check for leaks!
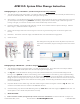
STEP 2
Use
Wr
ench
3rd
Stage
2nd
Stage
1st
Stage
STEP 1
After Taking the housing off, take out the dirty filters and put the new
3 pre-filters in. Remember, Stage 2 and Stage 3 are the same carbon
filters.
Fig.A
Changing Stage-4 Membrane: (should be changed every 3-5 years)
1) Turn OFF the cold water supply to RO system. Turn OFF the tank ball-valve. Lift up RO faucet lever briefly to relief the
built-up pressure inside the RO system. This will make opening the housings easier.
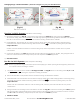
2) See Fig. B1. Locate the Membrane housing on the system (labeled “Membrane”). Remove the RED tubing from the
housing’s cap at point D. For Quick Connect fitting, push In and hold down on the collet ring square against the fitting.
With the collet held in this position the tube can be removed. For threaded fitting, unscrew the plastic nut (not the L-shape
fitting) and pull out tubing. Open up the cap (turn counter-clockwise). Remove the used membrane. Discard. Insert the new
membrane using a pair of pliers. Push membrane into housing tightly. Avoid touching the Membrane with your hands to
prevent contamination!
3) Important! Make sure the “double-ring” end of the membrane goes into the housing first as shown in Fig. A. above. The
membrane cannot filter water if it’s inserted in the WRONG direction!
4) Close the housing cap. Reconnect the RED tubing to the cap. Turn on the cold water supply and open the tank valve. Let
the RO system run to re-fill the tank (takes about 2-3 hours).
5) Check for leaks!
6) Drain two tanks of water (through faucet) to flush out the new membrane! The 3rd tank of water is ready for use.