
User`s guide


User’s Guide
Wireless Remote Mouse
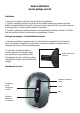
Installation
1- Plug the Micro receiver into a USB port of your computer.
2- Open the battery door and install battery, this mouse can operate with single battery, install two
battery can double the use time. turn on the mouse, a RED battery icon on the left side of mouse
will light On and flash 10s.
3- Install Software to take all advantage of your mouse. Insert the CD into your computer’s CD-ROM
drive and follow on-screen instructions.
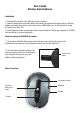
Receiver storage and ON/OFF the mouse
1- You can store the Micro Receiver by push it into the mouse. Ejecting the receiver will
automatically turn mouse on, and storing the receiver will shut the mouse off.
2- The Low battery indicator will flash 10s
when the mouse is turned on. If the battery
icon keep flash during your using, the
battery need to be replaced.
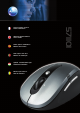
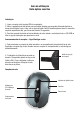
Mouse Functions
Low battery Indicator
Backward
Forward
CPI select /
Mode select
button
Tilt Wheel
Receiver eject
button