Setting Up Your Studio Display 15-inch flat panel monitor
K Apple Computer, Inc. © 1999 Apple Computer, Inc. All rights reserved. Under the copyright laws, this manual may not be copied, in whole or in part, without the written consent of Apple. Your rights to the software are governed by the accompanying software license agreement. The Apple logo is a trademark of Apple Computer, Inc., registered in the U.S. and other countries.
Contents 1 About Your Apple Studio Display 5 Important Safety Instructions 5 Setting Up Your Display 6 What’s Next 10 Finding Answers 12 2 Installing the Apple Displays Software 13 About Your Apple Displays Software 14 Adjusting the Display 14 3 Troubleshooting 15 4 Using Your Display Stands 19 Storing the Keyboard 22 Changing the Display Stand 22 5 Safety, Health, and Maintenance 27 Healthy Use of Your Computer Equipment 28 General Maintenance 29 Protecting Your Display From Theft 30 Do You
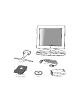
Flip-out stand Power cord Manual and service and support materials Software Power adapter
C H A P T E R 1 1 About Your Apple Studio Display Important Safety Instructions m Turn off the computer before setting up your Apple Studio Display. Leave the computer plugged into a grounded outlet. The only way to disconnect the monitor’s power completely is to unplug the power cord from the computer or electrical outlet. Make sure at least one end of the power cord is within easy reach so that you can unplug the display if you need to. Important m Don’t press or put hard objects against the screen.
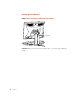
Setting Up Your Display Step 1: Place the display cable in the cable guide. Cable guide Important display.
Step 2: Plug in the display’s power adapter. Plug the power adapter cord into a grounded wall outlet or power strip. (Some cords may connect to the power socket in the back of your computer.) Plug the display’s power cable into the power adapter.
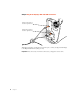
Step 3: Plug In the display’s DVI and USB connectors. Plug the USB connector into the computer here. Plug the DVI connector into the computer here. Although your graphics card may have two monitor ports, connect your Apple Studio Display to the Digital Visual Interface (DVI) port only. Important 8 Chapter 1 You can use only one monitor connected to your graphics card at a time.
Step 4: Connect a USB keyboard to the display, if desired. Connect your USB keyboard here.
Step 5: Press the monitor power button. Both your computer and your monitor start up. After a few moments, the Macintosh desktop appears on the screen. If nothing appears or you see other problems, see Chapter 3, “Troubleshooting,” for more information. How Do I Turn Off the Display? Your monitor power button shuts down or puts to sleep both your monitor and computer at the same time. Press the monitor power button again to start up or wake the monitor and computer.
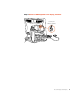
¤ ® Power indicator light ® Power button ¤ Brightness controls Keyboard storage pads Carrying handle USB port cover Desktop stand Power adapter Security ring DVI connector USB connector About Your Apple Studio Display 11
Finding Answers When you have questions about your display, there are several places to look for answers. In this manual Use this manual to find out how to set up your display, install the software, and find solutions to common problems. In Mac Help If you need help using the Apple Displays Software or adjusting the display, open the Help menu and choose Mac Help. Type the topic you want information about and click Search, or use the table of contents to find your topic.
C H A P T E R 2 2 Installing the Apple Displays Software To install the Apple Displays Software, follow these steps: 1 Insert the Apple Displays Software CD into your computer’s CD-ROM drive. The CD icon appears on the desktop. Make sure that you install the software from the Apple Displays Software CD that came with your monitor. Important 2 Double-click the CD icon. The Apple Displays Software window opens. 3 Double-click the folder that contains the language you want to use.
About Your Apple Displays Software The Apple Displays Software is a set of files that let you adjust basic picture and color settings. m The Monitors control panel lets you change the way your computer displays images. The Monitors control panel is located in the Control Panels folder in the Apple (K) menu. For help using the Monitors control panel, open the Help menu and choose Show Balloons. For more information, see Mac Help. m The Sound control panel lets you change the way your computer processes sound.
C H A P T E R 3 3 Troubleshooting Check this section for solutions to problems you might experience with your display. Warning If you have a problem with your display and nothing presented in this manual solves it, consult the service and support information that came with your display for instructions on how to contact an Apple-authorized service provider or Apple for assistance.
m Make sure the brightness is set properly. The brightness control (marked by ¤) is under the right front edge of the display. During installation of the Apple Displays Software, a message appears, “This version of system software is not supported by the Apple Displays Software.” m Make sure you’re using the latest version of the Mac OS. m If this message appears in the Apple Displays Software Installer, make sure you select the startup hard disk in the Installation dialog box.
The name of your display doesn’t appear in the title bar of the Monitors control panel. m Make sure you’ve installed the Apple Displays Software that came with your display. For installation instructions, see Chapter 2, “Installing the Apple Displays Software.” Changes in the Monitors control panel don’t appear on the display. m Each display connected to your computer has its own Monitors control panel. Use the control panel with the name of your display in the window’s title bar.
C H A P T E R 4 4 Using Your Display Stands You can use your display with two different stands. m You can use the desktop stand to connect your display to a Power Macintosh computer.
m You can use the flip-out stand if you want the display to be more portable, such as when you are giving presentations. Positioning the Display If you’re using the flip-out stand, move the display on the desk or table until you can see the screen clearly; there are no height adjustments. If you’re using the display with the desktop stand, you can adjust it for your greatest comfort. Before you adjust the display, make sure there is enough slack in the cables.
2 Adjust the height of the display by pulling up or pushing down on the display. 3 Adjust the viewing angle of the monitor by tilting it up or down and turning it left or right on the desktop stand.
Storing the Keyboard When the display is attached to the desktop stand, you can store the keyboard on the keyboard holders, small rubber indentations on the desktop stand. Keyboard storage pads Changing the Display Stand You can use the display with the desktop stand or with the smaller flip-out stand. Removing the Desktop Stand 1 Place a towel or cloth on a clean, flat surface to protect the display once it’s removed from the stand.
8 Remove any cables from the cable guide on the desktop stand. 9 Use a coin or flathead screwdriver to unscrew the two plastic thumbscrews on the back cover of the display. Plastic thumbscrews 10 Pull the display slightly up and away from the stand. Warning The desktop stand will automatically rise to its highest position, if it’s not already at its maximum height. Be careful not to drop the display. 11 Place the display on a clean, flat surface. 12 Store the stand in a safe place.
Attaching the Desktop Stand 1 If necessary, remove the flip-out stand. For instructions, see “Removing the Flip-Out Stand” on page 25. 2 Lift the display up and hook the three plastic tabs on the top of the desktop stand into the three openings on the back center area of the display. First, hook the display onto the desktop stand. Then tighten the thumbscrews. 3 Screw in the two plastic thumbscrews on the bottom of the cover. Use a coin or flathead screwdriver to tighten the screws.
Attaching the Flip-Out Stand 1 If necessary, remove the desktop stand. For instructions, see “Removing the Desktop Stand” on page 22. 2 Hook the three plastic tabs on the top cover of the flip-out stand into the three openings on the back center area of the display. First, hook the flip-out stand onto the back of the display. Then, tighten the thumbscrews. 3 Place the bottom part of the cover against the display and screw in the two plastic thumbscrews.
4 Unplug the power cord from the power adapter. 5 If necessary, remove the locking cable from the security slot on the back of the display. 6 Unplug the monitor’s DVI and USB cables from the computer. 7 Unplug any USB cables that are attached to the USB ports on the monitor. 8 Use a coin or flathead screwdriver to unscrew the two plastic thumbscrews connecting the flip-out stand to the display.
C H A P T E R 5 5 Safety, Health, and Maintenance Disconnect the power plug (by pulling the plug, not the cord) if any of the following conditions exists: m The power cord or plug becomes frayed or otherwise damaged. m You spill something into the case. m Your display is exposed to rain or any other excess moisture. m Your display has been dropped or the case has been otherwise damaged. m You suspect that your display needs service or repair. m You want to clean the case or screen.
Healthy Use of Your Computer Equipment Use the following illustration to help you in positioning your monitor. 45–70 cm (18–28 in.
m Position the monitor to minimize glare and reflections on the screen from overhead lights and windows. Tilt the monitor to the best angle for viewing, helping to reduce or eliminate glare from lighting sources you can’t move. m Adjust the brightness of the screen to ensure the best image quality and viewing comfort. For more health and safety information about your computer equipment, choose Mac Help from the Help menu in the Finder. You can also see the following (English only) World Wide Web site: m www.
Protecting Your Display From Theft The back of the display has a built-in slot for connecting a security lock. This lets you attach a narrow, flexible cable that you can use to secure your display to prevent theft. Your monitor cable also has a security ring that you can use to secure your monitor. Security locks are available from an Apple-authorized dealer or computer retailer. F Security slot Follow the instructions that came with the locking cable to secure it to your display.
Conserving Energy You can use the Energy Saver control panel to set your monitor to conserve energy after a specified period of inactivity. When Energy Saver detects that you’re not using the computer, it darkens the monitor screen and reduces the amount of energy it consumes. To wake up the monitor, press any key on the keyboard. For more information about using Energy Saver, choose Mac Help or Mac OS Help from the Help menu in the Finder.
A P P E N D I X Technical Information General Specifications Screen m 15.1-inch (38.4 centimeters) viewable diagonal image, 307 millimeters (mm) horizontal x 230 mm vertical m 1024 horizontal x 768 vertical active pixels m Color depth: 8 bit/color, 24 bit Desktop Stand m Tilt adjustment: –10 degrees downward and +45 degrees upward m Swivel adjustment: ±45 degrees m Height adjustment: 4.
For instructions on adjusting the system and display sleep settings and additional energyconservation information, see Mac Help. m TCO/NUTEK: This product has been certified by TCO (the Swedish Confederation of Professional Employees) to meet the standards for ergonomics, energy efficiency (NUTEK), emissions, and ecology. m MPR II: This product meets the strict limits for reduced electromagnetic and electrostatic emissions.
Humidity (Noncondensing) m Operating: 20% to 80% m Storage (up to 6 months): 20% to 80% m Shipping (up to 72 hours): 20% to 80% Altitude m Operating: 0 to 10,000 feet (0 to 3,030 meters) m Shipping: 0 to 35,000 feet (0 to 10,606 meters) Active Video Image Area The recommended resolution for your monitor is 1024 x 768. You can choose other standard resolutions that are scaled to fit your monitor’s screen size.
Display Cable Specifications m DVI digital-only connector The digital-only connector contains 24 signal contacts organized in three rows of 8 contacts.
Communications Regulation Information FCC Statement This equipment has been tested and found to comply with the limits for a Class B digital device in accordance with the specifications in Part 15 of FCC rules. See instructions if interference to radio or television reception is suspected. Radio and Television Interference The equipment described in this manual generates, uses, and can radiate radio-frequency energy.