
Food Warmer User Manual
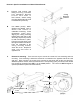

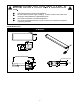

A. Remove food warmer and
ceiling mounting brackets
from packaging. Remove
screws from ends of
food warmer; attach ceiling
mounting bracket at both ends
of food warmer (as shown).
Ceiling
Mounting
Bracket
B. Use 88993 (screw), 89071
(washer), and 89062 (nut) to
attach food warmer to
underside of shelving. Place
foodwarmer under shelf,
aligning the ceiling mounting
bracket holes with that of the
shelf. May require two persons
to hold food warmer in place.
From the top of the shelf, push
through the washer and screw.
From the underside of the
ceiling mounting bracket,
screw the nut on. Repeat for
other hole and holes at
opposite end.
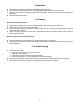
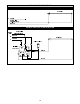
C Remote kit mounting
OFF north NOT
. . There are two ways to mount the remote kit, front mounting and rear
mounting. Front mounting is where the remote kit is mounted on the opposite side of the cord
and plug. Rear mounting, the remote kit is mounted on the same side as the cord and plug.
Whatever position chosen, when the food warmer is not operating (OFF), the knob on the remote
box should be oriented where is in the position. The control is designed to
operate upside down. (Mount as shown below)
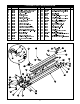
Domino's Specific Installations on Metro® Route Stands:
W
S
E
N
Front
Mounting
Rear
Mounting
Detail A
4” Minimum
4