
Food Warmer User Manual
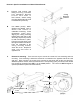

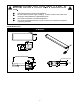
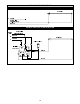

1. Use 88904 (screw), 89056 (washer), and 88921 (nut) to mount bracket. Place bracket (70402017)
around shelving pole on the inner side of the shelving unit. Screw bracket (70402018) to bracket
(70402017) around shelving pole on the outer side of the shelving unit. The bracket will allow the
remote box inner side to align with the front side of the food warmer
Do not tighten.
May have to
adjust height of
bracket in order
to mount remote.
Tighten, will not
be accessible
once remote box
is on.
Bracket (70402017)
always point to the inside
of the shelving unit
Bracket
70402018
2. Remove screw and washer from remote box. Align the holes of the remote box with those of bracket
70402017. Screw the remote box to bracket 70402017. Once remote box is mounted to bracket,
adjust height of the bracket so that the top of the remote box is even with or underneath the bottom of
the side shields on the shelving unit ( between the bottom of heat strip and top of
remote box) and tighten screws.
min. distance 4"
Now, tighten
screws.
Bracket
70402017
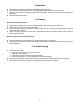
D. Repeat steps A through C for other food warmers and shelving combination.
E. Illustration of a complete Food warmer
And Metro® Route stand unit
5