
Installation Guide


3
INSTALLATION INSTRUCTIONS
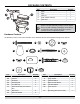
1. Install Floor Bolts
NOTE: Inspect existing oor ange for damage. If it
is damaged, replace the ange before proceeding.
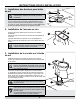
Insert oor ange bolts (AA) into the toilet ange (not included)
with bolt heads down and threaded ends facing up. (Bolts
should be parallel to wall and 6 in. apart). Then, hand-tighten
the bowl nuts (BB) onto the oor ange bolts (AA) to secure.
Floor
Flange
AA
BB
BB
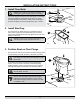
2. Install Wax Ring
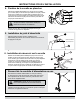
Turn toilet bowl (A) upside down onto a cushioned surface.
Place wax ring (OO) over the raised outlet ring of the bowl.
Press rmly and slightly twist wax ring against bowl so the wax
adheres to the bowl.
NOTE: If wax ring has an integral plastic ange, be
sure ange taper points away from the toilet.
A
OO
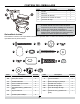
3. Position Bowl on Floor Flange
Gently lower the bowl (A) into position with the oor ange bolts
(AA) protruding up through the holes in the base of the bowl.
NOTE: Keep the bowl level as it is lowered onto the
oor ange. You may need a second person to help
lift the bowl.
Once bowl is in position, press down with a slight twisting
motion on the top center of the bowl, eventually applying
full body weight to evenly compress the wax ring to create a
watertight seal. Make sure the bowl is as level as possible.
CAUTION: Do not rock the bowl back and forth as
this may break the seal.
TIP: It may be necessary to use small wedges
(shims) under the edge of the bowl due to slight
variations in vitreous chinaware or uneven oors.
Bowl should be rmly seated on the oor so it does
not wobble or rock.
Floor
Flange
AA
A