
Installation Guide


4
INSTALLATION INSTRUCTIONS
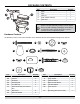
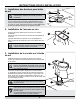
4. Secure Bowl to Floor
Place the bevel discs (CC) and bowl wing nuts (DD) onto the
oor ange bolts (AA). Alternately tighten bowl wing nuts (DD)
until toilet (A) is rmly seated on oor. Place the oor bolt caps
(EE) over the oor ange bolts (AA) and snap into place.
CAUTION: Do not overtighten small nuts because
vitreous china can easily crack or chip.
Pour water into bowl to prevent the escape of sewer gases.
AA
CC
DD
EE
A
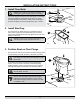
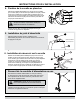
5. Install Tank-to-bowl Seal
Turn the tank (B) upside down, and press the tank-to-bowl seal
(FF) into place over the tank lower opening.
6.
Unscrew the metal at washers (HH) and wing nuts (II) from
the tank screws (GG). Lower the tank (B) onto the bowl (A)
and let the tank screws (GG) protrude through the mounting
holes on bowl (A). From the underside of bowl (A), thread metal
at washers (HH) and wing nuts (II) onto the protruding tank
screws (GG). Tighten the wing nuts (II) alternatively untill the
tank (B) is evenly seated on the bowl (A).
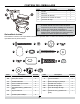
7. Attach Water Supply Line
Connect the water supply line (not included) to the tank (B) and
shut-off valve. Tighten the tank connection coupling nut 1/4 turn
beyond hand tight.
CAUTION:Do not overtighten the tank connection
nut.
Turn on supply valve and allow tank to ll. Check for leaks at all
connections and tighten or correct as needed.
FF
GG
II
HH
6. Install Tank on The Bowl
B