
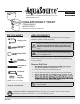
Installation Guide


5
INSTALLATION INSTRUCTIONS
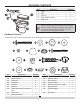
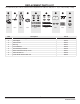
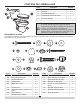
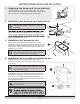
9. Install Seat
Place seat (E) on bowl (A), centering the hinges over the holes
in the bowl. Open the hinge covers, insert plastic seat bolts (KK)
into hinge holes and adjust the toilet seat and lid to nd the best
assembly position. Finally, place the at seat washers (MM)
onto plastic seat bolts (KK) from underneath the bowl (A). Use a
screwdriver to secure seat lock nuts (LL). Close hinge covers.
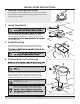
9. Side Note 1:Install Flush Handle Assembly
Remove the handle nut (QQ),at ring washer (PP) and square
washer (OO) from the ush handle assembly (D) and insert the
ush handle assembly (D) through the hole on the side of tank
(B). Replace the square washer (OO), at ring washer (PP) and
handle nut (QQ), then hand tighten to secure the ush handle
assembly (D) to the tank (B). Do not overtighten.
The ush handle assembly (D) has been installed at the factory.
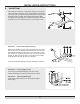
Side Note 2:Connect Flapper Chain
Connect the preassembled flapper chain to the flush
handle assembly (D), ensuring a small amount of slack.
Side Note 3: Take Off Rubber Band
Take off the rubber band from the flush valve & flapper
before using.
E
KK
MM
LL
OO PP QQ
B