
Replacement Part List
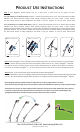

Step 1: (see diagrams below)
For 3/4" (19mm) wand attach one layer of remove film from back of one 2"x 5" Velcro® loop piece and place
adhesive side around pressure washer wand starting 2"(50mm) above the spray nozzle / quick connect.
For best results attach at room temperature and allow 1 hour for adhesive to cure for most secure bond.
For 1/2"(12.5mm)
the second (2"x 5") piece and attach the adhesive side to the first piece of
. This will create a double layer around the wand that is bonded together (see diagram below).
Attach only on a wand that is clean and free of grease and dirt.
Velcro® -
wand attach double layer of Velcro® - remove film from back of one 2"x 5" Velcro® piece and place
adhesive side around pressure washer wand starting 2"(50mm) above the spray nozzle / quick connect.
Remove the film from back of Velcro® Velcro®
previously attached
For best results attach at room temperature and allow 1 hour for adhesive to cure for most secure bond.
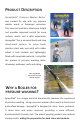
PRODUCT USE INSTRUCTIONS
1 1
two layers of Velcro® one layer of Velcro®
GAS ½” (12.7mm)
Electric
3/4” (19mm)
or
TM
Step 3: Attach 1"x 6" hook and loop straps around both the wand and Sprayglide .
We recommended you start this wrapping procedure by attaching the strap to the loop material adhered to the wand
TM
in step 1. This will provide stronger grip when you pull to secure tightly around the wand and Sprayglide together.
TM
Step 2: Attach Sprayglide to the underside of the wand (gun trigger side). For first time mounting, the recommended
TM
position is close to the spray nozzle (end of the wand closest to surface when in use ). When Sprayglide is attached,
test distance of spray to surface for your pressure washer and desired results. Remove and re-attach as necessary,
TM
the further up the wand Sprayglide is - the closer the spray will be to the surface. See note and diagrams below.
Note: Sprayglide attachment method allows for adjustment of the spray height relative to 3 criteria:
1) the operators physical height; 2) the pressure washers power (PSI, GPM & nozzle selection); and 3) spray wand length.
The distance from surface can also be adjusted while in operation: Tilt (pivot) the wand upward when closer distance
is required; tilt (pivot) the wand downward when further distance is required. Invert the wand 180 degrees with
Sprayglide attached when controlled extremely close proximity of the spray is required.
3
2
© Copyright 2011 Kirkvision Group
See instructional videos at www.sprayglide.com