300 UTILITY DVX 300 ! WARNING UNDER 16 Operating this ATV if you are under the age of 16 increases your chance of severe injury or death. NEVER operate this ATV if you are under 16. Do not remove this Operator’s Manual from this ATV according to the guidelines and agreement with the U.S. Consumer Product Safety Commission. Read this manual carefully. It contains important safety information.
Your ATV can be hazardous to operate. A collision or rollover can occur quickly, even during routine maneuvers such as turning and driving on hills or over obstacles, if you fail to take proper precautions. FAILURE TO FOLLOW THE WARNINGS CONTAINED IN THIS MANUAL CAN RESULT IN SERIOUS INJURY OR DEATH. For your safety, it is important to understand and follow all of the warnings contained in this Operator’s Manual and the labels on your ATV prior to riding.
Foreword Congratulations and thank you from Arctic Cat Inc. for purchasing an ARCTIC CAT® All-Terrain Vehicle (ATV). Built with American engineering and manufacturing know-how, it is designed to provide superior ride, comfort, utility, and dependable service. You have chosen a quality Arctic Cat ATV designed and assembled to give dependable service. Be sure, as the owner/operator of an Arctic Cat ATV, to become thoroughly familiar with its basic operation, maintenance, and storage procedures.
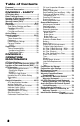
Table of Contents Foreword .................................................. 1 Parts and Accessories............................ 1 DIVISION I - SAFETY ATV Safety Alert ...................................... 4 Rider Training Course ............................. 5 Hangtag & Warning Information ............ 6 Warning Labels (Utility) .......................... 7 Warning Labels (DVX) ............................. 8 Warnings ............................................. 9-16 Prevention.........................
DIVISION I - SAFETY An ATV Is Not A Toy And Can Be Hazardous To Operate. • Always go slowly and be extra careful when operating on unfamiliar terrain. Always be alert to changing terrain conditions when operating the ATV. • Never operate on excessively rough, slippery, or loose terrain. • Always follow proper procedures for turning as described in this manual. Practice turning at slow speeds before attempting to turn at faster speeds. Do not turn at excessive speed.
ATV Safety Alert The Consumer Product Safety Commission has concluded that ALL-TERRAIN VEHICLES (ATV’s) may present a risk of DEATH or SEVERE INJURY in certain circumstances. Accidents may occur for many reasons: *** Over 2497 people, including many children, have died in accidents associated with ATV’s since 2006. *** Many people have become severely paralyzed or suffered severe internal injuries as a result of accidents associated with ATV’s.
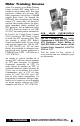
Rider Training Course Arctic Cat sponsors a free Rider Training Course to teach ATV riding skills or to reinforce current riding skills. First-time purchasers without any previous ATV riding experience will receive a $100.00 coupon from Arctic Cat through the SVIA/ASI after completing the training course (U.S. owners only, one incentive, and free rider training courses for appropriate immediate family members per ATV purchase).
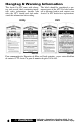
Hangtag & Warning Information This Arctic Cat ATV comes with a hangtag and several labels containing important safety information. Anyone who rides the ATV should read and understand this information before riding. The labels should be considered as permanent parts of the ATV. If a label comes off or becomes hard to read, contact your Arctic Cat ATV dealer for a replacement.
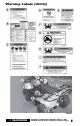
Warning Labels (Utility) KM152C ! WARNING Indicates a hazardous situation which, if not avoided, could result in death or serious injury.
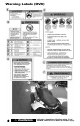
Warning Labels (DVX) KM169E 8 ! WARNING Indicates a hazardous situation which, if not avoided, could result in death or serious injury.
Warnings ! WARNING POTENTIAL HAZARD Operating this ATV without proper instruction. WHAT CAN HAPPEN The risk of an accident is greatly increased if the operator does not know how to operate the ATV properly in different situations and on different types of terrain. HOW TO AVOID THE HAZARD Beginning and inexperienced operators should complete the certified training course offered.
Warnings ! WARNING POTENTIAL HAZARD Operating this ATV on paved surfaces. WHAT CAN HAPPEN The ATV’s tires are designed for off-road use only, not for use on pavement. Paved surfaces may seriously affect handling and control of the ATV and may cause the ATV to go out of control. HOW TO AVOID THE HAZARD Never operate the ATV on any paved surfaces, including sidewalks, driveways, parking lots, and streets.
Warnings ! WARNING POTENTIAL HAZARD Operating this ATV after or while consuming alcohol or drugs. WHAT CAN HAPPEN Could seriously affect your judgment. Could cause you to react more slowly. Could affect your balance and perception. Could result in an accident. HOW TO AVOID THE HAZARD Never consume alcohol or drugs before or while driving this ATV. ! WARNING POTENTIAL HAZARD Operating this ATV at excessive speeds.
Warnings ! WARNING POTENTIAL HAZARD Removing hands from handlebars or feet from footrests during operation. WHAT CAN HAPPEN Removing even one hand or foot can reduce your ability to control the ATV or could cause you to lose your balance and fall off the ATV. If you remove a foot from a footrest, your foot or leg may come into contact with the wheels, which could injure you or cause an accident.
Warnings ! WARNING POTENTIAL HAZARD Climbing hills improperly. WHAT CAN HAPPEN Could cause loss of control or cause the ATV to overturn. HOW TO AVOID THE HAZARD Always follow proper procedures for climbing hills as described in this Operator’s Manual. Always check the terrain carefully before you start up any hill. Never climb hills with slippery or loose surfaces. Shift your weight forward. Never open the throttle suddenly or make sudden gear changes. The ATV could flip over backwards.
Warnings ! WARNING POTENTIAL HAZARD Improperly crossing hills or turning on hills. WHAT CAN HAPPEN Could cause loss of control or cause the ATV to overturn. HOW TO AVOID THE HAZARD Never attempt to turn the ATV around on any hill until you have mastered the turning technique as described in this Operator’s Manual. Practice first on level ground. Be very careful when turning on any hill. Avoid crossing the side of a steep hill, if possible.
Warnings ! WARNING POTENTIAL HAZARD Skidding or sliding. WHAT CAN HAPPEN You may lose control of the ATV. You may also regain traction unexpectedly, which may cause the ATV to overturn. HOW TO AVOID THE HAZARD Learn to safely control skidding or sliding by practicing at slow speeds and on level, smooth terrain. On extremely slippery surfaces, such as ice, go slowly and be very cautious in order to reduce the chance of skidding or sliding out of control.
Warnings ! WARNING POTENTIAL HAZARD Operating the ATV with improper tires or with improper or uneven tire pressure. WHAT CAN HAPPEN Use of improper tires on the ATV, or operation of the ATV with improper or uneven tire pressure, may cause loss of control increasing your risk of accident. HOW TO AVOID THE HAZARD Always use the size and type tires specified in this Operator’s Manual for this ATV. Always maintain proper tire pressure as described in this Operator’s Manual.
Prevention Overview When using an ATV, prevention is the name of the game. “Had you only known” something could go wrong, you would have prevented it. If you don’t notice your conditions and surroundings before riding your ATV, you give up control over the situation. Using ATV prevention techniques helps you forecast potential hazards before they injure you or damage your ATV. Following the safety instructions and warnings in this manual will help you “P.A.S.S.” the safety test. P.A.S.S.
Prevention These helmets should provide full-face protection. TESTIMONIAL DOCUMENT#: N490117A1 CITY/STATE: N. HUNTINGDON, PA SEX: M AGE: 6 BODY PART: HEAD DATE ACCIDENT: 14-06-94 DISPOSITION: DOA SYNOPSIS: The 6 year old male victim died from blunt force trauma to the head when the 4-wheel ATV on which he was a passenger struck a rock on a hill connecting two roads and flipped over backwards onto the victim, shattering his bicycle helmet. The victim was life-flighted to the hospital and died that night.
Prevention 1. TIRES AND WHEELS B. Throttle Correct tire pressure is crucial. Consult the General Maintenance section of this Operator’s Manual for tire pressure guidelines. Incorrect tire pressure can cause poor handling, instability, and a loss of ATV control. The throttle should have a free, smooth range of motion. If it seems to “stick” at any point, refer to the General Maintenance section of this Operator’s Manual for instructions.
Prevention 5. CHASSIS AND DRIVE TRAIN Grass and leaves can gum-up your suspension and shocks. Clear and clean the suspension arms, shock absorbers/springs, and fenders. Check smoothness by turning the handlebar full-left and full-right. Verify there is no binding, restrictions, freeplay, or looseness in steering components. Check and clean the drive chain and sprockets of foreign material and debris. Check drive chain adjustment. Check: 1. 2. 3. 4. 5.
Prevention Emergency Kit with Flashlight and First Aid Kit You’ll need several items in your Emergency Kit including a flashlight. The matches will come in handy if you need to start a fire to stay warm. Flares are appropriate for signaling help. A first aid kit is very important if an injury of some type should happen. A good First Aid Kit should include bandages, antiseptic spray, gauze, tape, etc. ! WARNING Carry these items: 1. 2. 3. 4. 5.
Active Riding Overview “Active Riding” is the second part of “P.A.S.S.” It involves an understanding of how your body weight, balance, gravity, and physical forces affect the handling of the ATV. For example, when you drive a car quickly into a sharp turn, your body is pulled to the outside of the vehicle by centrifugal force. Although a car is relatively stable, enough centrifugal force can cause an ATV to overturn.
Sound Judgment Overview You are not invincible. Knowing that the first “S” in “P.A.S.S.” stands for “Sound Judgment” means you need to use yours. Do you consider yourself to be pretty conservative, or are you a heavy risktaker? Before continuing with this section on sound judgment, check your Risk Factor by doing this short survey: 1. Do you drive over the speed limit? 1 2 3 Never Sometimes Often 9. Do you tailgate other drivers when you think they’re driving too slow? 1 2 3 Never Sometimes Often 10.
Sound Judgment Constantly be aware of your surroundings before and during your ride. Trail Signs Night Riding Riding at night can be very hazardous. Obstacles and other hazards (that are easily identified during daytime) are much more difficult to see and avoid. When night riding, make sure the lights are properly adjusted and in good working order. Reduce speed; do not over-drive the headlight. Never travel in an unfamiliar area or blaze a new trail at night.
Sound Judgment Other Vehicles ATV Maintenance Depending on where you’re riding, you might encounter other ATV’s, bikes, or motor vehicles on public lands. Respect the presence of cars if you’re crossing roads or riding in public areas and make yourself be seen. If you can’t see other vehicles coming, that means you’re invisible, too. You have to maintain your ATV. The General Maintenance section of this Operator’s Manual tells you about taking care of your ATV.
Sound Judgment Towing Capacity - Total weight of trailer and all cargo in the trailer. NOTE: Tongue and accessory weight (winch, gun scabbard brackets, etc.) must be included as part of the front and rear rack weights. ! WARNING Operating this ATV with improper modifications can be hazardous. Improper installation of accessories or modification of the ATV may cause changes in handling which could lead to an accident. Never modify the ATV with improper installation or use of improper accessories.
Sound Judgment Don’t use alcohol or drugs before or dur- Reckless Riding ing your ATV ride. Where excessive or high speed is a factor, the potential for personal injury is THE EFFECTS OF greatly increased. Ride within reason and ALCOHOL* your skill level. Avoid maneuvers that are The Number of Drinks that Impair reckless. Don’t show off. Mental and Physical Abilities Laws and Regulations 1-2 DRINKS Any police officer will tell you that ignorance of the law is no defense.
Supervision Overview Experienced/Trained You’re responsible for supervising those Riders who ride your ATV. Your wisdom is valuable... it’ll bring them all back safely—your friends, your family, your relatives, and your ATV. It’s crucial that you consider yourself a supervisor for all riders of your ATV. Whether you accept responsibility or not, the truth is that you are responsible for others riding your ATV. If anyone is going to borrow your ATV, you are responsible for their supervision.
DIVISION II - OPERATION/ MAINTENANCE ATV Specifications ENGINE AND DRIVE Type Bore x Stroke Displacement Ignition Type Spark Plug Type Spark Plug Gap Brake Type UTILITY DVX Four-Cycle/Liquid Cooled 72.7 x 65.2 mm (2.86 x 2.57 in.) 270 cc (16.5 cu in.) CDI NGK DPR7EA-9 0.8-0.9 mm (0.032-0.036 in.) Hydraulic w/Brake Lever Lock and Rear Foot Brake CHASSIS Length (Overall) 186.9 cm (73.6 in.) 171.9 cm (67.7 in.) Height (Overall) 111.8 cm (44.0 in.) 113.5 cm (44.7 in.) Width (Overall) 105.1 cm (41.4 in.
Location of Parts and Controls (Utility) 1. Battery 2. Headlights 3. Hand Brake Lever 4. Fuel Valve 5. Choke Lever 6. Seat Lock Lever 7. Rear Foot Brake KM091A 8. Recoil Starter 9. Engine Stop Switch 10. Brake Lever Lock 11. Key Switch 12. Shift Lever 13. Throttle Limiter 14. Throttle Lever 15. Starter Button KM119A 16. Taillight/Brakelight 17. Operator’s Manual Location 18. Headlight OFF/HI/LO Switch 19. Reverse Override Button 20.
Location of Parts and Controls (DVX) 1. Battery 2. Headlight 3. Hand Brake Lever 4. Fuel Valve 5. Choke Lever 6. Seat Lock Lever 7. Rear Foot Brake 8. Shift Lever KM186A 9. Brake Lever Lock 10. Engine Stop Switch 11. Key Switch 12. Reverse Override Button 13. Throttle Limiter 14. Throttle Lever 15. Tool Kit Location 16. Taillight/Brakelight KM187A 17. Operator’s Manual Location 18. Headlight OFF/HI/LO Switch 19.
ATV Operation 1. Ensure that the fuel valve is in the ON position. . Basic Operating Maneuvers 2. Mount the ATV and sit down. Active riding and basic maneuvers are the foundation of your ATV ride. Without basic skills, it’s impossible to move to this level— active riding. These are your basic maneuvers: • • • • • • • 3. Compress the hand brake; then engage the brake lever lock. 4. Shift the transmission into neutral. 5. Turn on the ignition.
ATV Operation Starting A Cold Engine Shifting (Utility) 1. Turn off all electrical accessories This ATV has a dual-range automatic (lights, etc.); then rotate the ignition transmission with reverse. To shift the switch key to the first position (ON) ATV, follow these steps: leaving the headlights OFF. Note 1. To engage the high range from neuthat the Neutral light is illuminated. tral, move the shift lever outward 2. Push the choke lever to the left. and forward. 2.
ATV Operation Shifting (DVX) This ATV has a single-range automatic transmission with reverse. To shift the ATV, follow these steps: 1. To engage the forward gear from neutral, move the shift lever outward and forward. 2. To engage reverse gear from neutral, move the shift lever outward and rearward into the R position. 4. Never “ride” the brake.
ATV Operation Leaning, Weight Shift, and Balance Handling the ATV (Active Riding Techniques) Active riding involves moving your body. You must learn to lean and shift your weight into your turns to maintain control. Your safety depends on using safe riding techniques. Statistics from the U.S.
ATV Operation Sharp Turns After mastering wide turns, practice the advanced skill of sharp turns. ATV-0046 ATV-0045 ATV-0044 ATV-202 1. Ease off the throttle as you approach the turn to slow down. 1. Ease off the throttle as you approach the turn to slow down. 2. Use the principles of leaning, weight shifting, and balancing—shift your body weight to the inside of the turn. 2. Use the principles of leaning, weight shifting, and balancing—shift your body weight to the inside of the turn. 3.
ATV Operation Quick Turns K-Turns Quick turns are the most difficult turns Use K-turns if you accidentally stall and should only be done after you are while riding uphill; you need to take experienced with your ATV. action before the ATV rolls backward down the hill. ATV-203 1. Ease off the throttle as you approach the turn to slow down. 2.
ATV Operation 4. Get off the ATV on the uphill side. 5. If you’re to the left of the ATV, turn the handlebar all the way left. 6. Partially release the brake, but lightly hold the brake lever. 7. Let the ATV roll to your right side until it faces slightly downhill. 8. Reapply the brakes. 9. Get back on the ATV from the uphill side, and keep your weight shifted uphill when you sit down. 10. Start the engine and follow the method for riding downhill. Riding Uphill 1.
ATV Operation ATV-0030 ATV-0028 ATV-0031 ATV-0029 1. Shift your body weight as far back on the seat as possible. 1. Keep your speed low and consistent. 2. Shift into low range; stay out of neutral. 2. Shift all your body weight to the uphill side of the seat; also, support your weight on the uphill footrest. 3. Lightly apply the brake and release the throttle lever completely. 3. Steer like you’re driving into the hill. Sidehilling/Traversing 4.
ATV Operation ATV-0016 ATV-0026 ATV-206 1. Ease off the throttle as you approach the obstacle. 2. Turn the handlebar. At the same time, shift your weight and balance as you swerve. Use the principles of leaning, weight shifting, and balancing—shift your body weight to the inside of the turn. 3. Keep your hand off the brake until the emergency is over and you’re back in control. Crossing Obstacles ATV-0027 1. Keep your speed way down; less than 5 mph. 2. Approach the obstacle head-on. 3.
ATV Operation 1. Use the ATV’s momentum to clear the obstacle. 2. Don’t pull up on the handlebar. 3. Don’t apply the throttle. 2. Engage the brake lever lock. 3. Find something to block the rear tires. Stalling on a Hill If you use the right method for riding uphill, this shouldn’t happen. But if you Driving an ATV and a car have some have a problem, do this: similarities; however, there are a few sit1.
ATV Operation 1. Stop completely on the shoulder of the road. 2. Check both directions for traffic. 3. Crossing near a blind corner or intersection is dangerous; don’t do it. 4. Drive straight across to the opposite shoulder. 3. If the brakes are frozen, take the ATV to a warmer area to thaw out the brakes. ! WARNING Do not attempt to free frozen brakes by pouring warm water on the brake pads and housings. 5.
General Information ATV Identification Numbers Control Locations and Functions The Arctic Cat ATV has two identifica- Ignition Switch tion numbers: Vehicle Identification Number (VIN) and Engine Serial Num- The ignition switch has three positions. ber (ESN). The VIN is located on the front of the frame. KM185 OFF position — All electrical circuits are off. The engine will not start. The key can be removed in this position.
KM203A KM161B 1. Squeeze the hand brake two or three times and release it. 2. Push and hold the brake lever lock. 3. While pushing forward on the brake lever lock, squeeze the brake lever. NOTE: It will click as it engages and the brake lever will not return to its released position. KM124A Hand Brake Lever 4. Release the brake lever lock by squeezing the brake lever. It will return to its released position.
Engine Stop Switch ! WARNING Never use the brake lever lock as a parking brake or depend on it to hold the ATV when parking on a hill. The brake may relax if left engaged for a long period of time. This could cause an accident; therefore, do not leave the ATV on a hill depending on the brake lever lock. Always block the downhill side of the wheels if leaving the ATV on a hill or park the ATV in a sidehill position. Rear Foot Brake OFF position - The ignition circuit is off.
Throttle Lever Control engine RPM with the position of the throttle lever. Operate this lever with the thumb. Pushing it forward increases engine RPM and allowing it to retract decreases engine RPM. KM146A KM122A Throttle Limiter Screw Throttle lever travel may be limited by adjusting the throttle limiter screw. The throttle limiter should be adjusted according to the operator’s skill and experience. To adjust the throttle limiter, use the following procedure.
2. High Beam Indicator - A blue light will illuminate when the engine is running, the ignition switch is in the LIGHTS position, and the headlight switch is in the HI beam position. CAUTION 3. Neutral Indicator - A green light will illuminate when the transmission is in neutral and the ignition switch is on. The light will go out when shifted into any gear other than neutral. Arctic Cat does not recommend using a pressure washer to clean the radiator core.
6. Digital Clock (6) - Displays time in NOTE: Normal operating range is hours and minutes when the ignition from the bottom segment (C) up to switch is turned to the ON position. but not including the top segment (H). In the event the top segment (H) To set the time, turn the ignition is displayed, all segments of the switch to the ON position; then use display and the temperature icon the following procedure. will flash indicating high engine NOTE: If the Hour Set or Minute temperature.
Gas/Vent Hoses Replace the gas hose every two years. Damage from aging may not always be visible. Do not bend or obstruct the routing of the carburetor vent hose. Make certain that the vent hose is securely connected to the carburetor and hose holder and the opposite end is always open. Carburetor Float Bowl Drain KM180 Periodically, the float bowl should be Seat Latch drained to remove condensation. To drain 1. To remove the seat, push the seat the float bowl, use the following procedure.
Transporting ATV ! WARNING When transporting the ATV, Arctic Cat recommends that the ATV be in its normal Make sure the loads on the front and operating position (on all four wheels) and rear racks will not interfere with the the following procedure be used. ATV controls or obstruct the view of the operator. Also, make sure the loads are evenly distributed, properly secured, and will not shift while operating the ATV. Trailering and Towing (Utility) ! WARNING 1.
Recommended Engine Oil Filling Gas Tank CAUTION ! WARNING Any oil used in place of the recommended oil could cause serious engine damage. Do not use oils which contain graphite or molybdenum additives. These oils can adversely affect clutch operation. Also, not recommended are racing, vegetable, non-detergent, and castor-based oils. Always fill the gas tank in a well-ventilated area. Never add gasoline to the ATV gas tank near any open flames or with the engine running or hot.
Engine Break-In After the completion of the break-in period, the engine oil should be changed and the screen should be cleaned. Other maintenance after break-in should include checking of all prescribed adjustments and tightening of all fasteners. At the discretion and expense of the owner/ operator, the ATV may be taken to an authorized Arctic Cat ATV dealer for this initial service. When the engine starts, allow it to warm up properly.
General Maintenance NOTE: Proper maintenance of the ATV is important for optimum performance. Follow the Maintenance Schedule and all ensuing maintenance and care instructions/information. NOTE: Proper maintenance procedures for each item can be found on the corresponding page indicated. If, at any time, abnormal noises, vibrations, or improper functioning of any component of this ATV is detected, DO NOT OPERATE THE ATV.
Cooling System NOTE: Debris in front of the engine or packed between the cooling fins of the radiator can reduce cooling capability. Using a garden hose, wash the radiator to remove any debris preventing air flow. CAUTION Arctic Cat does not recommend using a pressure washer to clean the radiator core. The pressure may bend or flatten the fins causing restricted air flow, and electrical components on the radiator could be damaged. Use only a garden hose with spray nozzle at normal tap pressure.
The shock absorber has a spring force adjustment sleeve with five adjustment positions to allow the spring to be adjusted for different riding and loading conditions. If the spring action is too soft or too stiff, adjust it according to the chart. Engine Oil and Screen NOTE: Refer to the recommended oil viscosity chart (on page 51) in this manual for the proper engine oil. Change the engine oil and clean the oil screen at the scheduled intervals.
CD628 KM106A 5. Install the O-ring, screen/filter, compression spring, and the O-ring; then secure with the screen/filter cap. Tighten cap to 11 ft-lb. 4. Install the drain plug and tighten to 22 ft-lb. 6. Remove the oil fill plug; then pour recommended oil into the crankcase. Install fill plug. 7. Start the engine (while the ATV is outside on level ground) and allow it to idle for a few minutes. 5.
6. Start the engine and drive the ATV Brake Hoses to warm up the rear drive; then check for any leaks around the drain Carefully inspect the hydraulic brake hoses for cracks or other damage. If found, take and fill plugs. the ATV to an authorized Arctic Cat ATV dealer to have the brake hoses replaced. Hydraulic Brakes Brake Pads ! WARNING Be sure to inspect the hydraulic brake system before each use. Always maintain brakes according to the Maintenance Schedule.
3. Attempt to push the ATV. NOTE: The brake lever lock must 1. Secure the ATV on a support stand to elevate the front wheels. lock the wheels. If it doesn’t, take the ATV to an authorized Arctic Cat ATV dealer for service. 2. Remove both front wheels. Protective Rubber Boots The protective boots should be inspected periodically according to the Maintenance Schedule. Ball Joint Boots (Upper and Lower/Right and Left) 3. Inspect the four tie rod boots for cracks, tears, or perforations. 4.
NOTE: The sealing strip should NOT be removed and NO fluid should be added. 3. Be sure the charger and battery are in a well-ventilated area. Be sure the charger is unplugged from the 110volt electrical outlet. 4. Connect the red terminal lead from the charger to the positive terminal 3300A of the battery; then connect the black terminal lead of the charger to the NOTE: Not using a battery charnegative terminal of the battery.
NOTE: For optimal charge and performance, leave the charger connected to the battery for a minimum 1 hour after the Maintenance Charge Indicator (D) illuminates. If the battery becomes hot to the touch, stop charging. Resume after it has cooled. 2. Inspect the battery for any signs of electrolyte leaks, loose terminals, or bulging sides. Leaking or bulging battery cases may indicate a frozen or shorted battery. ! WARNING 7.
Spark Plug The ATV comes equipped with a specified spark plug. See the specifications chart for the correct spark plug. A light brown insulator indicates that the plug is correct. A white or dark insulator indicates that the engine may need to be serviced or the carburetor may need to be adjusted. Consult an authorized Arctic Cat ATV dealer if the plug insulator is not a light brown color.
To properly adjust the idle, a tachometer is necessary. If one is not available, take the ATV to an authorized Arctic Cat ATV dealer. To adjust idle RPM: 1. Start the engine and warm it up to normal operating temperature. 1. Remove the center cover from between the front fenders; then remove the two screws securing the filter housing to the front fender. 2. Remove the filter housing cover. Tap the filter lightly to remove dust and debris; then use compressed air to thoroughly clean the filter. 2.
Air Filter (Engine) The air filter inside the air filter housing must be kept clean to provide good engine power and gas mileage. If the ATV is used under normal conditions, service the filter at the intervals specified. If operated in dusty, wet, or muddy conditions, inspect and service the filter more frequently. Use the following procedure to remove the filter and inspect and/or clean it.
Air Filter Housing Drain Tube Periodically (weekly) check the drain tube for gasoline or oil accumulation. If noticed, remove the drain tube cap from beneath the housing, drain the gasoline or oil into a suitable container, and install and secure the tube cap. Cleaning and Lubricating The drive chain should be cleaned and lubricated frequently to prolong chain and sprocket life. Use the following procedure to clean and lubricate the chain. NOTE: This ATV is equipped with an O-ring type roller chain.
3. With a person seated on the ATV, Tire Replacement check chain tension at the mid-point The ATV has low-pressure tubeless tires. of the chain. Air is sealed by the contact surfaces of NOTE: Chain “slack” should be the inner wheel rim and the tire bead. If within a range of 30-40 mm (1.2-1.6 either the inner wheel rim or tire bead is damaged, air may leak. Be extremely in.). careful not to damage these areas when 4. Push the ATV forward to tighten replacing tires.
7. Tighten the nuts in a crisscross pat- NOTE: If the screen is damaged in tern to 40 ft-lb. any way, it must be replaced. ! WARNING Failure to tighten the wheel nuts to the specified torque value can be hazardous. If the wheel nuts are not properly tightened, the wheel can come off causing an accident and possible injury. 8. Remove the jack. Muffler/Spark Arrester 3. Install the spark arrester and secure with the cap screw.
2. Push the bulb in and turn it counterclockwise. 3. Install the new bulb by turning it clockwise while pushing in. 4. Install the lens. Tighten the two screws securely. Fuses The fuse box (with three active fuses and one spare fuse) is located under the seat 3. Install the new bulb into the hous- near the battery. ing; then secure with the spring clip. KM192A KM102 NOTE: To remove the fuse, com4.
Preparation for Storage CAUTION Prior to storing the ATV, it must be properly serviced to prevent rusting and component deterioration. Arctic Cat recommends the following procedure to prepare the ATV for storage. An authorized Arctic Cat ATV dealer should perform this service; however, the owner/operator may perform this service if desired. 1. Clean the seat cushion (cover and base) with a damp cloth and allow to dry. 2.
Preparation after Storage Taking the ATV out of storage and correctly preparing it will assure many miles and hours of trouble-free riding. Arctic Cat recommends the following procedure to prepare the ATV. 1. Clean the ATV thoroughly. 2. Clean the engine. Remove the cloth from the exhaust system. 3. Check all control wires and cables for signs of wear or fraying. Replace if necessary. 7. Check the entire brake systems (fluid level, pads, etc.
Maintenance Record DATE 70 HOURS SERVICE PERFORMED/NOTES
Limited Warranty Arctic Cat Inc. (hereinafter referred to as Arctic Cat) extends a limited warranty as described below on each new Arctic Cat ATV it assembles and on each genuine Arctic Cat ATV part and accessory assembled and sold by an authorized Arctic Cat ATV dealer.
Warranty Procedure/Owner Responsibility At the time of sale, an ATV Rider Training Certificate and Owner Registration form is to be completed by the selling dealer and consumer. The receipt of the form by Arctic Cat is a condition precedent to warranty coverage. It is the selling dealer’s responsibility to retain and/or submit appropriate copies of the form to the appropriate place(s) to initiate warranty coverage.
Arctic Cat ATV Emission Control Warranty Statement Warranty Rights and Obligations Arctic Cat Inc. (hereinafter referred to as Arctic Cat) and the California Air Resources Board are pleased to explain the emission control system warranty for each new Arctic Cat ATV sold in the state of California. In California, a new ATV must be designed, built, and equipped to meet the state’s stringent anti-smog standards.
U.S. EPA Emission Control Statement/ Warranty Coverage - ATV (U.S. Only) Statement/Warranty Arctic Cat warrants to the original retail purchaser, and each subsequent purchaser, that all U.S. EPA-certified Arctic Cat ATV’s are designed, built, and equipped to conform to all U.S. EPA Emission Control Regulations. Please read the following information completely. Your authorized Arctic Cat ATV dealer will repair or replace any defective emission-related component at no cost to you during the warranty period.
Arctic Cat Emission Control System Limited Warranty Arctic Cat Inc., P.O. Box 810, Thief River Falls, MN 56701 (hereinafter referred to as Arctic Cat) warrants that this new Arctic Cat ATV manufactured on or after January 1st, 1997: A. Is designed, built, and equipped so as to conform at the time of initial purchase with all applicable regulations of the California Air Resources Board and B.
Declaration of Conformity Application of council directives: EMC Directive 97/24/EC Date of Issue: June, 1997 EC Machinery Directive 2006/42/EC Date of Issue: May, 2006 Issued by European Commission. Type of Equipment: All-Terrain Vehicles Brand Name: Arctic Cat Model: DVX 300 300 Utility Standards to which conformity is declared: Manufacturer (if not issuing agent): EN 61000-6-2:2005 EN 55012:2007 Arctic Cat Inc. 601 Brooks Ave S.
Change of Address, Ownership, or Warranty Transfer Arctic Cat Inc. keeps on file the current name and address of the owner of this vehicle. This allows Arctic Cat to reach the current owner with any important safety information which may be necessary to protect customers from personal injury or property damage. Please make sure a copy of this form is completed and returned to Arctic Cat Inc. if you move or if the vehicle is sold to another party.
Fold Back Place Stamp Here CHANGE OF ADDRESS/OWNERSHIP ARCTIC CAT INC. PRODUCT SERVICE AND WARRANTY DEPT. P.O.
NOTES 79
NOTES 80
Identification Numbers Record 1. KEY IDENTIFICATION NUMBER: The key identification number is stamped on the key as shown in the illustration. Record this number in the space provided for reference if you ever need a new key. 2. VEHICLE IDENTIFICATION NUMBER: 3. ENGINE SERIAL NUMBER: Record the Vehicle Identification Number and Engine Serial Number in the spaces provided to assist you in ordering parts from your authorized Arctic Cat ATV dealer or for reference in case the ATV is stolen.
! WARNING Improper ATV use can result in SEVERE INJURY or DEATH ALWAYS USE NEVER USE AN APPROVED ON PUBLIC HELMET AND ROADS PROTECTIVE GEAR NEVER CARRY NEVER USE PASSENGERS WITH DRUGS OR ALCOHOL NEVER operate: • without proper training or instruction • at speeds too fast for your skills or the conditions • on public roads - a collision can occur with another vehicle • with a passenger - passengers affect balance and steering and increase risk of losing control ALWAYS: • use proper riding techniques to av