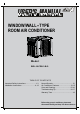
WINDOW/WALL - TYPE ROOM AIR CONDITIONER Model: EWL-08CRN1-BJ9 TA B L E O F C O N T E N T S Important Safety Instructions ......................1-3 Installation Instructions................................4-12 Normal Sounds.............................................13 Air Conditioner Features...........................13-15 Care and Cleaning...................................15-16 Troubleshooting Tip..................................16-17 Warranty Term..............................................
IMPORTANT SAFETY INSTRUCTIONS READ THIS MANUAL Inside you will find many helpful hints on how to use and maintain your air conditioner properly. Just a little preventive care on your part can save you a great deal of time and money over the life of your air conditioner. You'll find many answers to common problems in the chart of troubleshooting tips. If you review our chart of Troubleshooting Tips first, you may not need to call for service at all.
IMPORTANT SAFETY INSTRUCTIONS CAUTION When the air filter is to be removed, do not touch the metal parts of the unit. It may cause an injury. Do not put a pet or house plant where it will be exposed to direct air flow. This could injure the pet or plant. Do not use strong detergent such as wax or thinner but use a soft cloth. Appearance may be deteriorated due to change of product color or scratching of its surface. Do not clean the air conditioner with water.
IMPORTANT SAFETY INSTRUCTIONS WARNING NOTE: The power supply cord with this air conditioner contains a current detection device designed to reduce the risk of fire. Please refer to the section Operation of Current Device for details.In the event that the power supply cord is damaged, it cannot be repaired-it must be replaced with a cord from the Product Manufacturer. WARNING Avoid fire hazard or electric shock. Do not use an extension cord or an adaptor plug. Do not remove any prong from the power cord.
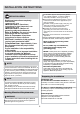
INSTALLATION INSTRUCTIONS If cold water pipe is interrupted by plastic, non-metallic gaskets, or other insulating materials, DO NOT use for grounding. Check with a qualified electrician if you are in doubt as to whether the appliance is properly grounded. DO NOT modify power supply cord plug. If it does not fit outlet, have a proper outlet installed by a qualified electrician. DO NOT have a fuse in the neutral or grounding circuit.
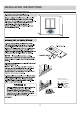
INSTALLATION INSTRUCTIONS 1. Make sure you have all the necessary parts. Installation kit contents: 1. Platform(1) 2. Support brace(1) 3. Adjustment bolt(1) 4. Hex flange nut - 1 / 4 (1) 5. Track seal(1) 6. Side channel seal(1) 7. Foam seal strip/Sash seal 8. Safety bracket(1) 9-11.Screw-2-1/2 (2), or Screw-1-3/4 (2), or Screw-1 (2) 12. Screw-3/4 (6) 13. Screw-3/4 self-threading(7) 14. Window locking bracket(1) 15. Plastic window panel(1) 16. Side channel(2) 17. Screw-3/8 (6) 18.
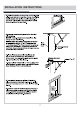
INSTALLATION INSTRUCTIONS 1 4 11 16 Alternate screw location (depending on the stool depth) Platform tab Window track 6 Window se al
INSTALLATION INSTRUCTIONS 7
INSTALLATION INSTRUCTIONS 1 8
INSTALLATION INSTRUCTIONS or 3 9 4 or1 3 4 or 1
INSTALLATION INSTRUCTIONS 10
INSTALLATION INSTRUCTIONS 11
INSTALLATION INSTRUCTIONS 1 12
NORMAL SOUNDS High Pitche d Cha tter Vibra tion High efficiency compressors may have a high pitched chatt er durin g the cooling cycle. Unit may vibrate and make noise because of poor wall or window cons truction or incorrect insta llation. Sound of R ushing Air At the front of t he unit, you m ay hear the sound of rushing ai r being moved by the fan Pinging or Switching Droplets o f water hittin g condenser during nor mal operatio n may cause pinging o r switching sounds.
AIR CONDITIONER FEATURES TO ADJUST FAN SPEEDS: TO SELECT THE OPE RATING M ODE: Press to select the Fan Speed in four steps-Auto, Low, Med or High. Each time the button is pressed, the fan speed mode is shifted. To choose operating mode, press Mode button.Each time you press the button, a mode is selected in a sequence that goes from Auto, Cool, Dry and Fan. The indicator light beside will be illuminated and remained on once the mode is selected.
AIR CONDITIONER FEATURES DISPLAYS: Exhaust Control Displays S Exhaust cl osed Tim er off Energy Saver Tim er on open A uto Coo l Dry Fan Mode DISPLAYS: Shows the set temperature in " OC " or " OF " and the Auto-timer settings.While on Fan only mode,it shows the room temperature. Error codes: AS-Room temperature sensor error-Unplug the unit and plug i t back in.If error repeats, call for service. NOTE:In Fan only mode,it wil l di splay " LO " or " HI " .
CARE AND CLEANING Cabinet Cleaning Air Filter Cleaning Take the filter by the center and pull up and out. Be sure to unplug the air conditioner to prevent shock or fire hazard. The cabinet and front may be dusted with an oil-free cloth or washed with a cloth dampened in a solution of warm water and mild liquid dishwashing detergent. Rinse thoroughly and wipe dry. Never use harsh cleaners, wax or polish on the cabinet front. Be sure to wring excess water from the cloth before wiping around the controls.
TROUBLESHOOTING TIPS Problem Air conditioner cooling, but room is too warm- NO ice forming on cooling coil behind decorative front. Solution Dirty air filter- air restricted. Clean air filter. Refer to Care and Cleaning section. Temperature is set too High, set temperature to a Lower setting. Air directional louvers positioned improperly. Position louvers for better air distribution. Front of units is blocked by drapes, blinds, furniture, etc. - restricts air distribution.
WARRANTY TERM 1-86 6-646-4332.
The design and specifications are subject to change without prior notice for product improvement. Consult with the sales agency or manufacturer for details.
AIRE ACONDICIONADO DE DÓMESTICO-VENTANA/PARED Modelo: EWL-08CRN1-BJ9 TA B L E O F C O N T E N T S Instrucciones Importantes de la seguridad....1-3 Instrucción de Instalación.............................4-12 Sonidos normales..........................................13 Funciones del aire acondicionado............13-15 Mantenimiento y limpieza.........................15-16 Soluciones de los problemas....................16-17 Plazo De Garantía.........................................
INSTRUCCIONES IMPORTANTES DE LA SEGURIDAD Lea este manual Dentro de este manual podría encontrar muchos consejos ayudables diciendo cómo usa y mantener su aire acondicionado correctamente.le cuesta un poco cuidado antes, le ahorrará mucho tiempo y dinero en su aire acondicionado.Puede encontrar muchas respuestas a los problemas communes en el cuadro de las soluciones de problemas. Si lea nuestro cuadro de las soluciones de problemas primero, quizá no será necesario llamar por servicio.
INSTRUCCIONES IMPORTANTES DE LA SEGURIDAD CAUTION No lo guarda una mascot o planta donde sera expuesto al flujo del aire directo. Podría hacer daño a su mascot o planta. Cuando el filtro del aire está eliminado, no la toca las partes metálicas de la unidad. Podría causar una lesion. No utilice detergente fuerte como cera o algo más delgado, sino usa un paño suave. La apariencia podría deteriorarse por el cambio del color del producto u arañazos en su superficie.
INSTRUCCIONES IMPORTANTES DE LA SEGURIDAD NOTA: El cable de energía con el aire acondicionado contienen un dispositivo de detección de corriente, lo cual está diseñado para reducir el riesgo de incendio.Por favor consulte la sección de Operación del dispositivo de Corriente los detalles.En el caso que el cable de energía está dañado, no puede ser reparado, debe reemplazarlo por un cable del Fabricante del Producto. WARNING Evita el incendio o descarga eléctrica.
INSTRUCCIONES DE INSTALACIÓN Si la tuebería de agua fría es inetrrumpida por empaqaue plástico o no-metálico, u otros materiales aislantes, NO lo usa a concectar el suelo. Consulte a un electriista calificado si tiene duda sobre si el aparato está corrctamente conectado al suelo No modifique el cable del suministro eléctrico.Si no se ajusta al enchufe, instala uno por un electricista calificado. Nunca tener un fusible en el circuito neutro o conectado a la teirra.
INSTRUCCIONES DE INSTALACIÓN 1. Asegúrese de tener todas las partes necesarias: Contenidos de los equipos de la instalación: 1. Plataforma(1) 2. Llave del soporte(1) 3. Perno de ajuste(1) 4. Tuerca de brida hexagonal - 1 / 4 (1) 5. Sello del carril (1) 6. Sello del canal lateral(1) 7. Banda del sello de espuma/Sello del marco 8. Soporte de seguridad(1) 9-11.Tornillo-2-1/2 ”(2), or Tornillo -1-3/4” (2), or Tornillo -1” (2) 12. Tornillo -3/4 (6) 13. Tornillo -3/4 autorroscante(7) 14.
INSTRUCCIONES DE INSTALACIÓN 3. Elija una buena ubicación para la ventana Elija una ventana que permite el flujo frío a fluir libremente y directamente entra la habitación que quiere ser frío. Recuerde, es difícil mover el aire del alrededor de los rincones.También, elija una ventana que está dentro 6 pies cerca a un enchufe.(Consulte al electricista calificado/cable recptáculo).Nunca usar un cable extensión. 6 pie cada cable eléctrico Instala la unidad en la ventana corrediza 1.
INSTRUCCIONES DE INSTALACIÓN Aplicar un sello de carril al lado de la ventana del carril 4.Despeque el soporte protectivo desde el sllo del soporte.Ofrecer sellos al carril de la vantana del lado de la habitación.El centro de la banda de sello debe coincidir con la línea marcada en Paso 2.Los dos agujeros de tornillos perforados en Paso 3 debe ser directamente sobre la banda de sello en el carril interior. 5.Seguramente adjunta un tablero protectivo de revestimiento al lado de la casa.
INSTRUCCIONES DE INSTALACIÓN 10.Restrinje al panel plástico de la ventana entre un tablero y una mesa laboral, y corte por la línea de corte de una sierra de diente fino.Elimite cualquier rebabas con una lima. Sujete los canales laterales 11.Sujete canal lateral al lado del AC con 3 tornillos (artículo 17) cada canal.Empieza con el primer tornillo en el canal superior.Asegúrese de que ha engachado los extremos de los canales frente hacia la trasera de la unidad. 12.
INSTRUCCIONES DE INSTALACIÓN 16.Deslice el marco interior firmamente contra el lado del gabinete. Asegúrese de no pelar la banda de sello desde el carril de la ventana y canales laterales del gabinete.Si el marco de panel no encaja cómodamente en el marco inerior,sujete el marco de panel en el marco con tornillos de 3/4 pulgadas o 3/4- pulgadas roscados. Utilice los agujeros tapados parcialmente en el marco de panel.Perfora 178 pulgas agujero pilotos para el tornillo.
INSTRUCCIONES DE INSTALACIÓN Instalar la unidad en una ventana abatible NOTA: Abra la ventana máxima para permitir la separación del gabinete.La manivela debe ser quitado para sujetar la plataforma en la jamba.Si la ventana no puede abrir suficiente(más que 15-1/2 pulgadas)para el gabinete a limpiar la ventana, quite la ventana entera con perforar los remaches.El perno puede servirse como el eje en el futuro.
INSTRUCCIONES DE INSTALACIÓN 5.Ajunte el montaje de plataforma para que el borde del AC puede ser 3/16 pulgadas más bajo que la frontera.Este asegura que el agua drenar desde el AC. Mide desde aquí Entre 1" a 11/4" NOT A: Adjunte la plataforma asemblea por la que el AC puede ser 11/8"a 11/2"más bajo que la frontera(inclina aproxima 3°a 4 °atrás la fuera).
INSTRUCCIONES DE INSTALACIÓN 11.Corte el sello del canal lateral entre dos partes iguales.Elimite el soporte protector y adjúntelo en el lado trasero del canal lateral del gabinete, empezando bajo el marco asembleo del panel.Quita el exceso de la longitud para que el sello es igual que el canal lateral del fondo del gabinete. 12.Para eliminar la frontera 1.Elimina dos tornillos de retención frontal desde el marco frontal. 2. Suavemente saque la frontera y la levante a liberarla de la caja. 3.
SONIDOS NORMALES Sonido Agudo Vibración Un compressor con alta eficiencia podrá tener un sonido agudo durante su ciclo de enfrigeración. La unidad podrá vibarar y hacer ruido por una débil pared o .construcción de ventana o una instalación incorrect.tion. Sonido del Corriente del Aire En la frontera de la unidad, podría oir un sonido del corriente del aire debido al movimiento del ventilador.
FUNCIONES DEL AIRE ACONDICIONADO PARA AJUSTARLA VELOCIDAD DEL VENTILADOR: Presiona a elegir la velocioad del ventilador entre cuatro pasos-Auto, Bajo, Medio o Alto. Cada vez presiona el botón, el modo de la velocidad del ventilador va a cmabiar. FUNCIÓN DURMIENTA: Presiona el botón durmiento a iniciar el modo durmiento. Bajo este modo la temperatura selecciona incrementará a 2 OF/1(o 2) OC 30 minutos despúes de elegir el modo.
FUNCIONES DEL AIRE ACONDICIONADO PANTALLAS: Control de la salida de aire Pantallas S Salida de aire apagar Timer off Energy Saver Timer on encender Auto Cool Dry Fan Modo PANTALLAS: Muestra la temperatura en “ OC” or “ OF” y las opciones del Auto-reloj.Cuando bajo el modo de ventilador sólo, muestra la temperatura actual de la habitación. Los códigos de error AS-Sensor de error de la temperatura de la habitacióndesenchufe la unidad y conéctala otra vez.Si repite este error, llama al servicio.
MANTENIMIENTO Y LIMPIEZA La Limpieza del Gabinete La Limpieza del Filtro de Aire Asegúrese de desconectar el AC para protegerlo de descarga eléctrica o incendio.El gabinete y su frontera pueden ser limpiado por un paño libre de aceite o un paño humedecido en agua caliente con liquid detergente para limpiar los platos. Enjuaquelo bien y séquelo. Nunca use limpiadores abrasives, ceras ni pulimento en el frente del gabinete. Asegúrese de quitar el agua en el paño antes de limpiar los controles.
SOLUCIONES DE PROBLEMAS Problema El aire acondicionado enfria, pero la habitación hace mucho calor – no forma hielo en la bobina fría detrás el frente decorativo Solución Un seco filtro de air- aire limitado. Limpie el filtro. Consulte a la sección del Mantenimiento y limpieza. Tha elegido una temperatura tan alta, elige una temperatura baja. Ha puesto la rejillas direccionales incorrectamente.. Ponga la rejilla en un lugar con mejor distribución del aire.
PLAZO DE GARANTÍA 18
El diseño y especificación se publican sin previo aviso de las mejoras del producto. Consulte a la agencia de ventas o el fabricante sobre más informaciones.