
User manual


32 User Manual
Arduino Materia 101
The possibilities offered by your Arduino
Materia 101 are very broad, but like all
technological tools, this must be understood
and used by applying various measures
over time more and more sophisticated.
3D printing technology, promises to create
any shape but are frequent cases where
a print ends with a big disappointment.
ORIENTATION
Let’s start with a consideration on guidance
of the pieces in relation to the printing:
mechanism of object creation is in layers
and each layer is created that it overlaps
the previous one. When a wall or a surface
is tilted more than 45 degrees, or some
parts have not beneath them earlier layers
(based in vacuum), it has to do with a certain
specific measures requesting model. The first
question concerns the possibility to rotate
the model with respect to print plan to
improve or resolve the issue of inclinations.
Spins may be needed by 90 or 180
degrees, thus changing the portion
resting on the press plane. In general, if
you can find an orientation that allows
a reasonable flat surface extension to
be in contact with the press, you are
ensuring the tightness of the object to
the plate during the printing process.
Let’s take the example of a door: printed in
its natural position (vertical) would have
a thin backing, as opposed to lying down
would potentially a lot more contact surface
wide and stable. May be details (such as the
handle, for example) that don’t allow the
support: in this case we recommend you
remove the handle to print it separately,
attaching it with a little glue in its original
position. An excellent example of how the
orientation can make
a printable object without any problems (or,
as we shall see, adding media) can be found
at www.thingiverse.com/thing:37978.
It is a house-shaped lamp (Fig. 1).
JUST ONE OBJECT?
There are cases when printing in one piece
is inevitable, but there are as many cases
where you can cut into several parts the
object to print more easily. An example that
you often see on the internet is that the Eiffel
Tower: for his height would print a whole
small object and with details too tiny to be
created from most printers FDM. Cutting the
model into two or three parts it is possible to
place it in print volume of almost all printers
and metal structures large enough to be
printed accurately. After the parts can easily
be combined with a drop of glue having
so perfectly printed Tower and defined.
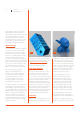
SUPPORTS
When you cannot avoid parties suspended,
tilted geese begin in anything you have to
give the printer a support on which to begin
to create these pieces. The supports are the
solution that has developed technology to
overcome the force of gravity and allow the
creation of complex models, also suspended
parts and other parts (balls of a bearing), or
with items that necessarily begin (moving
upwards) from nothing, as the arms do
not place the hips in a bust (Fig. 2).
In any case, the problem can only be
linked to one detail and then you can
create in the model solution. Take the
case of this famous model who, thanks to
an enterprising user, was modified with
the addition of only support necessary
to achieve a flawless printing: the lower
part of the Chin started with some ring in
anything, so I added a calculated support
to the tenth of a millimeter (Fig. 3 and 4).
In this way, by printing to be done with
some attention and with a critical point,
became a print from the result guaranteed.
The supports are still generated by slicing
software if it is enabled the creation of print
Fig. 1 Fig. 2