
Assembly Instructions
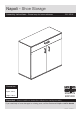

Assembly Instructions
4
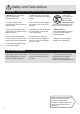
If you have damaged or missing components, call the
Customer Helpline: 08456 400800 quoting the reference
numbers below
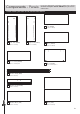
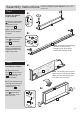
Step 1
8
7
B
A
C
a:
A
b:
C
7
a:
b:
A
A
F
C
C
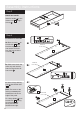
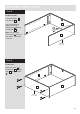
Prepare the drawer
front and wrap
a: Screw 2 metal dowels
. into the holes shown
on the back of the
drawer front .
Note: Tighten the metal
dowels up fully against
the panel.
b: Insert 2 small locking
nuts into the holes
shown on the drawer
wrap .
Note: The arrow on the
locking nut must point
towards the hole in the
edge of the panel.
A
8
C
7
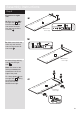
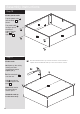
Assemble the drawer
a: Place the drawer
base into the narrow
slot on the drawer wrap
. . Fold the wrap
around the base.
b: Turn the drawer wrap
assembly over and push
it onto the back of the
drawer front .
Note: Turn the locking
nuts clockwise to
secure panels - more
than 1/2 a turn.
9
7
8
C
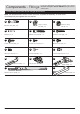
Step 2
7
7
9
plain surface
7
8
8
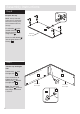
Note: Due to the manufacturing
process, the holes for the
locking nut can be on either
surface of the drawer wrap.
Note: The locking nuts can be on
either surface of the drawer sides.
Make sure that the small groove
is on the inside, as shown.