
User Manual


3/6
After Installation:
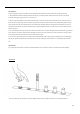
1. Before supplying any power to the product, you should inspect the power cables to ensure the power leads are properly connected.
2. After installation and before starting the product for the first time, you should inspection all the connections to ensure they are properly
connected; including parts, plugs, hoses, nuts, screws, wires, etc.
3. After you have fully installed the unit and made all the inspections to ensure the unit can function safely, fully clean the unit inside and out to
ensure the unit is ready for usage, and also to check for any potential lose debris that may have fallen into any of the plumbing. After a thorough
visual inspection, close the drain and fill the tub up to the overflow drain, submerging all the jets underwater. If any debris floats out, remove it.
The whirlpool system will not run unless the water-level sensor is fully submerged underwater. The water-level sensor is placed above the water
line of the water jets.
4. Turn-on the whirlpool system and operate it for a minimum of 10-minutes. Then turn-off the whirlpool system and without draining it, allow it to
sit for a minimum of 10-minutes. Now check all the plumbing, pipe works, hoses, joints, threads and any other connections for any leaks. If there
are any adjustments made, restart this test and review all the connections again.
5. You must ensure the product works as it normally would: immediately test all functions of the product to possibly find any errors.After testing,
place the tub against the wall(s) and seal the wall joints with an acid-free caulking agent and then allow it to cure sufficiently before any further
use.
Important Note:
It is not generally recommended to use bath oils in whirlpool bathtubs, as the oil residue can stick to the side walls of the tub and plumbing.
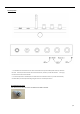
Switch on/off:
Press the on/off button at the first time to operate the bubble function; and press it by the second time to turn off the bubble function.