
Installation Guide


Ariel Walkin Bathtub [ Installation Guide ]
Page 3
GETTING STARTED (1)
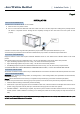
UNPACKING THE UNIT
1. Inspect the carton, if carton damage is noted: take a picture if possible, notify the deliverer, write “DAMAGED” on the Proof of
Delivery (P.O.D), and call: (800) 304-3598
2. NEVER LIFT THE TUB BY THE PLUMBING. Doing so can result in leaks, for which the installer is responsible.
3. Immediately inspect the unit for damage even if there is no carton damage. Once the unit is accepted surface damages will be
assumed to be installation related if not reported within 72 hours of delivery. Installers are responsible for damage that occurs
once the unit is placed in its niche.
4. Inspect the plumbing for any loose fittings.
5. Remove all packaging material except for the protective plastic. This has been placed on the tub at the factory to eliminate
abrasions from handling. This should only be removed at final clean up.
GETTING STARTED (2)
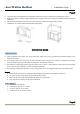
TESTING YOUR SAFETY TUB BEFORE INSTALLATION
1. All Tubs 100% water tested at the factory and certified to be free of leaks. Transportation and mishandling may cause leaks. It is
necessary to test the bath while there is access to all sides of the bath.
2. This unit should be both static and operationally tested with water. It is best to test the unit outside by filling with a garden hose.
A. Place the tub on a completely flat surface in an area where it may be drained after testing.
B. Seal the drain (can be sealed with tape for test) and fill the tub three inches above the jets or to a normal level if it’s a
soaking tub.
C. Allow the water to stand in tub for 10 minutes and then inspect all plumbing and seals for leaks.
D. Insure all jets are open and working (every hydro jet is adjustable for both flow rate and direction of flow, depending on the
jet, the water flow is adjusted by either turning the outside ring or the nozzle clockwise and counter clockwise).
GETTING STARTED (3)
NOTE: If the pumps do not operate:
A. Check the breaker to insure power is on and the cable connecting the controls to the pump is attached.
B. If an optional heater is present, check the indicator light on the heater to insure that power is present.
Do not run any pumps or heaters unless the tub is filled with water to proper usage level, 4-inches (10cm) above the highest jet
fixture. Damage due to dry-running pumps (running pumps without proper water level height) is not covered under any stated
warranty.
Failure to perform these tests before installation will make the installer liable for future repair costs.