
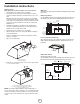
Installation Guide


3
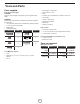
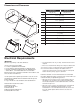
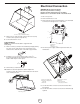
Parts supplied
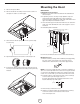
Removing the packaging
CAUTION!
Remove carton carefully, wear gloves to protect against sharp
edges.
WARNING!
Remove the protective lm covering the product before putting
into operation.
• Hood assembly with blower and LED lamps already installed.
• 6” (15.2 cm) round air transition
• Grease lters
• Hardware bag with:
Part Qty Part Qty
5x45 mm
4
Torx 20 adapter
1
4.5x13 mm
4
10 x 60 mm wall
anchors
4
3.5x9.5 mm
2
5.4x75 mm screws
(for 10x60 mm wall
anchors)
4
Torx 10 adapter
1
Tools/Materials required
• Level
• Drill with 1¼” (3.2 cm),
1
⁄8” (3.2 mm), and
1
⁄16” (4,8 mm)
drill bits
• Pencil
Tools and Parts
• Wire stripper or utility knife
• Tape measure or ruler
• Pliers
• Caulking gun and weatherproof caulking compound
• Vent clamps
• Jigsaw or keyhole saw
• Flat-blade screwdriver
• Metal snips
• Phillips screwdrive
r
Parts needed
• Home power supply cable
• ½” (12.7 mm) UL listed or CSA approved strain relief
• 3 UL listed wire connectors
For vented installations, you will also need:
• 1 wall or roof cap
• Metal vent system
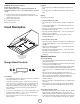
Parts not supplied
Optional Accessories
Kit # Part Kit # Part
No Return
Valve
KIT0102873 Recirculating 30” KIT01939
36” KIT01940
Duct Cover
6” height
30” KIT01941
36” KIT01942
Duct Cover
12” height
30” KIT01944
36” KIT01945
CFM
Reduction
KIT02748 Grease
Filter
KIT01668