
Installation Guide


5
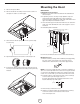
Preparation
Do not cut a joist or stud unless absolutely necessary. If a joist or
stud must be cut, then a supporting frame must be constructed.
Fittings material is provided to secure the hood to most types of
walls/ceilings.
However, a qualied technician must verify suitability of the mate-
rials in accordance with the type of wall/ceiling.
Before making cutouts, make sure there is proper clearance with-
in the ceiling or wall for exhaust vent.
Hood installation height above cooktop is the users preference.
The lower the hood is above the cooktop, the more efcient the
capturing of cooking odors, grease and smoke.
CAUTION: Mount this hood so that the bottom edge above the
cooking surface is at 30” (76.2 cm) minimum if a gas range is
used or from 24” (61 cm) to 30” (76.2 cm) if an electric range is
used. Household use, please, read installation manual for specic
application. Check your ceiling height and the hood height maxi-
mum before you select your hood.
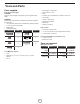
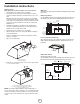
Venting through the roof Non Vented (recirculating)
A
B
C
F
F
C
E
Venting through the wall
F
A
B
D
F
C
A
B
A. 6” round transition
B. 6” round duct system
C. Cabinet / Duct cover kit
D. 90° elbow
E. Recirculating kit
F. Installation height:
Gas range MIN: 30” (76.2 cm)
Electric range: from 24” (61 cm ) to 30”
(76.2 cm)
Venting Requirements
(Ducted models only)
• Vent system must terminate to the outdoors, except for non
vented (recirculating) installations.
• Do not terminate the vent system in an attic or other enclosed
area.
• Do not use 4” (10.2 cm) laundry-type wall cap.
• Use metal vent only. Rigid metal vent is recommended.
Plastic or metal foil vent is not recommended.
• The length of vent system and number of elbows should
be kept to a minimum to provide efcient performance.
For the most efcient and quiet operation:
• Use no more than three 90° elbows.
• Make sure there is a minimum of 24” (61 cm) of straight vent
between the elbows if more than 1 elbow is used.
• Do not install 2 elbows together.
• Use clamps to seal all joints in the vent system.
• The vent system must have a damper. If the roof or wall cap has
a damper, do not use the damper supplied with the range hood.
• Use caulking to seal exterior wall or roof opening around the cap.
• The size of the vent should be uniform.
Cold weather installations
An additional back draft damper should be installed to minimize
backward cold air ow and a thermal break should be installed to
minimize conduction of outside temperatures as part of the vent
system. The damper should be on the cold air side of the thermal break.
The break should be as close as possible to where the vent
system enters the heated portion of the house.
Makeup air
Local building codes may require the use of makeup air systems
when using ventilation systems with greater than specied CFM
of air movement. The specied CFM varies from locale to locale.
Consult your HVAC professional for specic requirements in your area.
Venting Methods
This hood is factory set for venting through the roof (vertical
discharge) or wall (horizontal discharge). A 6” (15.24 mm) round
duct system is needed for installation (not included).
NOTE: Flexible vent is not recommended. Flexible vent creates
back pressure and air turbulence that greatly reduce perfor-
mance. Vent system can terminate either through the roof or wall.
To vent through a wall, a 90° elbow is needed.
For Non-Vented (recirculating) Installations
If it is not possible to vent cooking fumes and vapors to the out-
side, the hood can be used in the non-vented (recirculating) ver-
sion, using the recirculating kit . Fumes and vapors are recycled
through the round grid. See optional accesories section.