
Installation Guide
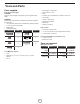


8
A
B
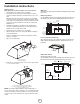
A. Mounting Screws
B. Lower security screws (Wall Installation)
5. Drive 2 pieces of the selected screws in the lower security
screws location (see the image above).
6. Connect Ductwork to hood.
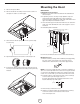
Cabinet Installation
NOTE: Your cabinet must be able to support at least
88 lb (40 kg).
7. Drive a mounting screw (from the hardware package) partway
into each center of the narrow neck of the keyhole slots
marked on the cabinet bottom or the wall’s support frame.
8. Install the 4 - 4 x 8 mm mounting screws. Leave a
1
⁄4”
(6.4 mm) gap between the wall and the back of the screw
head to slide range hood into place.
1
⁄4”
(6.4 mm)
9. Fix the wiring conduit of the hood.
10. Slide the hood back against the cabinet. Tighten the
mounting screws. Be sure the screw heads are in the narrow
neck of the keyhole slot.
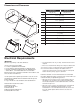
A
A. Mounting Screws
Electrical Connection
WARNING: Electrical Shock Hazard
Disconnect power before servicing.
Replace all parts and panels before operating.
Failure to do so can result in death or electrical shock.
1. Disconnect power.
2. Remove terminal box cover.
3. Remove the knockout in the terminal box cover and install
a UL listed or CSA approved
1
⁄2” strain relief.
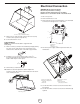
C
B
A
A. Terminal box
B. Knockout
C. Terminal box cover
4. Run home power supply cable through strain relief, into
terminal box.
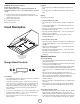
A
B
F
C
E
D
A. Home power supply cable
B. UL listed or CSA approved
strain relief
C. Black wires
D. UL listed wire connectors
E. White wires
F. Green (or bare) and
yellow-green ground wires
5. Use UL listed wire connectors and connect black wires
(C) together.
6. Use UL listed wire connectors and connect white wires (E)
together.