
Instructions / Assembly

8
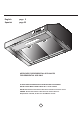
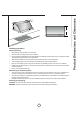
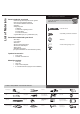
Product Dimensions and Clearances
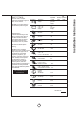
Installing preparation
Advance planning
• Determinetheexactlocationoftheventhood.
• Plantherouteforventingexhausttotheoutdoors.
• Usetheshortestandstraightestductroutepossible.Forsatisfactoryperformanceductrunshouldnotexceed
100’equivalentlengthforanyductcongurations.
•
Back to back elbows and “S“ turns give very poor delivery and are not recommended.
• A short straight length of duct at the inlet of the remote blower gives the best delivery.
• Referto“DuctFittings”charttocomputethemaximumpermissiblelengthforductrunstotheoutdoors.
• Installawallcapwithdamperorroofcapattheexterioropening.Orderthewallorroofcapandanytransition
needed in advance.
• Use 8" round metal ductwork only.
Wall framing for adequate support
• This vent hood is heavy. Adequate structure and support must be provided in all types of installations. If
mountedondrywall,thehoodmustbesecuretoverticalstudsinthewall,ortoahorizontalsupport.
• Theventhoodshouldbeonsitebeforenalframingandwallnishing.Thiswillhelptoaccuratelylocatethe
duct work and electrical service.
• Installation will be easier if the vent hood is installed before the cook-top and countertop are installed.
Removing the packaging
CAUTION:Removetthecartoncarefully.Wearglovestoprotectagainstsharpedges.
WARNING:Removetheprotectivelmcoveringtheproductbeforeputtingintooperation.
23
3
/32”
18”
30“
36“
12
1
/64”
18”