
Instructions / Assembly


lp-772 Rev. 000 Rel. 000 Date 3.17.21
14
T&P Relief Valve Maintenance Instructions:
• Annually: Certain naturally occuring mineral deposits may
adhere to the valve, blocking waterways and rendering the
valve inoperative. The T&P Relief Valve lever must be operated
to ensure the waterways are clear. If waterways are clear, hot
water will discharge from the valve. Take precautions to avoid
personal injury and property damage from contact with hot
water. Before operating lever, check to see that a discharge
line is connected to the valve, directing the ow of hot water
from the valve to a proper place of disposal.
• Replacement of the valve is required if no water ows when
the lever is operated. Turn the water heater o until the valve
is replaced.
• If water ows from the valve, drain a few gallons from the tank
to ensure the water ows freely.
• At least once every three years: To ensure that the T&P
valve has not been aected by corrosive water conditions
and that the valve and discharge line have not been altered
or tampered with illegally, relief valves should be inspected,
and replaced, if necessary, by a licensed plumbing contractor
or qualied service technician.
Failure to comply with these guidelines could result in failure
of relief valve operation, and possibly result in substantial
property damage, severe personal injury, or death.
A
A
A
A
B
C
D
E
F
G
H
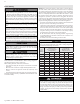
Figure 7 - Leakage Checkpoints
Leakage Checkpoints
A. *Condensation may be seen on pipes in humid weather or pipe
connections may be leaking.
B. The primary anode rod may be leaking.
C. Small amounts of water from the temperature / pressure relief
valve may be due to thermal expansion or high water pressure in
your area.
D. *The temperature / pressure relief valve may be leaking at the
tank tting.
E. The element may be leaking at the tank tting. Turn electrical
power “OFF”, remove the access panels, insulation block, and pad.
If leaking is visible around the element, follow proper draining in-
structions and remove the element. Reposition or replace gasket on
element. Place element into opening and tighten securely. Then fol-
low “Filling the Heater” instructions, this manual.
F. Water from drain valve may be due to the valve being opened
slightly.
G. *The drain valve may be leaking from the tank tting.
H. *Water in the water heater bottom or on the oor may be from
condensation, loose connections, or the temperature / pressure re-
lief valve. DO NOT replace the water heater until full inspections of
all possible water sources are determined and necessary corrective
steps have been taken.
NOTE: *To check the tting threads, insert a cotton swab between
the jacket opening and tting. If the cotton is wet, follow the drain-
ing instructions in the Maintenance section of this manual. Then re-
move the tting. Put pipe dope or Teon tape on the threads and
reinstall the tting. Then follow “Filling the Heater” instructions, this
manual.
Water drained from the water heater may be scalding hot. Take care
to avoid scalding. Wear gloves and safety glasses, and direct water to
a safe drainage location. It is recommended to turn power o to the
water heater and run water at a hot water faucet until it cools BEFORE
draining water from the heater. Failure to comply with this warning
could result in property damage, severe personal injury, or death.
The maintenance activities described below are only to be performed
by the Installer / Qualied Service Provider. These maintenance
items should be performed during recommended annual service and
any service calls.
1. Ask the owner / user if there have been any issues with the water
heater. Diagnose any heater issues and repair / replace parts as
necessary.
2. Check the water heater and related plumbing for leaks. Repair any
that are found.
3. Check the area around the water heater for ammable liquids or
combustible materials. If any are found, remove from the area.
4. Check the heating element while the heater is in operation. If the
element is hissing / singing excessively, it may need to be cleaned.
Inspect the element and clean if necessary.
5. Inspect the Temperature and Pressure (T&P) Relief Valve. See
instructions below.
6. Turn power supply o to the water heater. Open the drain valve
and drain a few gallons of water from the tank to clear any hard water
deposits. Once complete, close the drain valve and restore power to
the water heater.
Hydrogen gas can be produced in a hot water system that has not
been used for a long period of time (generally two weeks or more).
HYDROGEN GAS IS EXTREMELY FLAMMABLE! To dissipate such gas
and reduce the risk of injury, it is recommended that the kitchen
sink hot water faucet be opened for several minutes before using
any electrical water heater connected to the hot water system.
If hydrogen is present, there will be an unusual sound, such as air
escaping through the pipe as water begins to ow. Do not smoke or
use an open ame near the faucet while it is open. Failure to follow
this warning could result in property damage, severe personal injury,
or death.