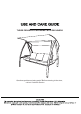
THREE PERSON FUTON SWING WITH RECLINERS Questions,problems,missing parts? Before returning to the store, call our Customer Service
WARNING:Protective eyeglasses are recommended during assembly. WARNING:Two or more people are needed to assemble the swing and to move the swing. WARNING:Use proper caution when swinging. Gentle swinging is recommended. Do not leave young children alone on the swing. WARNING:Maximum weight capacity of the swing is 600 lbs. WARNING:Assemble and place the swing at leats 6 ft. away from any obstructions,such as fences,walls,grills, tree branches,and electrical wires.
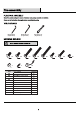
M8 Allen Wrench (#2)(Included) M6 Allen Wrench (#1)(Included) Part AA BB CC DD EE FF GG HH II JJ KK AA BB II JJ Hex Wrench X2 (#3)(Included) CC Description Bolt M8×15 Round Head Bolt M8×15 Hex Head Bolt M8×40 Bolt M8×45 Bolt M8×50 Bolt M6×15 Bolt M6×25 Locknut M6 capnut Plastic washer Plastic caps DD KK Quantity 8 8 8 2 2 8 2 10 4 8 30 EE FF GG HH
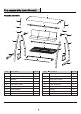
P Q A Q O R C O B B F D C I E N K D J H M L G Part Description Quantity Part Description Quantity A Top cross bar 1 J Left swing arm & armrest 1 B Joint part 2 K Right swing arm & armrest 1 C Bracket 2 L Front seat cross bar 1 D Front leg tube 2 M Rear seat cross bar 1 E Left back leg tube 1 N Seat & back frame 1 F Right back leg tube 1 O Hook 2 G Left side table 1 P Canopy 1 H Right side table 1 Q Canopy adjustment tube 2 I Rear stabil
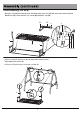
Assembly 1.Assembling the Metal Structure Insert the top cross bar (A) into the joint part (B). Insert the joint part (B) into the front leg tube (D), left back leg tube (E) and right back leg tube (F). A B B F E D D Attach the bracket (C) to the top cross bar (A) with M8x15 bolts hex head (BB) and plastic caps (KK). Attach the bracket (C) to the front leg tube (D), left back leg tube (E) and right back leg tube (F) with M8x40 bolts (CC), locknut (HH), and plastic caps (KK). .
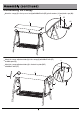
Attach the rear stabilizing bar (I) to the left back leg tube (E) and right back leg (F) with M8x15 bolts hex head (BB) and plastic caps (KK). Attach the Left side table (G) to the front leg tube (D) and left back leg tube (E) with M8x15 bolts round head (AA). Attach the right side table (H) to the front leg tube (D) and right back leg tube (F) with M8x15 bolts round head (AA). F D D H KK AA E I BB G AA BB KK 2.
3.Assembling the Seat Attach the seat and back frame (N) to the left swing arm & armrest (J) and right swing arm & armrest (K) with M8x45 bolts (DD), plastic washers (JJ), locknut (HH) and plastic caps (KK). . KK DD JJ JJ K J N JJ KK HH Set the hook (O) into the holes on the left swing arm & armrest (J) and right swing arm & armrest (K). Set the hook (O) into the holes on the top cross bar (A).
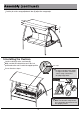
4.Assembling the canopy Attach the canopy (P) to the top cross bar (A) with M8x50 bolts (EE), plastic washers (JJ) and plastic caps (KK). JJ EE KK P A Attach the canopy adjustment tube (Q) to the canopy (P) with M6x15 bolts (FF) and M6 capnut (II). II Attach the canopy adjustment tube (Q) to the back leg tube (E&F) with M6x15 bolts (FF).
Push the pin on the canopy adjustment tube (Q) adjust the canopy angle. Q 5.Installing the Cushion Lay the cushion (R) on the seat frame (N). Make sure that the safety latches are in the lock position when the seat is used in the upright position. Secure the velcro straps. Velcro straps NOTE: Do not secure the velcro straps too tight so that the seat frame can be easily converted to the (daybed) position.
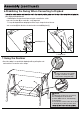
6.Stabilizing the Swing When Converting to Daybed After laying the daybed down - Stabilizing the back and seat frame using the curved hooks on the rear seat cross bar (M) on each side. - very important - To keep the daybed from swinging insert the long L-shape hook on the rear seat cross bar (M) into the holes located on the rear stabilizing bar (I). I stabilizing hook M L-shape hook 7.